
This pumpkin dump cake is the kind of dessert that shows up when you want impressive fall flavor without a lot of fuss. It’s fast to assemble, bakes in a single pan, and gives you the cozy spices and tender custardy pumpkin center everyone asks for. I reach for this recipe when I want something homey and satisfying, but I don’t have time for multiple bowls and layers.
There’s no rolling pin, no pie shell to blind-bake, and no separate streusel — everything comes together in one go. That makes it an excellent weeknight dessert or a reliable offering for potlucks and last-minute guests. It’s forgiving; the texture settles as it cools, and leftovers are downright tempting the next day.
Below you’ll find a clear ingredient list, the step-by-step method straight from the recipe source, sensible substitutions for common allergies, and practical storage and reheating tips. Read through the reasons I love this cake and the mistakes to avoid, and you’ll be set to make a consistently delicious Pumpkin Dump Cake.
Ingredient Rundown
- 2 x 15 ounce cans pumpkin puree — the base of the cake; use pumpkin puree, not pumpkin pie filling, for a true pumpkin flavor and proper texture.
- 1 (14–16 ounce) can evaporated milk — adds creaminess and helps create the custard-like interior when baked with the eggs.
- ¾ cup granulated sugar — sweetens the pumpkin mixture and balances the spices; adjust slightly if you prefer less sweet.
- 2 teaspoons ground cinnamon — primary warm spice; it gives the cake the classic pumpkin profile.
- 1 teaspoon ground ginger — brightens and complements the cinnamon without overpowering the pumpkin.
- ¼ teaspoon ground cloves — a little goes a long way; it deepens the spice notes and adds complexity.
- 4 large eggs — at room temperature; they bind the pumpkin and evaporated milk into a smooth custard while baking.
- 1 x 15-ounce box yellow cake mix — the dry layer that creates the crumbly, cakey top once buttered and baked.
- 1 cup pecans — raw and chopped; they add crunch and a toasty flavor contrast to the soft pumpkin layer.
- ¾ cup unsalted butter — melted and drizzled over the dry cake mix so it bakes into a golden, moist topping.
Step-by-Step: Pumpkin Dump Cake
- Preheat the oven to 350°F (180°C). Lightly grease a 9×13-inch baking pan and set it aside.
- In a large mixing bowl, combine 2 x 15-ounce cans pumpkin puree, 1 (14–16 ounce) can evaporated milk, ¾ cup granulated sugar, 2 teaspoons ground cinnamon, 1 teaspoon ground ginger, ¼ teaspoon ground cloves, and 4 large eggs (at room temperature). Whisk until smooth and fully combined.
- Pour the pumpkin mixture into the prepared pan and spread it into an even layer.
- Evenly sprinkle the entire 15-ounce box of yellow cake mix over the pumpkin mixture. Do not stir.
- Evenly sprinkle 1 cup chopped raw pecans over the cake mix.
- Melt ¾ cup unsalted butter (microwave or stovetop) and drizzle it slowly and evenly over the top so the dry cake mix is moistened.
- Bake in the preheated oven for 55–60 minutes, or until the top is golden and the center is mostly set (the center may be slightly jiggly but will firm as it cools).
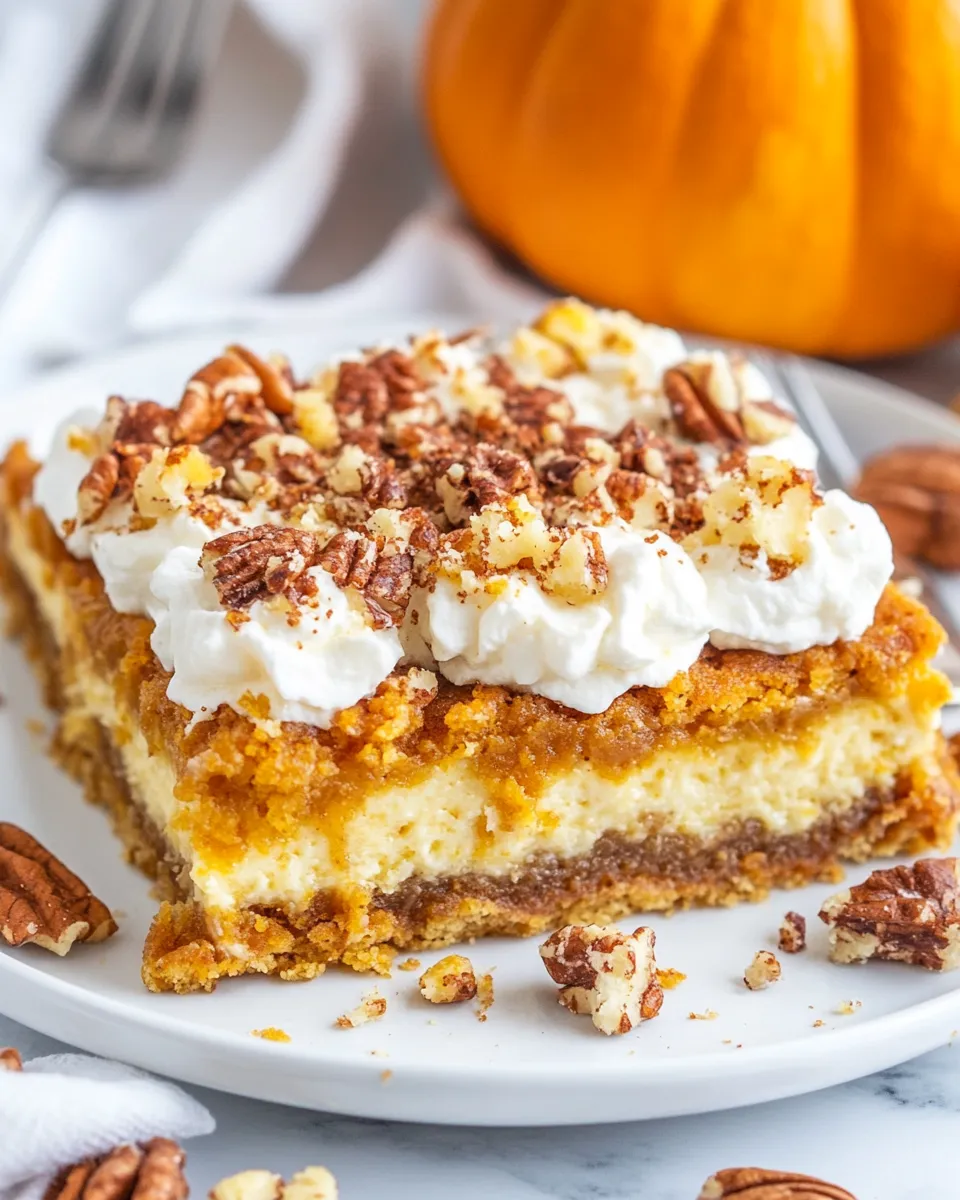
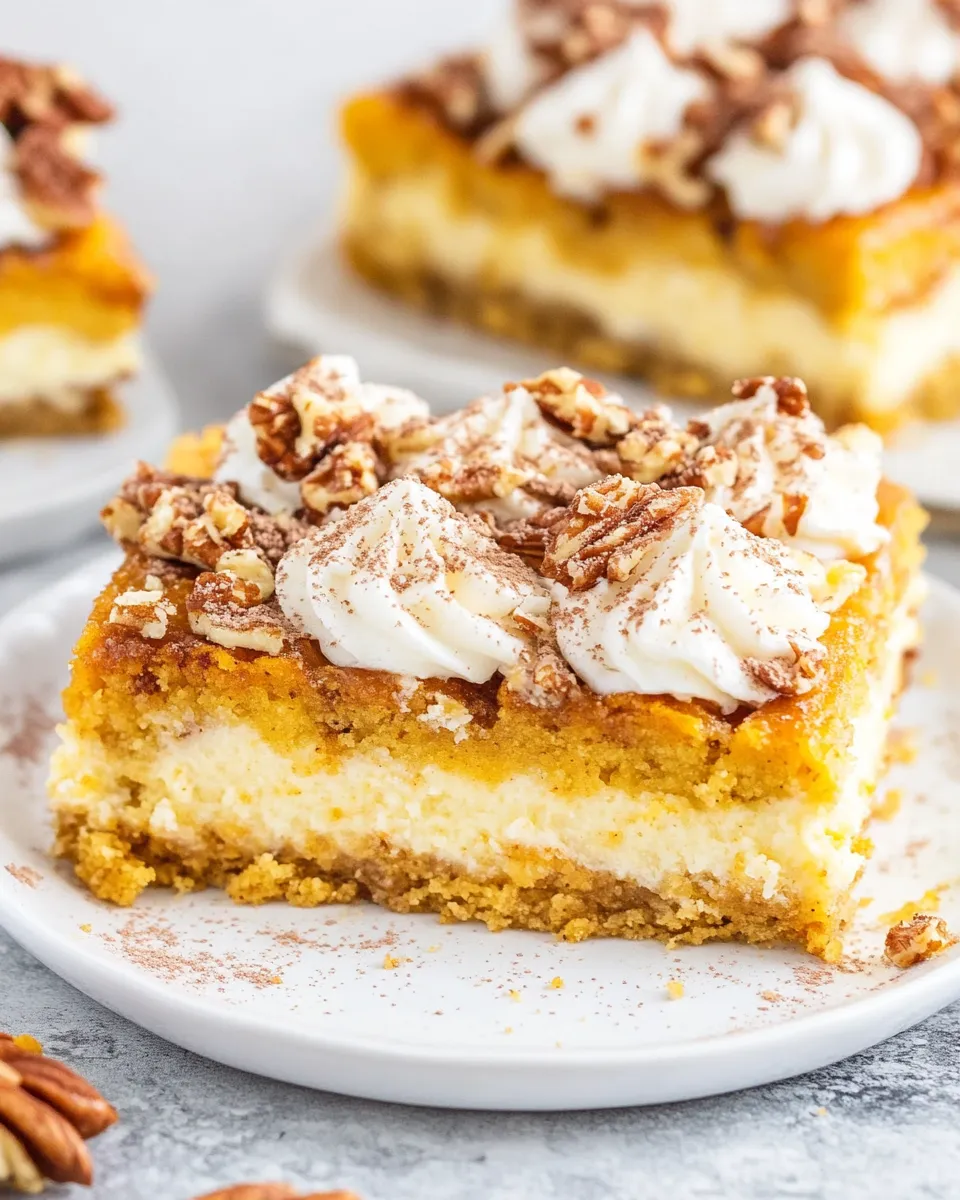
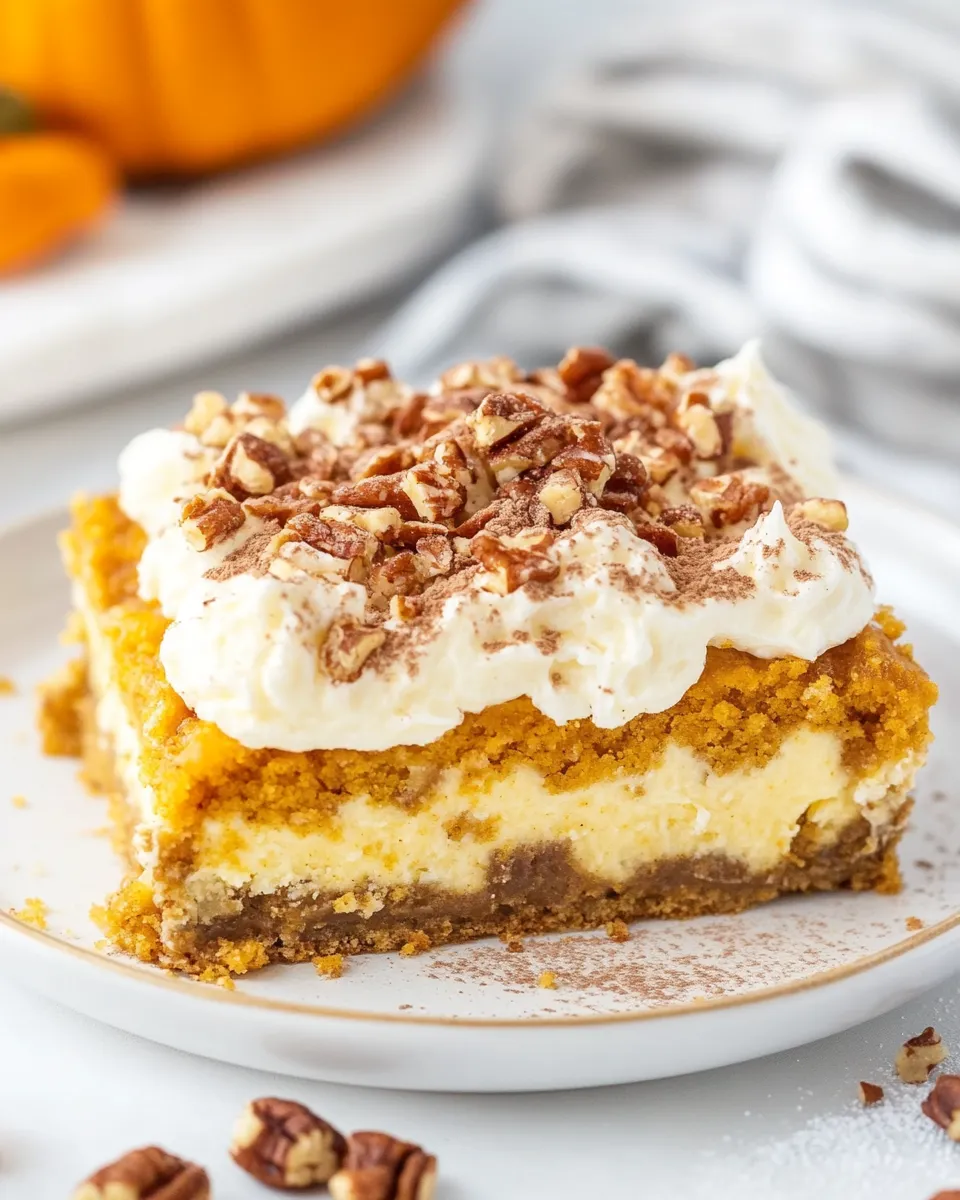
- Remove from the oven and let the cake cool in the pan for 30 minutes. Cut into squares and serve warm or at room temperature.
Reasons to Love Pumpkin Dump Cake
First, it’s quick. With a handful of pantry staples and one bowl for mixing the wet ingredients, you’ll have it in the oven within 15 minutes. The hands-on time is minimal, which makes this recipe easy to fit into busy evenings or last-minute entertaining.
Second, the texture is the star. The pumpkin layer bakes into a soft, custardy interior while the boxed cake mix and melted butter create a sweet, crumbly top that mimics a streusel without extra work. The pecans give you that necessary crunch and nutty warmth that pairs perfectly with pumpkin spices.
Third, it’s forgiving. The instructions allow for slight wobble in the center — and that’s fine. The cake firms as it cools, and you get reliably good results even if your oven runs a touch hot or cool. It’s also an economical dessert: canned pumpkin, a box mix, and a few other ingredients deliver a dessert that looks and tastes like you spent more time on it than you actually did.
Allergy-Friendly Substitutes
Here are practical swaps when you need to accommodate allergies or dietary preferences. I stick to swaps that don’t require inventing new ingredients.
- Dairy-free butter alternative — use a plant-based margarine or vegan butter measured 1:1 for the ¾ cup unsalted butter. It will change the flavor slightly but keep the topping moist and golden.
- Egg alternatives — if eggs are a concern, commercial egg replacers can sometimes work, but because eggs contribute to the custard texture, expect a difference. For best texture without eggs, a different recipe may be preferable; this dump cake relies on eggs for structure.
- Nut-free — omit the 1 cup chopped pecans to avoid nut allergies. You can replace the crunch with 1 cup of seeds (pumpkin seeds) if seeds are safe, or leave it off entirely.
- Lower-lactose option — if evaporated milk is an issue but lactose-free evaporated milk is available, use that. Alternatively, some people use canned coconut milk in a pinch, but flavor and texture will differ.
- Gluten-free — swap the yellow cake mix for a gluten-free cake mix of similar volume (15-ounce box equivalent). Results depend on the mix; check package instructions for any required binders.
Toolbox for This Recipe
Keep the gear minimal and practical. You don’t need special tools to make this work.
- 9×13-inch baking pan — a metal or glass pan both work; adjust baking time slightly if your pan is dark or light-coated.
- Large mixing bowl — for whisking the pumpkin, eggs, evaporated milk, sugar, and spices until smooth.
- Whisk or fork — a whisk speeds smoothing the mixture, but a sturdy fork will do.
- Measuring cups and spoons — for accurate amounts; especially important for the spices and sugar.
- Microwave-safe bowl or small saucepan — to melt the ¾ cup unsalted butter.
- Rubber spatula or offset spatula — helps spread the pumpkin mixture into an even layer.
Avoid These Mistakes
Here are the common missteps I see, and how to avoid them. Follow these and you’ll get the texture you want every time.
- Using pumpkin pie filling instead of pumpkin puree — pumpkin pie filling contains extra sugar and spices and will make the balance too sweet and flavored. Use pumpkin puree as called for.
- Stirring the cake mix into the pumpkin — the dry cake mix must sit on top so it bakes into a crumbly, cakey layer. Do not stir; if you mix, you’ll lose that contrast of textures.
- Pouring melted butter all at once — drizzle slowly and evenly so the dry cake mix is moistened throughout. If you dump it in one spot, parts will remain dry and won’t bake properly.
- Skipping the 30-minute resting time — the center may seem soft straight out of the oven but it firms as it cools. Cutting too soon yields messy squares.
- Overbaking until completely firm — aim for mostly set center with slight jiggle; overbaking can dry out the custard interior.
How to Make It Lighter
If you want to reduce richness or calories while keeping the spirit of the dessert, small adjustments help. Keep in mind these swaps will change texture and flavor, so accept modest differences.
- Reduce sugar slightly — the recipe uses ¾ cup granulated sugar in the pumpkin mixture. You can try reducing by 1–2 tablespoons without a dramatic flavor loss, but don’t cut too much or the pumpkin layer may taste flat.
- Use lower-fat evaporated milk — if available, a lower-fat evaporated milk will lighten the custard slightly compared with full-fat versions.
- Trim the butter for the topping — lowering the ¾ cup unsalted butter will make the topping less rich, but it also risks leaving the dry cake mix too crumbly in places. If you cut butter, shave off small amounts and expect a firmer top.
- Serve smaller portions — cutting into smaller squares is the simplest way to reduce per-serving calories while retaining the full recipe.
Insider Tips
Little habits make a big difference in a dump cake. A few things I do every time:
- Room-temperature eggs — they whisk more smoothly into the pumpkin and evaporated milk, giving a uniform custard. Pull eggs out 20–30 minutes before you start.
- Even distribution — when sprinkling the cake mix and pecans, aim for an even layer edge-to-edge. I lightly tap the pan to settle the dry mix and then check for thin or bare spots.
- Butter melting — melt the butter until fully liquid but not browned. Browned butter adds great flavor, but it can bake differently against the dry mix; if you want that nutty note, brown it intentionally and accept slightly different results.
- Test for doneness — the center will be mostly set with slight jiggle; a toothpick inserted into the center should come out with a few moist crumbs rather than wet batter.
- Let it rest — the 30-minute cooling time in the pan is important. The custard continues to set and is easier to cut into neat squares once it cools.
Storing Tips & Timelines
Storage is straightforward and this cake holds up well.
- Room temperature — you can keep the cake covered at room temperature for up to 24 hours. Use a cake dome or tightly wrap the pan with foil.
- Refrigerator — for longer storage, cover the pan and refrigerate for up to 4 days. Chill before slicing for cleaner cuts, or slice and keep squares in an airtight container layered with parchment.
- Freezing — you can freeze individual squares wrapped tightly in plastic wrap and placed in a freezer-safe bag for up to 2 months. Thaw in the refrigerator overnight and bring to room temperature or reheat gently.
- Reheating — warm single servings in the microwave for 15–25 seconds or reheat a whole pan at 325°F (160°C) until warmed through. A quick 5–7 minute reheat helps revive the topping’s texture.
Questions People Ask
Q: Can I use fresh pumpkin instead of canned pumpkin puree?
A: Fresh pumpkin can be used but it needs to be cooked, pureed, and reduced to the same consistency as canned pumpkin puree. Freshly made pumpkin puree contains more water and may alter the custard set; canned pumpkin puree is recommended for consistent results.
Q: Will different cake mix flavors work?
A: You can experiment with spice cake or butter cake mixes, but the recipe calls for a 15-ounce box of yellow cake mix specifically. Different mixes will change sweetness and flavor intensity; don’t forget to keep the size consistent.
Q: Can I make this ahead?
A: Yes. Bake as directed, cool completely, then cover and refrigerate. Reheat squares before serving if you prefer them warm. Making it the day before is a great way to save stress on the day of an event.
Q: Why is the top crumbly in places?
A: That can happen if the melted butter isn’t distributed evenly. Drizzle slowly and try to cover all areas of the dry mix. Leaving some crumbly bits is normal and still delicious.
Final Thoughts
This Pumpkin Dump Cake is one of those rare recipes that delivers cozy flavor, attractive presentation, and minimal effort. It’s dependable, flexible enough for small swaps, and forgiving of imperfect technique. Make it for a quick weeknight treat, bring it to a gathering, or prepare it as an easy Thanksgiving side dessert.
Follow the steps, avoid the common pitfalls, and you’ll have a warm, spiced dessert with a custardy center and crisp, buttery top that few will believe came from a box and a can. Enjoy it with whipped cream or a scoop of vanilla ice cream for a simple finishing touch.
Easy Pumpkin Dump Cake
Ingredients
Ingredients
- ?2 x 15 ouncecanspumpkin pureenot pumpkin pie filling
- ?14-16 ouncecanevaporated milk
- ?3/4 cupgranulated sugar
- ?2 teaspoonground cinnamon
- ?1 teaspoonground ginger
- ?1/4 teaspoonground cloves
- ?4 largeeggsat room temperature
- ?1 x 15-ounceboxyellow cake mix
- ?1 cuppecansraw and chopped
- ?3/4 cupunsalted butter
Instructions
Instructions
- Preheat the oven to 350°F (180°C). Lightly grease a 9×13-inch baking pan and set it aside.
- In a large mixing bowl, combine 2 x 15-ounce cans pumpkin puree, 1 (14–16 ounce) can evaporated milk, ¾ cup granulated sugar, 2 teaspoons ground cinnamon, 1 teaspoon ground ginger, ¼ teaspoon ground cloves, and 4 large eggs (at room temperature). Whisk until smooth and fully combined.
- Pour the pumpkin mixture into the prepared pan and spread it into an even layer.
- Evenly sprinkle the entire 15-ounce box of yellow cake mix over the pumpkin mixture. Do not stir.
- Evenly sprinkle 1 cup chopped raw pecans over the cake mix.
- Melt ¾ cup unsalted butter (microwave or stovetop) and drizzle it slowly and evenly over the top so the dry cake mix is moistened.
- Bake in the preheated oven for 55–60 minutes, or until the top is golden and the center is mostly set (the center may be slightly jiggly but will firm as it cools).
- Remove from the oven and let the cake cool in the pan for 30 minutes. Cut into squares and serve warm or at room temperature.
Equipment
- Mixing Bowl
- Whisk
- 9x13-inch pan
Notes
If the Cake is Browning Too Quickly, cover it with a piece of foil to prevent it from becoming too brown.
Storing:This pumpkin dump cake tastes best when it’s fresh. But if you have leftovers, you can store them in the fridge in an airtight container for up to 5 days. Reheat in the microwave for 15-20 seconds before serving.
Freezing:Wrap individual slices tightly with plastic wrap, and freeze it for up to 3 months. Thaw in the fridge, and reheat before serving.


