

These espresso marshmallows are my go‑to when I want something homemade that feels special but doesn’t demand a pastry degree. They have a clean coffee bite from instant espresso powder and the pillowy texture you expect from classic marshmallows. I make a batch when friends come over—coffee and marshmallows are an easy way to make an ordinary evening feel intentional.
The method leans on timing and attention: bloom the gelatin, bring the syrup to soft‑ball stage, then beat until glossy. I’ll walk you through every step I actually do in my kitchen, plus the tools I rely on, the mistakes that sneak up on bakers, and simple adjustments you can make without wrecking the texture.
If you’ve never tempered a sugar syrup or worked with gelatin before, don’t worry. These are temperamental, not impossible. Read the steps before you start, have your thermometer and mixer ready, and you’ll be rewarded with marshmallows that are tender, just slightly chewy, and alive with espresso aroma.
Ingredient List

- 2 packets unflavored gelatin — provides the structure and chew of the marshmallows; bloom it in cold liquid first.
- 1/3 cup plus 1/4 cup cold water, divided — part hydrates the espresso and gelatin, the rest dissolves the sugar for the syrup.
- 1 tablespoon instant espresso powder — the concentrated coffee flavor; dissolve in the cold water so it disperses evenly.
- 1 1/2 cups granulated sugar — the primary sweetener and body of the syrup; it must reach the soft‑ball stage for correct texture.
- 1/2 cup corn syrup — adds chew and prevents crystallization in the sugar syrup.
- pinch salt — balances sweetness and brightens the coffee notes.
- 1 teaspoon vanilla — rounds and softens the espresso’s edge; fold in at the end.
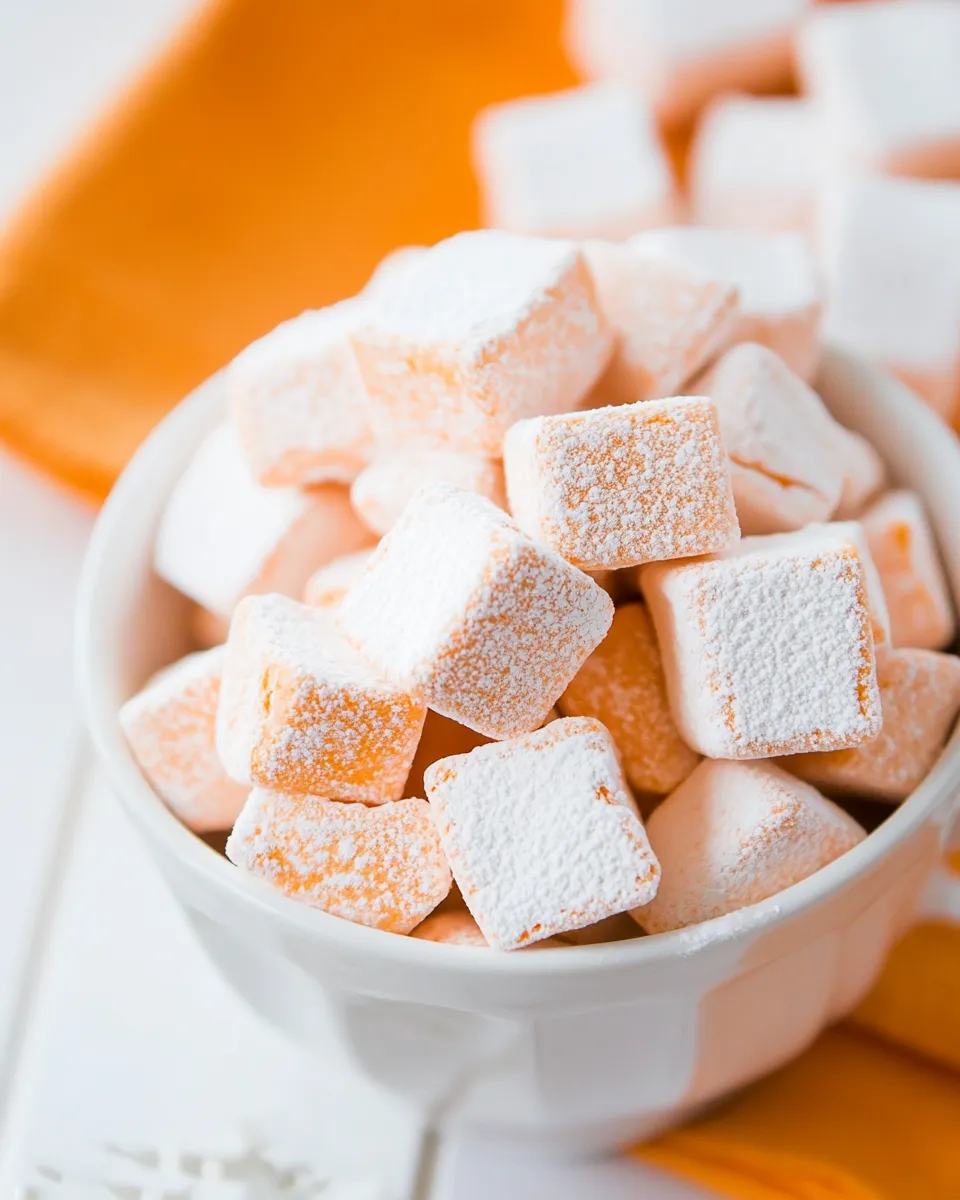
- powdered sugar, for dusting — prevents sticking; dust the pan, dust the cut marshmallows, and re‑dust between cuts.
Espresso Marshmallows Made Stepwise
- Line an 8×8 or 9×9 square baking pan with parchment paper, leaving an overhang on two opposite sides to lift the marshmallow out later. Generously dust the parchment and the interior sides/corners with powdered sugar so surfaces are coated.
- In the bowl of a stand mixer, dissolve 1 tablespoon instant espresso powder in 1/3 cup cold water. Evenly sprinkle 2 packets unflavored gelatin over the espresso water and let sit at least 5 minutes to bloom.
- In a heavy saucepan combine the remaining 1/4 cup cold water, 1 1/2 cups granulated sugar, 1/2 cup corn syrup, and a pinch of salt. Stir over medium heat just until the sugar dissolves. Attach a candy thermometer to the pan.
- Bring the mixture to a boil. Once boiling, cover the pan and let it sit covered for 2 minutes. Remove the cover and continue boiling, without stirring, until the syrup reaches 238°F (soft‑ball stage), about 7 to 8 minutes.
- Fit the mixer with the whisk attachment and set it to low. Very carefully and slowly pour the hot sugar syrup down the inside of the mixer bowl into the bloomed gelatin mixture, taking care to avoid splattering.
- Increase the mixer speed to medium‑high and beat the mixture for 12 to 15 minutes, until it becomes thick, glossy, and lukewarm to the touch.
- Add 1 teaspoon vanilla and beat on low just until incorporated (a few seconds).
- Transfer the marshmallow mixture into the prepared pan. Use a spatula dusted lightly with powdered sugar to spread it evenly (the mixture is very sticky).
- Let the marshmallow sit uncovered at room temperature for at least 3 hours, or until fully set.
- Use the parchment overhang to lift the marshmallow from the pan. Dust the top with powdered sugar, then cut into squares with a knife dusted with powdered sugar (re-dust the knife or the surface between cuts as needed).
- Dust the cut marshmallow squares liberally with powdered sugar so they do not stick together. Store in an airtight container for up to 5 days.
What You’ll Love About This Recipe
First, the flavor: the espresso powder gives a clean, true coffee note without adding liquid or bitterness when used correctly. These aren’t overly sweet in the way store marshmallows can be; the coffee tempers the sugar so they taste grown‑up and balanced.
Second, the texture: once you hit the soft‑ball stage and beat long enough, the marshmallows are pillowy with a slight chew—perfect to toast, tuck into hot chocolate, or eat by themselves. They hold their shape nicely and slice into smooth squares when you keep the knife powdered.
Finally, the satisfaction of making them. There’s a rhythm to blooming gelatin, boiling syrup, and watching the glossy mixture come together. It’s a little bit of theater with a delicious payoff.
Easy Ingredient Swaps
- Reduce or omit the espresso powder — if you want a more neutral marshmallow, skip the espresso; the texture will be the same.
- Adjust the espresso intensity — use slightly less than 1 tablespoon for a subtler coffee note or a bit more for a pronounced bite (taste preferences vary).
- Vanilla variations — you can omit the vanilla if you prefer only the coffee flavor; it is added at the end to soften the profile.
- Powdered sugar for coating — stick to powdered sugar for dusting; it prevents sticking and keeps the exterior delicate.
Recommended Tools
- Stand mixer with a whisk attachment — hands‑down the best for achieving the volume and gloss these marshmallows need.
- Candy thermometer — essential. Soft‑ball stage at 238°F is the target; guessing won’t give reliable results.
- Heavy saucepan — even heat prevents hotspots and reduces the chance of premature caramelization.
- 8×8 or 9×9 square pan — gives the right thickness for cutting into squares.
- Spatula and small offset spatula — a spatula dusted with powdered sugar keeps the sticky marshmallow manageable while spreading.
- Sharp knife — dusted with powdered sugar for clean cuts; keep a bowl of powdered sugar nearby to re‑dust between cuts.
Errors to Dodge
There are a few pitfalls that turn a fine batch into a sticky mess or dense block. Watch for these:
- Underdone syrup — stopping short of 238°F will give soft, collapsing marshmallows. Use the thermometer and be patient.
- Overheating — pushing beyond soft‑ball starts to change texture and flavor. Remove the syrup when it hits 238°F.
- Pouring too fast — when you add the hot syrup to the gelatin mix, pour slowly down the inside of the bowl to avoid splatters and to incorporate the syrup smoothly.
- Not blooming the gelatin — skip the bloom and the marshmallows won’t set properly. Give the gelatin at least 5 minutes in the espresso water.
- Rushing the beat time — the 12–15 minutes of whipping is critical. Stop early and the mixture will be runny; beat long enough and it becomes glossy and lukewarm.
- Cutting too soon — give the marshmallow the full minimum 3 hours to set so you get clean squares.
Seasonal Spins
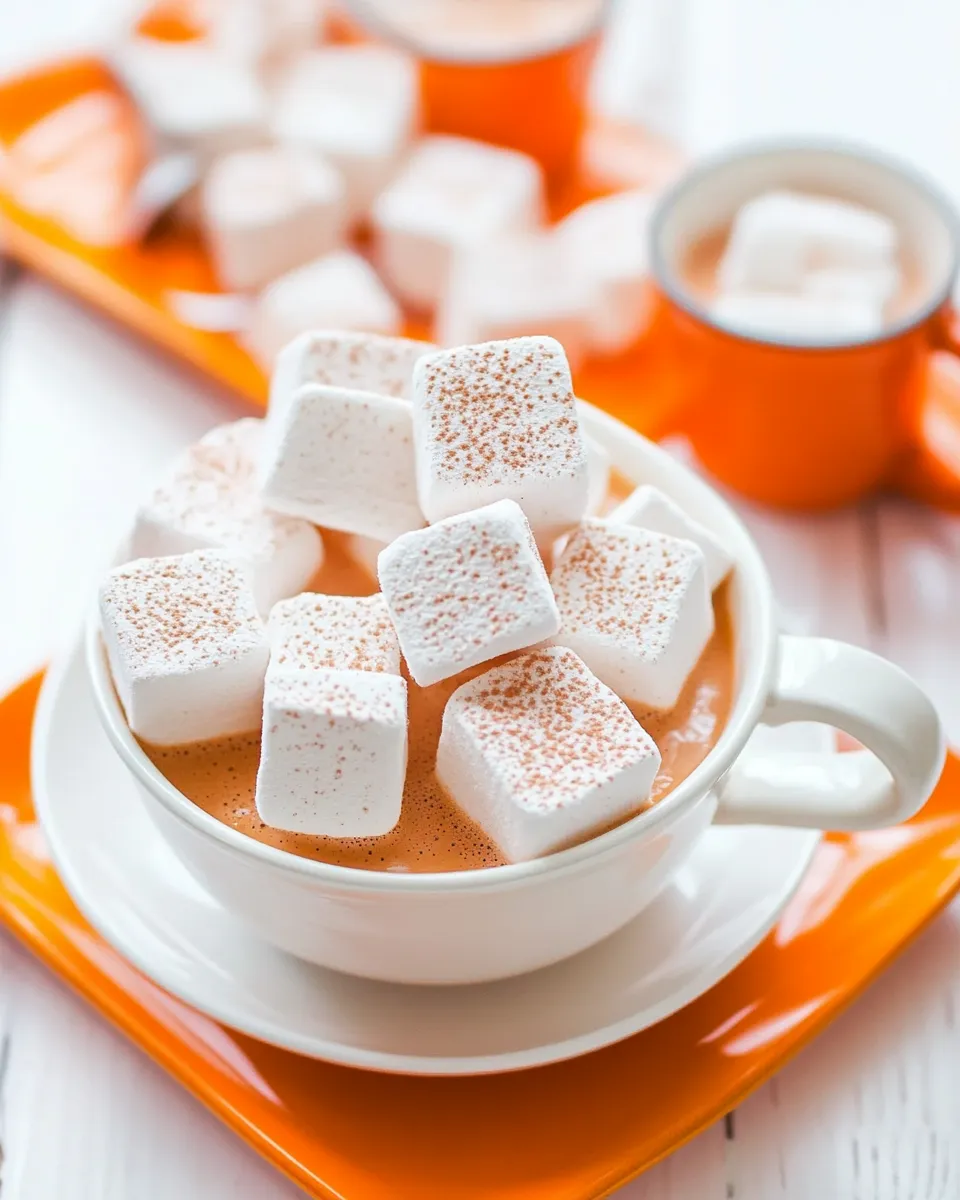
Espresso marshmallows are an excellent base for seasonal variations without changing the core method. In colder months, pair them with a rich hot chocolate; in spring, add them to coffee‑based desserts for a light contrast. You can also use them as a garnish for cocktails or coffee drinks—one marshmallow on a skewer over the top of a latte is charming and functional.
Behind-the-Scenes Notes
I make these in a small batch because texture control is easier in an 8×8 or 9×9 pan. The ratio of sugar to corn syrup and the final temperature determine chewiness; changing those proportions will change the end result. The gelatin packets I use are standard size—blooms predictably in the espresso water. When I test new variations, I keep one pan as the control to compare texture and flavor differences.
One practical note: the kitchen will get sticky. Powdered sugar dust in the air is a given; wear an apron and have damp warm towels handy for quick cleanup. The sticky film washes off easily with warm water and a little dish soap.
Store, Freeze & Reheat
Store the cut marshmallows in an airtight container for up to 5 days. Keep them in a single layer or separate layers with parchment so they don’t stick together. If humidity is high, use extra powdered sugar between layers to prevent clumping.
Freezing is possible for longer storage—freeze pieces separated on a tray, then transfer to a sealed container—but expect some slight changes in texture when thawed. Thaw at room temperature before serving; avoid microwaving, which will melt them.
Ask & Learn
Common questions
- My marshmallows are tacky and collapse—what happened? Likely the syrup didn’t reach soft‑ball stage or the mixture wasn’t beaten long enough. Confirm thermometer accuracy and extend the whipping time until the mixture is glossy and lukewarm.
- Can I flavor these differently? Yes—swap or omit the espresso and vanilla to change the profile, but add flavors sparingly and at the end so they don’t interfere with setting.
- Why dust everything with powdered sugar? Powdered sugar prevents sticking and gives the exterior a soft finish. Re‑dust the cutting knife and surface between cuts for tidy squares.
- Is the texture supposed to be chewy? A little chew is normal; these should be tender and springy rather than gummy or hard. Texture comes down to syrup temperature and whipping time.
Ready to Cook?
If you’ve read through the steps and checked your tools, pick a 2‑3 hour window for preparation and setting. Measure ingredients, bloom the gelatin, and have your thermometer and mixer ready. Work steadily, respect the temperatures and timing in the steps, and you’ll end up with espresso marshmallows that feel homemade and special. When you’re done, save a small plate of extras for guests—they’ll disappear fast.

Espresso Marshmallows
Ingredients
Ingredients
- 2 packets unflavored gelatin
- 1/3 cup plus 1/4 cup cold water divided
- 1 tablespoon instant espresso powder
- 1 1/2 cups granulated sugar
- 1/2 cup corn syrup
- pinch salt
- 1 teaspoon vanilla
- powdered sugar for dusting
Instructions
Instructions
- Line an 8×8 or 9×9 square baking pan with parchment paper, leaving an overhang on two opposite sides to lift the marshmallow out later. Generously dust the parchment and the interior sides/corners with powdered sugar so surfaces are coated.
- In the bowl of a stand mixer, dissolve 1 tablespoon instant espresso powder in 1/3 cup cold water. Evenly sprinkle 2 packets unflavored gelatin over the espresso water and let sit at least 5 minutes to bloom.
- In a heavy saucepan combine the remaining 1/4 cup cold water, 1 1/2 cups granulated sugar, 1/2 cup corn syrup, and a pinch of salt. Stir over medium heat just until the sugar dissolves. Attach a candy thermometer to the pan.
- Bring the mixture to a boil. Once boiling, cover the pan and let it sit covered for 2 minutes. Remove the cover and continue boiling, without stirring, until the syrup reaches 238°F (soft‑ball stage), about 7 to 8 minutes.
- Fit the mixer with the whisk attachment and set it to low. Very carefully and slowly pour the hot sugar syrup down the inside of the mixer bowl into the bloomed gelatin mixture, taking care to avoid splattering.
- Increase the mixer speed to medium‑high and beat the mixture for 12 to 15 minutes, until it becomes thick, glossy, and lukewarm to the touch.
- Add 1 teaspoon vanilla and beat on low just until incorporated (a few seconds).
- Transfer the marshmallow mixture into the prepared pan. Use a spatula dusted lightly with powdered sugar to spread it evenly (the mixture is very sticky).
- Let the marshmallow sit uncovered at room temperature for at least 3 hours, or until fully set.
- Use the parchment overhang to lift the marshmallow from the pan. Dust the top with powdered sugar, then cut into squares with a knife dusted with powdered sugar (re-dust the knife or the surface between cuts as needed).
- Dust the cut marshmallow squares liberally with powdered sugar so they do not stick together. Store in an airtight container for up to 5 days.
Equipment
- stand mixer with whisk attachment
- heavy saucepan
- Candy thermometer
- 8x8 or 9x9 square baking pan
- Parchment Paper
- Spatula
- Knife
Notes
Dust surfaces and tools with powdered sugar to prevent sticking when cutting and storing.


