

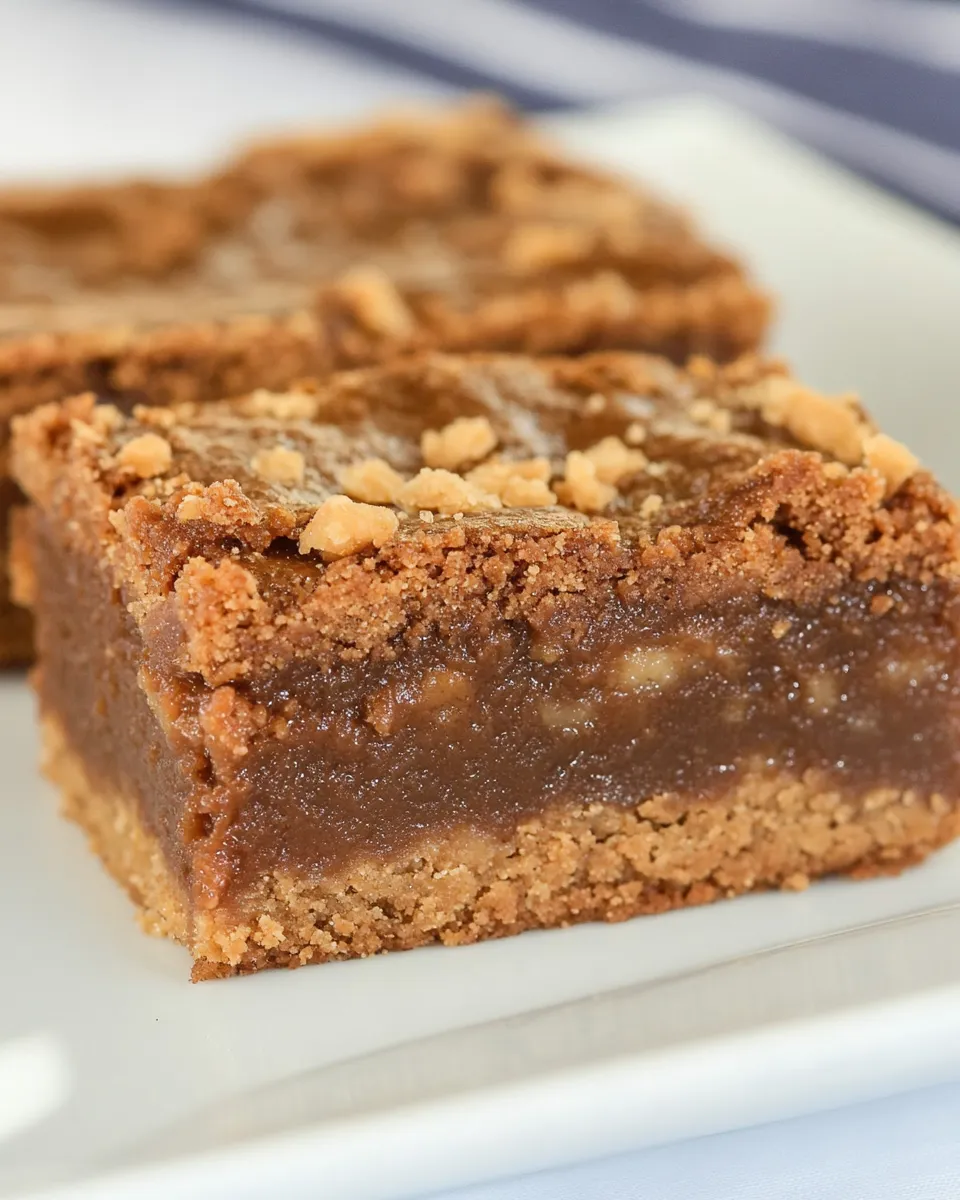
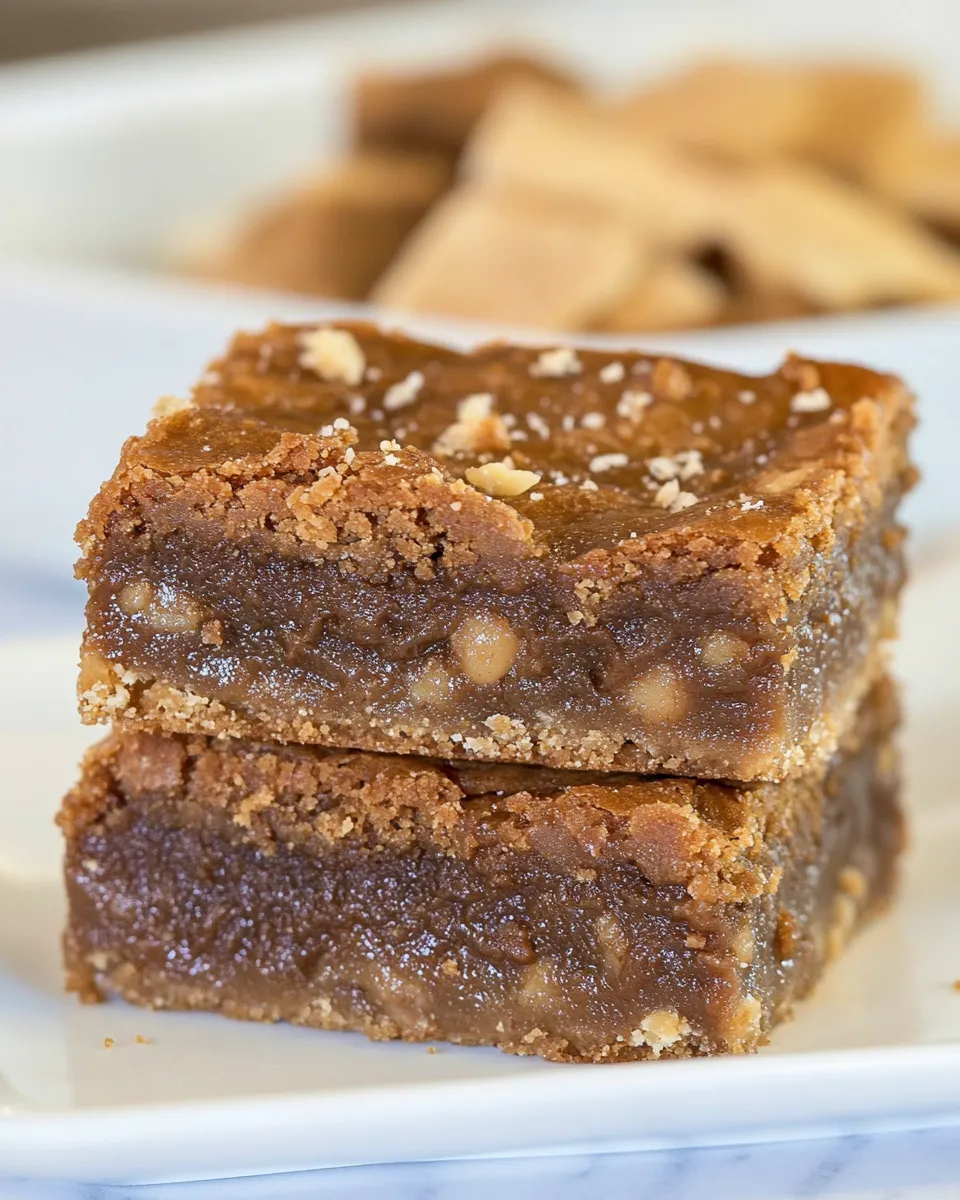
These brookies land squarely in the “comfort dessert that feels fancy” category. They’re rich, dense, and impossibly easy: a peanut butter cookie base topped with a fudgy, condensed-milk chocolate layer. No flour, no fuss — just pantry-friendly ingredients and reliable results.
I test this version when I need something quick for a bake sale or a weeknight dessert that still makes people pause. The texture is chewy rather than cakey, and the contrast between the salty peanut butter bottom and the sweet chocolate top is what keeps me making them again and again.
Read straight through the method once, then follow the short, step-by-step instructions. I also included troubleshooting notes, swaps, and storage tips so you can get it right the first time.
Ingredient Checklist
Ingredients
- 1 cup peanut butter — chunky or creamy but not natural; provides the fat and structure for the base.
- 1 cup granulated sugar — sweetens and helps the peanut layer set with a slight chew.
- 2 large eggs — divided; one egg goes in the peanut layer and one in the chocolate layer for lift and binding.
- 2 ounces baking chocolate — semi-sweet; melts into the condensed milk for a fudgy top.
- 1 can 14 ounces sweetened condensed milk — sweet, dense base for the chocolate layer; creates that glossy, fudgy texture.
- 1 teaspoon vanilla — brightens and balances the chocolate-sweetened condensed milk mix.
- 1/2 cup chopped peanuts — optional; adds crunch and a nut-forward finish when sprinkled on top.
Method: Flourless Peanut Butter Brookies
- Preheat oven to 350°F (175°C). Line a 9×9″ pan with foil (leave an overhang for lifting) and spray the foil with nonstick cooking spray.
- In a large bowl, stir together 1 cup peanut butter (chunky or creamy, not natural), 1 cup granulated sugar, and 1 large egg until a thick dough forms. If the mixture is sticky, lightly spray your hands with nonstick cooking spray and use them to press the dough evenly into the bottom of the prepared pan.
- Bake the peanut butter layer for 12 minutes. Remove from oven but leave the oven on.
- While the peanut butter layer bakes, melt 2 ounces semi-sweet baking chocolate in a microwave-safe bowl. Heat in 30-second increments, stirring between each, until the chocolate is melted and smooth. Let the melted chocolate cool for 3–5 minutes (cool to warm, not hot) so it won’t cook the egg in the next step.
- Stir the cooled melted chocolate together with the entire 14-ounce can of sweetened condensed milk, 1 teaspoon vanilla, and the remaining 1 large egg until fully combined and smooth.
- Pour the chocolate mixture evenly over the baked peanut butter layer. If using, sprinkle 1/2 cup chopped peanuts evenly over the top.
- Return the pan to the oven and bake an additional 20–25 minutes, or until a toothpick inserted near the center comes out with just a few moist crumbs.
- Remove from oven and cool completely in the pan on a wire rack. When cool, use the foil overhang to lift the bars from the pan and slice into squares.
- Store the brookies in an airtight container for up to 3 days or freeze for up to one month.
Why You’ll Keep Making It
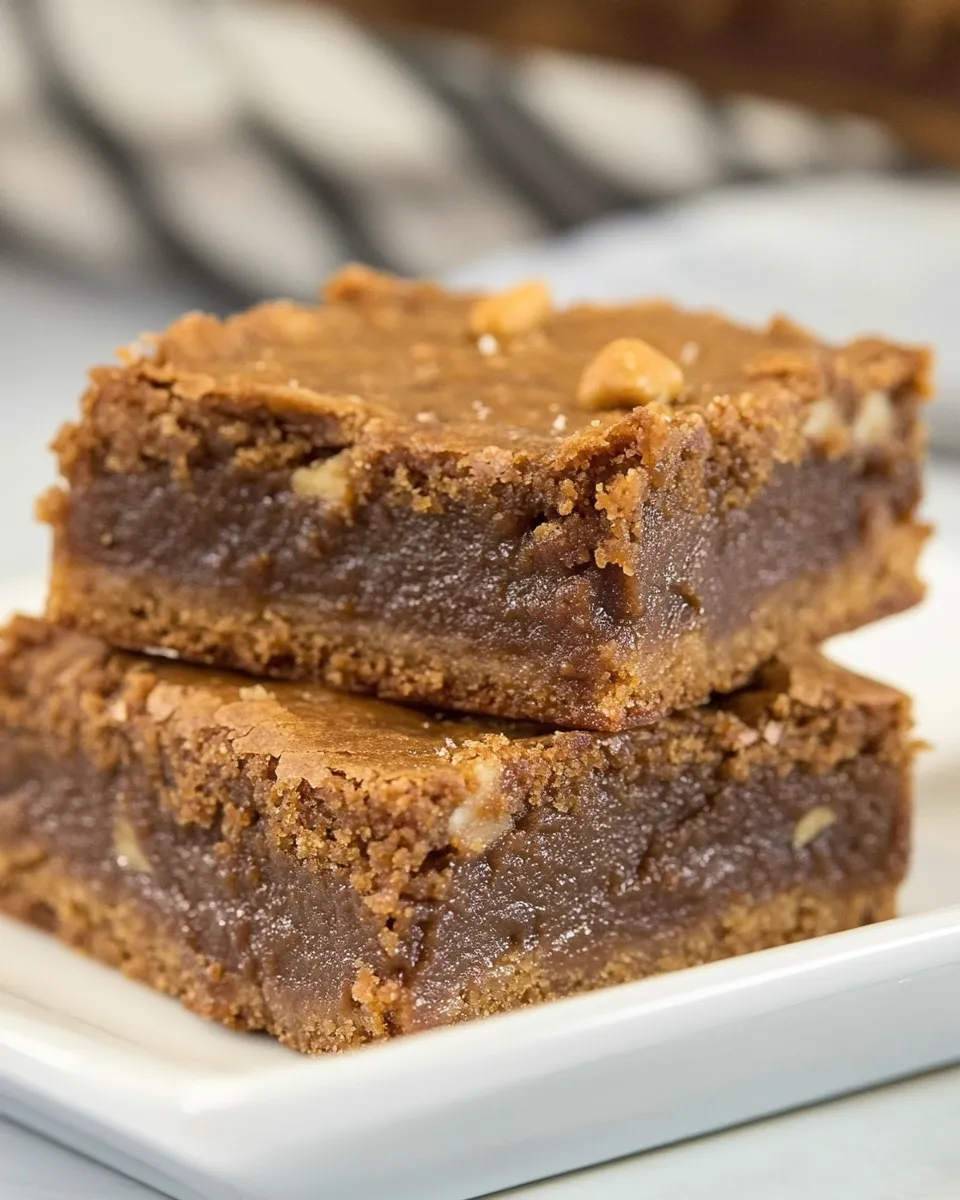
This recipe works because it’s simple and failsafe. The peanut butter layer needs only three ingredients and sets up without flour, so you get intense peanut flavor without extra steps. The condensed milk + melted chocolate creates a glossy, fudgy top that fools anyone into thinking you spent far more time on it than you did.
It’s versatile. Make it for a crowd, cut it into small squares for a party, or keep a tray in the freezer for unexpected cravings. People will ask for the recipe — and it’s short enough that you’ll actually share it.
Budget & Availability Swaps
- Semi-sweet chocolate — if you’re short, substitute with a similar baking chocolate you prefer; adjust for sweetness by tasting the melted mix before adding the egg (don’t overheat the chocolate).
- Peanut butter — use creamy or chunky based on preference. The recipe calls for commercial (not natural) peanut butter because of the texture and oil stability; natural will work but may yield a slightly different oil separation.
- Chopped peanuts — optional. If unavailable, skip them; the brookies are still satisfying without the extra crunch.
Must-Have Equipment
- 9×9″ baking pan — the size controls bake time; don’t sub dramatically smaller without adjusting time.
- Foil and nonstick spray — foil overhang makes cooling and slicing clean and easy.
- Microwave-safe bowl or double boiler — for melting the chocolate gently.
- Wire rack — cool completely in the pan on a rack to avoid condensation and soggy edges.
- Toothpick — for checking doneness of the chocolate layer.
Slip-Ups to Skip
- Skipping the overhang foil — you’ll regret trying to fish warm bars out of a pan. The foil makes removal clean.
- Pouring hot chocolate over the egg — let melted chocolate cool 3–5 minutes; adding it while hot can scramble the egg in the chocolate mixture.
- Underbaking the chocolate layer — pull it too early and it won’t set; use the toothpick test and look for a few moist crumbs, not a wet batter.
- Using natural peanut butter without adjustments — natural brands separate oil; stir thoroughly and expect a slightly greasier texture unless you chill before pressing into the pan.
Fit It to Your Goals
Want a crowd-pleaser for a potluck? Cut into small bite-sized squares and sprinkle a pinch of flaky sea salt on top for contrast. Need a travel-friendly treat? Pack in a single layer in an airtight container and separate layers with parchment.
Looking to reduce sugar a bit? This recipe is built around sweetness from both granulated sugar and sweetened condensed milk; swapping either will change texture. Instead, control portion size and serve smaller squares — you keep the texture intact and still satisfy the sweet tooth.
What Could Go Wrong
Here are common problems and quick fixes.
- Sticky, unformed peanut layer — if your peanut butter is very runny, chill the mixture for 10 minutes to firm it before pressing into the pan.
- Chocolate layer separates or looks grainy — overheating the chocolate can cause it to seize. Melt in short bursts and stir. Let it cool slightly before combining with the egg and condensed milk.
- Centers remain overly gooey after baking — bake until a toothpick near center shows only a few moist crumbs. If uncertain, add 3–5 minutes and check again; ovens vary.
- Edges overbake while center is raw — this usually means your pan is too small; use the recommended 9×9″ pan for even cooking.
Make Ahead Like a Pro
These bars hold well and are forgiving when made ahead. Cool completely, then either store or freeze depending on timeline.
Storage & Freezing
- Short term — store in an airtight container at room temperature for up to 3 days.
- Freezing — wrap individual squares in plastic or parchment and place in a freezer-safe container for up to one month. Thaw at room temperature for 30–60 minutes or in the refrigerator overnight.
For best texture after freezing, let the brookies come to room temperature before serving so the chocolate layer regains its fudgy mouthfeel.
Reader Questions
Q: Can I use natural peanut butter?
A: You can, but expect a slightly different texture because natural PB separates and has a looser consistency. Stir well and consider chilling before pressing the dough into the pan.
Q: Can I make these in a larger pan?
A: Yes, but decrease the thickness by moving to a larger pan and watch the bake times closely. A thinner layer will bake faster; start checking 5–7 minutes earlier for the peanut layer and 5–8 minutes earlier for the chocolate layer.
Q: Can I substitute evaporated milk for sweetened condensed milk?
A: No. Sweetened condensed milk is sweet and thick — evaporated milk is not a direct swap. Using evaporated milk will change texture and sweetness drastically.
Q: My top cracked. Is it ruined?
A: Not at all. Cracking is cosmetic and often happens with dense, fudgy layers. The flavor is unaffected.
That’s a Wrap
Flourless Peanut Butter Brookies are proof that excellent desserts don’t need long ingredient lists or fancy techniques. If you follow the steps — especially cooling the melted chocolate and testing the center — you’ll end up with reliably tasty bars every time.
Make them once and you’ll keep the recipe where you can grab it fast. They travel well, freeze well, and vanish fast. Now preheat the oven and get baking.
Flourless Peanut Butter Brookies
Ingredients
Ingredients
- 1 cuppeanut butterchunky or creamy but not natural
- 1 cupgranulated sugar
- 2 large eggsdivided
- 2 ouncesbaking chocolatesemi-sweet
- 1 can14 ounces sweetened condensed milk
- 1 teaspoonvanilla
- 1/2 cupchopped peanutsoptional
Instructions
Instructions
- Preheat oven to 350°F (175°C). Line a 9x9" pan with foil (leave an overhang for lifting) and spray the foil with nonstick cooking spray.
- In a large bowl, stir together 1 cup peanut butter (chunky or creamy, not natural), 1 cup granulated sugar, and 1 large egg until a thick dough forms. If the mixture is sticky, lightly spray your hands with nonstick cooking spray and use them to press the dough evenly into the bottom of the prepared pan.
- Bake the peanut butter layer for 12 minutes. Remove from oven but leave the oven on.
- While the peanut butter layer bakes, melt 2 ounces semi-sweet baking chocolate in a microwave-safe bowl. Heat in 30-second increments, stirring between each, until the chocolate is melted and smooth. Let the melted chocolate cool for 3–5 minutes (cool to warm, not hot) so it won’t cook the egg in the next step.
- Stir the cooled melted chocolate together with the entire 14-ounce can of sweetened condensed milk, 1 teaspoon vanilla, and the remaining 1 large egg until fully combined and smooth.
- Pour the chocolate mixture evenly over the baked peanut butter layer. If using, sprinkle 1/2 cup chopped peanuts evenly over the top.
- Return the pan to the oven and bake an additional 20–25 minutes, or until a toothpick inserted near the center comes out with just a few moist crumbs.
- Remove from oven and cool completely in the pan on a wire rack. When cool, use the foil overhang to lift the bars from the pan and slice into squares.
- Store the brookies in an airtight container for up to 3 days or freeze for up to one month.
Equipment
- 9x9-inch pan
- Foil
- Nonstick Cooking Spray
- Large Bowl
- Microwave-safe Bowl
- Wire Rack


