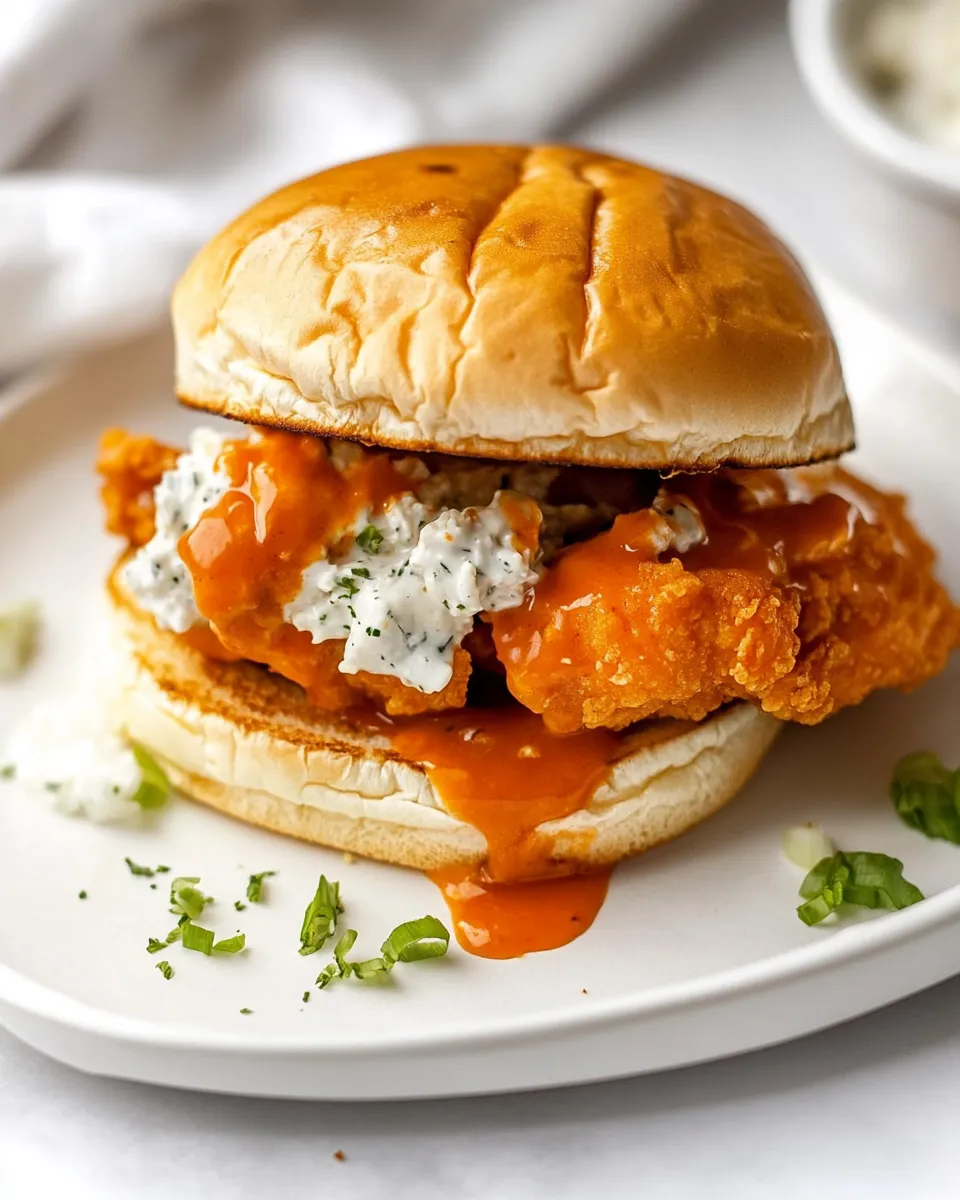
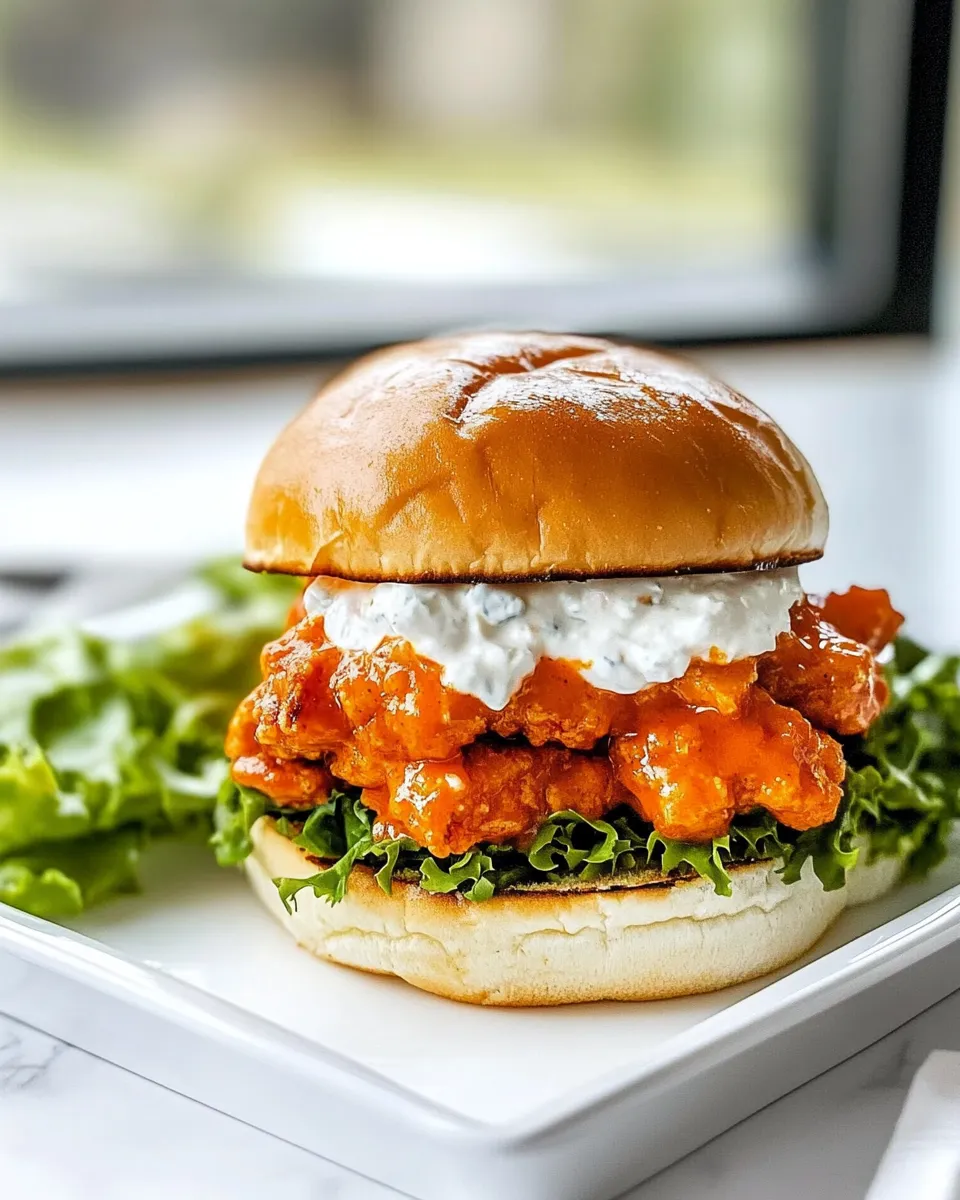
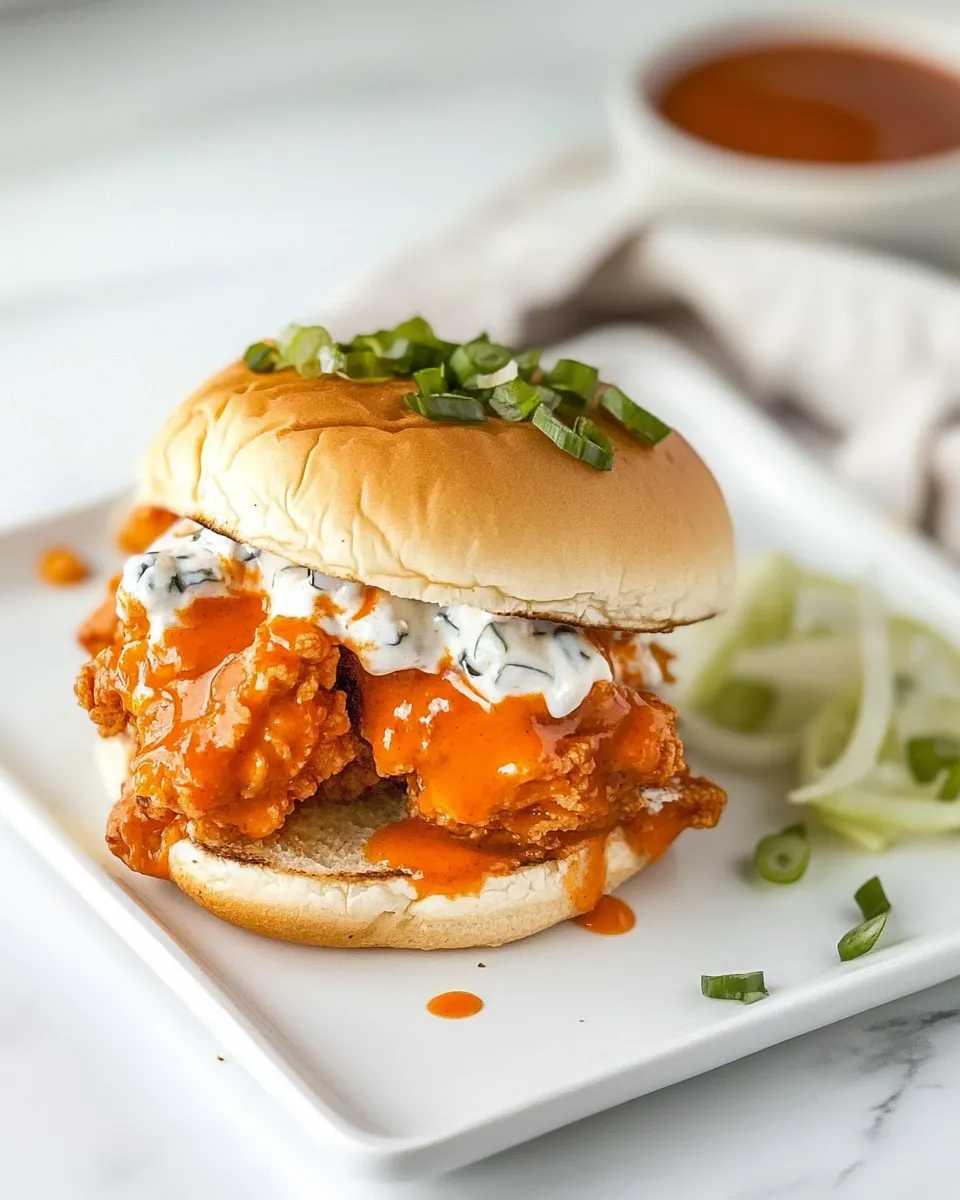
I test a lot of sandwiches for the blog, and this Fried Buffalo Chicken Sandwich is one I come back to when I want something loud, crisp, and reliably satisfying. It hits the right notes: tang from the buttermilk and hot sauce in the brine, a sturdy, crunchy coating, and the bright, vinegary finish from Buffalo sauce. The texture contrast between the fried chicken and crisp lettuce is exactly what a sandwich like this needs.
You’ll find the method straightforward: brine, flour, rest, double-dredge, fry, toss in sauce, and assemble. There are a few technical checkpoints — oil temperature, resting time for the coating, and internal doneness — that make the difference between a greasy dud and the sandwich you want to post a photo of.
Below is a compact, practical guide with the exact ingredient list and step-by-step instructions I use in the kitchen. Follow the order, keep an eye on temps, and you’ll have four excellent sandwiches ready to eat in about an hour of active time (plus marinating time if you choose to do it longer).
Gather These Ingredients
- 2 boneless, skinless chicken breasts — halved crosswise to make four cutlets; pound to 1/2-inch for even cooking.
- 1 cup buttermilk — acidic base for the marinade that tenderizes and helps the coating adhere.
- 1 teaspoon hot sauce — in the marinade for a touch of heat; you can use the same brand as your Buffalo sauce or a lighter version.
- 2½ teaspoons kosher salt (divided) — split between marinade and flour mix to season both inside and out.
- 1½ teaspoons ground black pepper (divided) — provides background heat; half goes in the brine, half in the flour.
- 1¼ cups all-purpose flour — the main dry coating base; press onto the chicken so it sticks well.
- 2 teaspoons cornstarch — adds extra crunch to the coating when fried.
- 1 teaspoon ground paprika — for color and mild smoky flavor.
- 1 teaspoon onion powder — brings savory depth to the flour blend.
- ½ teaspoon garlic powder — for subtle garlic flavor without fresh garlic burning in the oil.
- 1 cup Buffalo hot sauce — the coating sauce; toss the fried chicken here for classic Buffalo flavor.
- Cooking oil (for frying) — enough to reach about 1 inch deep in your pan; use a neutral oil with a high smoke point.
- 4 hamburger buns (toasted) — sturdy buns stand up to the saucy chicken and add texture when toasted.
- Sliced tomato — adds freshness and acidity on the sandwich.
- Leaf lettuce — for crunch and a cool layer between hot chicken and bun.
- Ranch or blue cheese dressing — optional but recommended for creaminess and to tame the heat.
Step-by-Step: Fried Buffalo Chicken Sandwich
- Slice each chicken breast in half crosswise to make 4 pieces. Place each piece between two sheets of plastic wrap and gently pound with a meat mallet or rolling pin until about 1/2-inch thick.
- Put the pounded chicken pieces into a large zip-top bag. Add 1 cup buttermilk, 1 teaspoon hot sauce, 1/2 teaspoon kosher salt, and 1/2 teaspoon ground black pepper. Seal the bag, massage to coat the chicken, and refrigerate to marinate for 2 to 24 hours.
- When ready to cook, line a baking sheet with parchment paper and set aside. Pour 1 cup Buffalo hot sauce into a second shallow bowl and set aside.
- In a large shallow bowl, combine 1 1/4 cups all-purpose flour, 2 teaspoons cornstarch, 1 teaspoon ground paprika, 1 teaspoon onion powder, 1/2 teaspoon garlic powder, the remaining 2 teaspoons kosher salt, and the remaining 1 teaspoon ground black pepper. Whisk to blend.
- Remove the chicken from the refrigerator. Pour the contents of the bag into a colander set over the sink to drain off excess buttermilk.
- One at a time, dredge each piece of chicken in the flour mixture, pressing the flour onto the surface so it adheres. Transfer the floured pieces to the prepared baking sheet in a single layer. Let the coated chicken rest 20–30 minutes at room temperature to help the coating set.
- While the chicken rests, pour enough cooking oil into a heavy skillet or Dutch oven to reach about 1 inch deep. Heat the oil over medium-high heat until it reaches 350°F on a candy/frying thermometer.
- After the resting period, dredge each piece of chicken through the flour mixture a second time, shaking off any excess. Work in batches so you do not crowd the pan.
- Fry the chicken pieces in the hot oil, 2–4 minutes per side, until golden brown and an instant-read thermometer inserted into the thickest part reads 165°F. Adjust heat as needed to maintain 350°F. Transfer cooked chicken to a cooling rack set over paper towels to drain.
- Place the fried chicken in the bowl with 1 cup Buffalo hot sauce and toss until each piece is evenly coated.
- Toast the 4 hamburger buns. Assemble sandwiches by placing a Buffalo-coated chicken piece on each bun and topping with leaf lettuce, sliced tomato, and ranch or blue cheese dressing as desired.
- Serve immediately.
Why This Recipe Works
The marinate: buttermilk and a touch of hot sauce tenderize and season the chicken from the inside out. That acidity softens muscle fibers so the meat stays juicy even after high-heat frying.
The double-dredge and resting stage set up a resilient crust. Pressing the flour onto wet chicken, letting it rest, then re-dredging gives you that clingy, crunchy coating that doesn’t fall off when you toss the pieces in sauce.
Cornstarch in the flour blend reduces gluten formation and helps the crust blister and crisp in hot oil. The seasoning mix — paprika, onion and garlic powders — gives a quick savory backbone that plays well with the Buffalo sauce.
Tossing the hot, drained chicken in Buffalo sauce after frying ensures each bite is saucy without making the crust soggy, because the surface has already sealed during frying.
Ingredient Swaps & Substitutions
- Chicken breasts — boneless thighs work if you prefer slightly fattier, more forgiving meat; adjust frying time if pieces are thicker.
- Buttermilk — if you don’t have buttermilk, mix 1 cup milk with 1 tablespoon lemon juice or vinegar and let sit 5 minutes to approximate it.
- All-purpose flour — for a lighter crust, replace up to half with self-rising flour, but omit additional salt as needed; for gluten-free, use a 1:1 gluten-free flour blend plus 2 teaspoons xanthan gum if the blend lacks it.
- Breadings and cornstarch — rice flour can be swapped for part of the flour for extra crispness, or use potato starch instead of cornstarch for a slightly different texture.
- Buffalo hot sauce — use your favorite brand; if you want less heat, mix the Buffalo sauce with a tablespoon of melted butter or a little honey to soften the punch.
- Ranch vs blue cheese — choose blue cheese for classic pairing or ranch if you prefer creaminess that’s less pungent.
Tools of the Trade

- Heavy skillet or Dutch oven — holds heat well and gives stable frying temperature.
- Candy/frying thermometer — indispensable for maintaining 350°F; visual cues alone aren’t precise enough.
- Instant-read thermometer — use to confirm internal doneness: 165°F in the thickest part.
- Zip-top bag — for marinating without extra dishes and easy cleanup.
- Colander and cooling rack — draining the buttermilk and letting the fried pieces rest on a rack keeps the crust crisp.
- Baking sheet and parchment — the resting stage needs a flat, nonstick surface so the crust can set.
Frequent Missteps to Avoid
- Skipping the resting step — not letting the flour-coated chicken rest leads to a coating that falls off in the oil.
- Overcrowding the pan — crowding drops oil temp and yields greasy chicken; fry in batches instead.
- Not monitoring oil temp — too hot burns the crust before the center cooks; too cool absorbs oil and becomes heavy. Aim for 350°F.
- Skipping the double-dredge — single coat will be less resilient when you toss the pieces in sauce.
- Tossing chicken straight from the oil into sauce without draining — drain on a rack briefly to remove excess oil and keep the sauce from thinning the crust.
Tailor It to Your Diet
Gluten-free: swap the all-purpose flour and cornstarch for a certified gluten-free flour mix and use potato starch or rice flour for extra crispness. Make sure your Buffalo sauce is gluten-free.
Lower fat: shallow pan-fry or use an air fryer, but expect a slightly different crust texture; brush with a little oil if air frying to encourage browning. Use lean cuts and blot excess oil before saucing.
Dairy-free: use a plant-based buttermilk substitute (unsweetened soy or oat milk mixed with vinegar) and select a dairy-free dressing instead of ranch or blue cheese for serving.
Behind-the-Scenes Notes
I learned the value of the 20–30 minute rest after trying to rush the process. Give the first coating time to form a tacky surface; that tackiness is what makes the second dredge stick and survive the toss in Buffalo sauce.
Temperature control is where most home cooks lose the crisp texture. A small electric burner creates steadier heat if your stove is temperamental. If your oil is dropping below 350°F between batches, turn the heat up briefly between additions and allow it to come back down to 350°F before adding more chicken.
If you plan to feed a crowd, set up an assembly line: keep fried chicken on a warm rack in a single layer, toss each piece in sauce just before plating to avoid syrupy buildup.
Keep It Fresh: Storage Guide
- Short term — refrigerated leftovers (chicken only, not in a sandwich) last 3–4 days in an airtight container. Reheat in a 375°F oven on a wire rack to restore crispness.
- Freezing — cooked, sauced chicken will lose some texture when frozen. For best results, freeze unsauced fried chicken pieces wrapped tightly for up to 2 months; reheat from frozen in a 400°F oven until heated through, then toss in warmed Buffalo sauce.
- Sandwiches — assemble just before serving. Leftover assembled sandwiches become soggy quickly because of the sauce and fresh produce.
Fried Buffalo Chicken Sandwich FAQs
- Can I use chicken thighs instead of breasts? — Yes. Boneless thighs are juicier and more forgiving; slice or pound to even thickness before proceeding with the recipe to ensure even cooking.
- How do I know when the oil is ready? — Use a candy/frying thermometer and bring oil to 350°F. If you don’t have a thermometer, drop a small pinch of flour into the oil — it should sizzle steadily and brown in about 30 seconds.
- What if my crust softens after tossing in sauce? — Drain well on a rack first, toss quickly, and serve immediately. If you need to hold the chicken, keep it un-sauced and toss just before assembly.
- Can I make this ahead? — You can brine the chicken up to 24 hours ahead. Frying and saucing are best done right before serving, but you can fry ahead and re-crisp in the oven before tossing in sauce.
- How spicy will this be? — The heat depends on your Buffalo sauce. If you want milder sandwiches, mix the Buffalo sauce with a tablespoon of butter or a touch of honey.
Save & Share
If this Fried Buffalo Chicken Sandwich becomes a weekend staple at your house, save this page or pin the recipe for quick reference. Take notes on tweaks you make — a different hot sauce, a swap of spices, or an alternate bun — so you can repeat your favorite version every time. Share with friends: these sandwiches are best eaten together, messy fingers and all.

Fried Buffalo Chicken Sandwich
Ingredients
Ingredients
- 2 boneless skinless chicken breasts
- 1 cupbuttermilk *
- 1 teaspoonhot sauce
- 2 1/2 teaspoonskosher salt divided
- 1 1/2 teaspoonsground black pepper divided
- 1 1/4 cupsall-purpose flour
- 2 teaspoonscornstarch
- 1 teaspoonground paprika
- 1 teaspoononion powder
- 1/2 teaspoongarlic powder
- 1 cupBuffalo hot sauce
- cooking oil for frying
- 4 hamburger buns toasted
- sliced tomato
- leaf lettuce
- ranch or blue cheese dressing
Instructions
Instructions
- Slice each chicken breast in half crosswise to make 4 pieces. Place each piece between two sheets of plastic wrap and gently pound with a meat mallet or rolling pin until about 1/2-inch thick.
- Put the pounded chicken pieces into a large zip-top bag. Add 1 cup buttermilk, 1 teaspoon hot sauce, 1/2 teaspoon kosher salt, and 1/2 teaspoon ground black pepper. Seal the bag, massage to coat the chicken, and refrigerate to marinate for 2 to 24 hours.
- When ready to cook, line a baking sheet with parchment paper and set aside. Pour 1 cup Buffalo hot sauce into a second shallow bowl and set aside.
- In a large shallow bowl, combine 1 1/4 cups all-purpose flour, 2 teaspoons cornstarch, 1 teaspoon ground paprika, 1 teaspoon onion powder, 1/2 teaspoon garlic powder, the remaining 2 teaspoons kosher salt, and the remaining 1 teaspoon ground black pepper. Whisk to blend.
- Remove the chicken from the refrigerator. Pour the contents of the bag into a colander set over the sink to drain off excess buttermilk.
- One at a time, dredge each piece of chicken in the flour mixture, pressing the flour onto the surface so it adheres. Transfer the floured pieces to the prepared baking sheet in a single layer. Let the coated chicken rest 20–30 minutes at room temperature to help the coating set.
- While the chicken rests, pour enough cooking oil into a heavy skillet or Dutch oven to reach about 1 inch deep. Heat the oil over medium-high heat until it reaches 350°F on a candy/frying thermometer.
- After the resting period, dredge each piece of chicken through the flour mixture a second time, shaking off any excess. Work in batches so you do not crowd the pan.
- Fry the chicken pieces in the hot oil, 2–4 minutes per side, until golden brown and an instant-read thermometer inserted into the thickest part reads 165°F. Adjust heat as needed to maintain 350°F. Transfer cooked chicken to a cooling rack set over paper towels to drain.
- Place the fried chicken in the bowl with 1 cup Buffalo hot sauce and toss until each piece is evenly coated.
- Toast the 4 hamburger buns. Assemble sandwiches by placing a Buffalo-coated chicken piece on each bun and topping with leaf lettuce, sliced tomato, and ranch or blue cheese dressing as desired.
- Serve immediately.
Equipment
- Dutch Oven(Optional)
- Instant-read thermometer
Notes
Nutritional information does not include optional toppings.