There’s a particular kind of joy that comes from a dessert that surprises you: cold, creamy ice cream wrapped in a warm, crunchy shell. This version skips the deep-frying marathon and leans into a toasted cornflake crust that gives you the same hit of contrast—crisp exterior, melting interior—without the fuss. It’s fast to assemble, easy to scale, and forgiving if you follow a couple of timing rules.
I like to make these when friends are coming over because they feel special but don’t need last-minute attention. You can shape the balls ahead of time, freeze them solid, and then finish with a glossy drizzle and whipped cream at the table. The basic technique is straightforward: crush, toast, cool, coat, freeze, and serve. Stick to the timing and temperature notes and you’ll end up with a dessert that looks store-bought but tastes homemade.
Below you’ll find the essentials, a concise ingredients list that follows the original tested quantities, and a step-by-step method you can follow exactly. I’ll also include equipment recommendations, common pitfalls, and a few flavor-forward tweaks so you can personalize it without losing the crisp-versus-creamy magic.
The Essentials
The heart of this recipe is the cornflake coating toasted in butter and cinnamon. Toasting brings out a toasty, nutty note and the butter helps the crumbs clump and stick to the ice cream. Cinnamon is subtle but important—it lifts the flavor and keeps the coating from tasting one-note.
Timing and temperature matter. Ice cream must be scoopable but firm enough to reshaped and refrozen; the coating must be completely cool before contact. If either element is off—warm crumbs or soft centers—the coating will clump unevenly or melt the ice cream. Work quickly and keep your freezer handy.
From approximately 32 ounces of vanilla ice cream you’ll get about eight individual servings or four large sharing scoops. The recipe scales up or down, but keep the ratios the same if you want consistent results.
Ingredients
- 6 cups (162 g) corn flakes cereal* — crunchy base for the coating; crush to small bits for an even crust.
- 1/2 cup salted butter — melts to bind the cereal and toast it; provides richness and browning.
- 2 1/4 tsp ground cinnamon — adds warmth and depth to the crust; mix into crumbs while butter is hot.
- Vanilla ice cream, firm enough to shape but just soft enough to scoop (approx. 32 oz) — choose a high-quality vanilla for best flavor; scoop and refreeze until very firm.
- honey or caramel sauce — for drizzling at service; adds sweetness and gloss.
- chocolate fudge sauce — alternate drizzle for richness and contrast.
- sweetened whipped cream — light topping to balance the texture.
- cherries (fresh or maraschino) — classic garnish that makes each serving feel finished.
The Method for Fried Ice Cream
- Place 6 cups (162 g) corn flakes cereal into a gallon-size resealable bag, remove excess air, seal the bag, and crush the corn flakes to small bits with a rolling pin. Set the crushed corn flakes aside.
- Melt 1/2 cup salted butter in a nonstick 10-inch frying pan over medium heat.
- Stir the crushed corn flakes and 2 1/4 teaspoons ground cinnamon into the melted butter, increase the heat slightly, and cook, stirring constantly, until the mixture is golden brown and fragrant, about 2 minutes. Take care not to burn it.
- Remove the pan from the heat and pour the cornflake mixture into a shallow dish in an even layer. Allow it to cool completely to room temperature (if it is still warm after 15–20 minutes, place the dish briefly in the refrigerator until cooled).
- When you are ready to shape the ice cream, remove the vanilla ice cream (approx. 32 oz) from the freezer. Scoop the desired serving sizes (about 8 individual servings or 4 large sharing servings from 32 oz), then quickly shape each scoop into a smooth ball using clean hands or plastic wrap. Place the shaped balls on a baking sheet lined with parchment and return them to the freezer until very firm, at least 30 minutes.
- Once the cornflake mixture is completely cool and the ice cream balls are very firm, transfer the cooled cornflake mixture to a shallow bowl or plate. One at a time, quickly roll each ice cream ball in the cooled cornflake mixture, pressing the mixture onto the surface for an even, thicker coating.
- Place the coated ice cream balls back on the lined baking sheet and freeze until fully solid and set, at least 30 minutes (keep frozen until ready to serve).
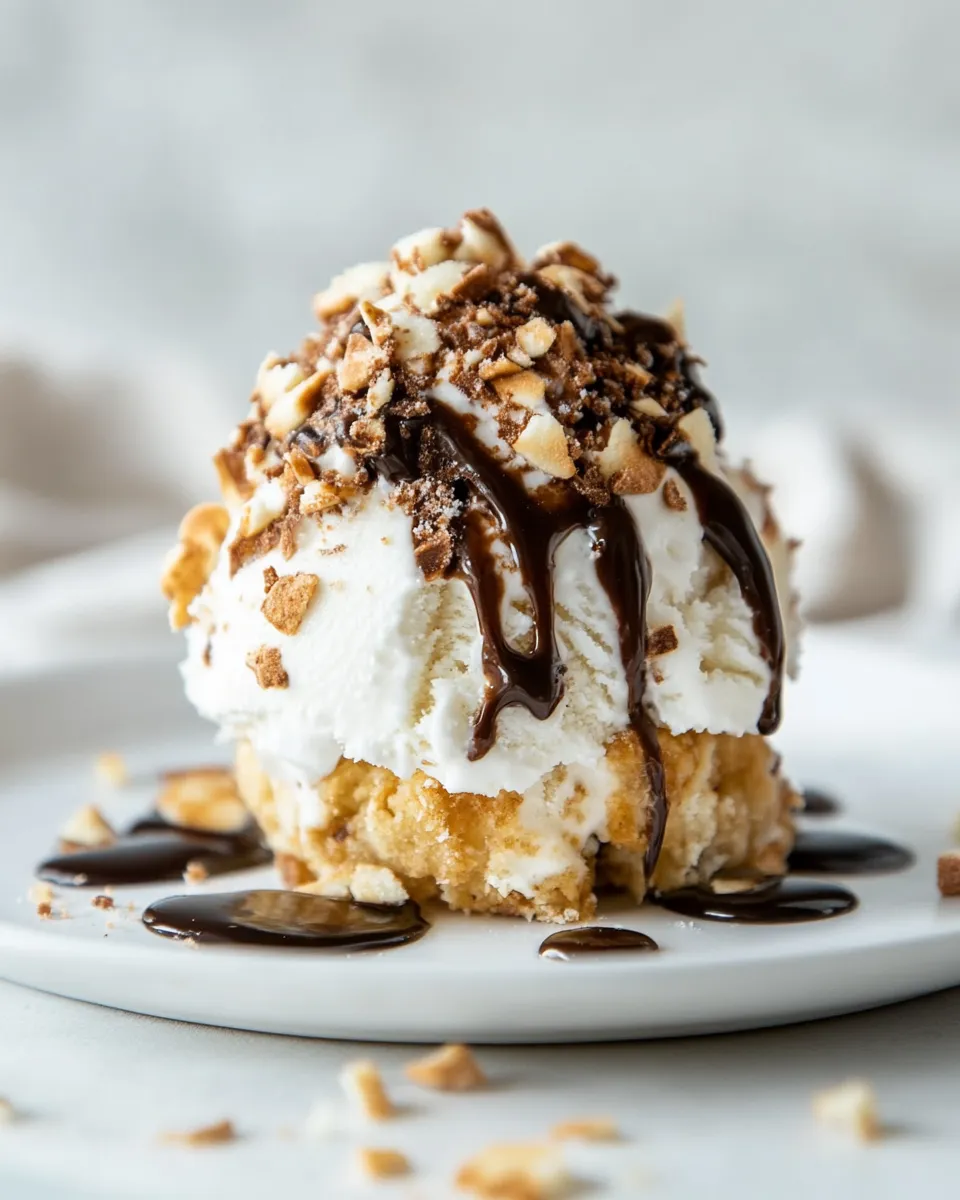
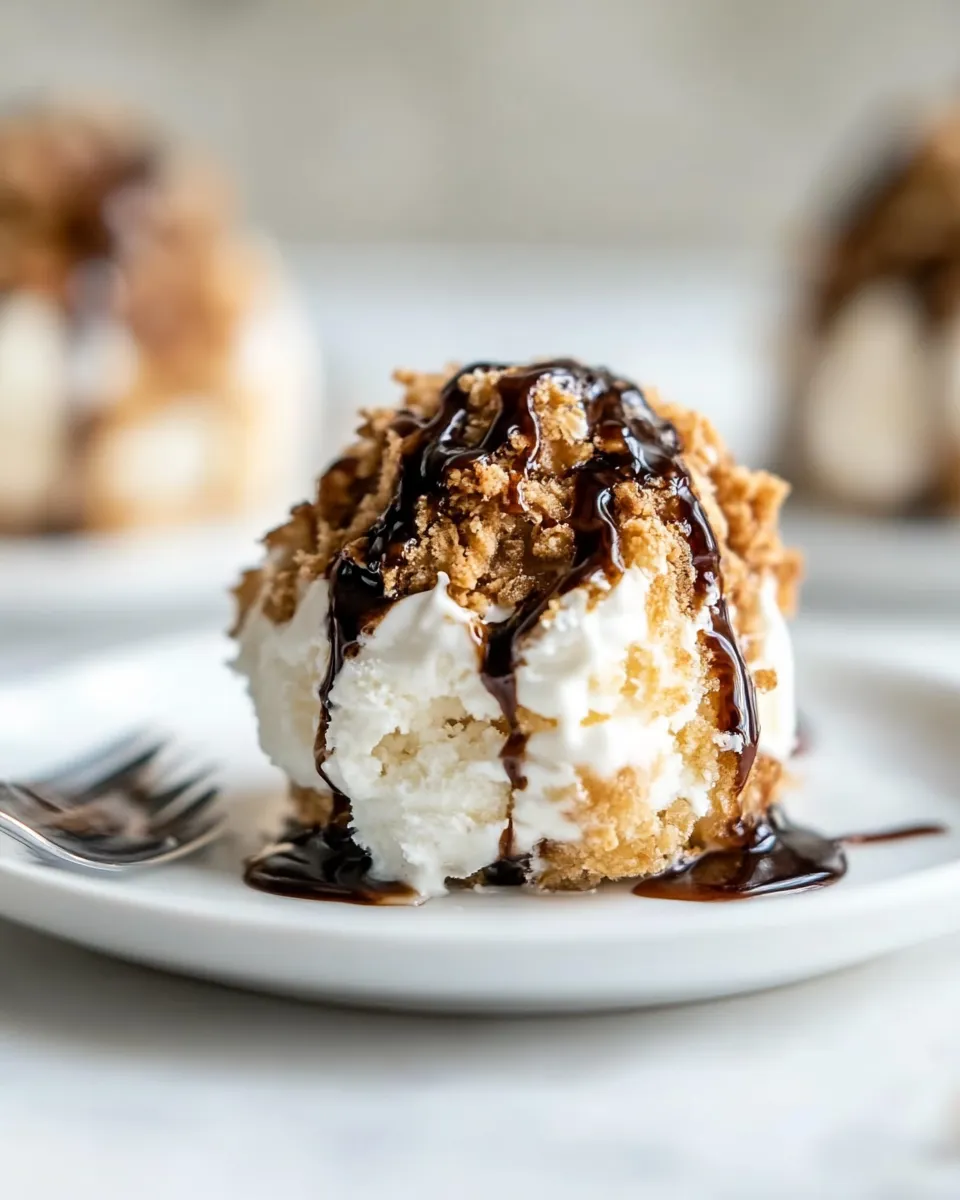
- To serve, drizzle with honey or caramel sauce and/or chocolate fudge sauce, top with sweetened whipped cream and a cherry, and serve immediately.
Why It Deserves a Spot
This dessert earns a place in the rotation because it is dramatic without being high-maintenance. The contrast of textures is immediately pleasing: a toasted crunch gives way to a cold, silky center. It’s the kind of dish that reads as indulgent but doesn’t require hours of active work.
It’s portable in the sense that you can prep the main elements ahead and assemble just before serving, which makes it ideal for dinner parties and summer gatherings. The finishing touches—sauces and a dollop of whipped cream—are flexible, so you can tailor the richness and sweetness to your guests’ preferences.
Flavor-Forward Alternatives

Keep the method and swap small elements to change the profile:
- Use a spiced cereal blend: add a pinch of ground ginger or nutmeg to the cornflake mix for autumnal notes.
- Mix in finely chopped toasted nuts with the crushed cornflakes for extra texture and flavor depth.
- Swap the vanilla ice cream for chocolate, coffee, or dulce de leche to create new contrasts with the coating.
- Replace honey with fruit compote or a citrusy sauce for a brighter finish in warm weather.
Before You Start: Equipment
- Gallon-size resealable plastic bag — for crushing the cereal.
- Rolling pin — crushes cereal quickly and evenly.
- Nonstick 10-inch frying pan — toast cereal in butter without sticking.
- Shallow dish or baking dish — cool the toasted cereal in an even layer.
- Baking sheet lined with parchment — hold and freeze shaped ice cream balls.
- Shallow bowl or plate — for rolling and pressing the coating onto ice cream balls.
- Ice cream scoop or large spoon — for consistent portioning.
- Freezer space — you’ll need room to hold the baking sheet flat while balls harden.
Mistakes That Ruin Fried Ice Cream
There are a few easy missteps that turn this from delightful to soggy or messy. Watch for these:
- Coating is still warm when you roll the ice cream — it will melt the surface and clump irregularly. Make sure the cornflake mixture is completely cool.
- Ice cream not firm enough — if the balls are soft, they’ll deform and the coating won’t stick properly. Always refreeze until very firm before coating and again after coating.
- Over-toasting the crumbs — buttered cornflakes can go from golden to burnt quickly. Stir constantly and remove from heat as soon as you smell a nutty aroma and see even browning.
- Applying too heavy a hand when pressing the coating — press enough to adhere, but pressing too hard can compress the ice cream and cause it to lose shape.
- Skipping the second freeze — the coating won’t set properly without that final solidification step.
Warm & Cool Weather Spins
For cold-weather dinner parties, go rich: serve the coated balls with warm chocolate fudge and a drizzle of bourbon caramel. The warm drizzle softens the outer crumbs just enough to create a pleasing contrast without melting the center if you serve quickly.
In summer, keep things brighter and lighter: use a fruit sauce (mango or raspberry) and fresh fruit garnish instead of heavy fudge. You can also swap in frozen yogurt or a fruit-based gelato for a tangier profile that feels refreshing on hot days.
Author’s Commentary
I’m a fan of desserts that look theatrical but don’t steal the evening. This cornflake-coated fried ice cream is one of those recipes—easy to pull off, and it always gets a little gasp when I plate it. My practical advice is to prep the coating and ice cream balls earlier in the day so you’re not juggling everything at the last minute.
When I photograph these for the blog, I like to keep one ball slightly melted at the edges to show the creaminess inside—but for actual serving, keep them rock-solid until the moment you dress them. Little details like a warm drizzle and a glossy cherry make a big visual difference.
Refrigerate, Freeze, Reheat
Storage is straightforward: keep the shaped and coated ice cream balls in the freezer on a lined baking sheet or in a shallow container with parchment between layers. They’ll hold their quality for several weeks if wrapped or covered to prevent freezer burn.
Do not refrigerate—refrigeration will soften the ice cream and ruin the coating. There’s no practical reheating step: finish with warm sauces at service time, but serve the balls immediately after drizzling so the shell stays crisp while the interior remains cold and smooth.
Frequently Asked Questions
Q: Can I actually deep-fry these? A: Traditional fried ice cream recipes do fry very briefly in hot oil, but this particular method uses a toasted cornflake crust and does not require frying. If you prefer the deep-fried method, use a very firm, well-chilled ball and a very hot oil; it’s trickier and not covered here.
Q: Can I use a different cereal? A: Yes. Rice crispies or panko mixed with crushed cornflakes both work. Keep textures similar so the coating adheres and toasts properly.
Q: How long should I freeze the scooped balls before coating? A: At least 30 minutes until very firm. If your freezer is warm or the balls are large, give them more time—solid firmness is essential.
Q: Will the coating stick if I don’t press it on? A: Pressing helps the coating adhere evenly. A light but firm press gives the best, thick, even crust. Rolling without pressure may cause a thin, uneven coat that flakes off.
Q: Can I make these ahead? A: Yes. You can prepare the coated balls and keep them frozen for several weeks. Store airtight or layered with parchment to avoid freezer burn.
Final Thoughts
This cornflake-coated take on fried ice cream is a reliable, crowd-pleasing dessert that rewards careful timing more than fancy technique. It’s ideal for hosts who want showstopping results without stress. Make the coating in advance, shape and freeze your scoops, and keep your sauces ready—then finish at the table for that little moment of delight when cold meets crisp.
Fried Ice Cream
Ingredients
Ingredients
- 6 cups 162 gcorn flakes cereal*
- 1/2 cupsalted butter
- 2 1/4 tspground cinnamon
- Vanilla ice cream firm enough to shape but just soft enough to scoop (approx. 32 oz)
- honey or caramel sauce
- chocolate fudge sauce
- sweetened whipped cream
- cherries fresh or maraschino
Instructions
Instructions
- Place 6 cups (162 g) corn flakes cereal into a gallon-size resealable bag, remove excess air, seal the bag, and crush the corn flakes to small bits with a rolling pin. Set the crushed corn flakes aside.
- Melt 1/2 cup salted butter in a nonstick 10-inch frying pan over medium heat.
- Stir the crushed corn flakes and 2 1/4 teaspoons ground cinnamon into the melted butter, increase the heat slightly, and cook, stirring constantly, until the mixture is golden brown and fragrant, about 2 minutes. Take care not to burn it.
- Remove the pan from the heat and pour the cornflake mixture into a shallow dish in an even layer. Allow it to cool completely to room temperature (if it is still warm after 15–20 minutes, place the dish briefly in the refrigerator until cooled).
- When you are ready to shape the ice cream, remove the vanilla ice cream (approx. 32 oz) from the freezer. Scoop the desired serving sizes (about 8 individual servings or 4 large sharing servings from 32 oz), then quickly shape each scoop into a smooth ball using clean hands or plastic wrap. Place the shaped balls on a baking sheet lined with parchment and return them to the freezer until very firm, at least 30 minutes.
- Once the cornflake mixture is completely cool and the ice cream balls are very firm, transfer the cooled cornflake mixture to a shallow bowl or plate. One at a time, quickly roll each ice cream ball in the cooled cornflake mixture, pressing the mixture onto the surface for an even, thicker coating.
- Place the coated ice cream balls back on the lined baking sheet and freeze until fully solid and set, at least 30 minutes (keep frozen until ready to serve).
- To serve, drizzle with honey or caramel sauce and/or chocolate fudge sauce, top with sweetened whipped cream and a cherry, and serve immediately.
Equipment
- gallon-size resealable bag
- Rolling Pin
- nonstick 10-inch frying pan
- Shallow Dish
- shallow bowl or plate
- Baking Sheet
- Parchment Paper
- Refrigerator
Notes
If you don't care about having uniformly shaped ice cream balls, then you can simply scoop out the ice cream and drop it into the toasted corn flake mixture without shaping.
Nutrition does not include toppings.