
I love a bread that asks for very little attention and returns a lot: crisp crust, olive oil sheen, herbs aromatic enough to fill the kitchen. This no-knead herb loaf is exactly that — hands-off bulk fermentation, a hot pot in the oven, and a loaf that looks and tastes like you baked it all day.
It’s practical: minimal equipment, a straightforward ingredient list, and forgiving timing. You don’t need to be precise with fancy shaping or intense kneading. The dough wants to be sticky and loose; you just guide it toward structure and heat.
I’ll walk you through the ingredients, the exact step-by-step method, gear you’ll need, common mistakes and fixes, and how to make the loaf ahead or keep it for several days. Read the quick how-to when you’re ready to bake, then come back to the troubleshooting section if something goes sideways.
What Goes Into Herb Bread (No-Knead)
Ingredients
- 2 teaspoons instant yeast — provides the lift in a short initial activation and during the long rise.
- 2 teaspoons honey — feeds the yeast during the preliminary mix and adds a touch of sweetness.
- 1-1/2 cups warm water — hydrates the dough; warm helps activate the yeast quickly.
- 3 cups flour — the structure of the loaf. All-purpose works fine here.
- 1-3/4 teaspoons salt — flavor and fermentation regulation.
- 2 teaspoons minced garlic — fresh or jarred; gives a savory backbone to the herbs.
- 1-1/2 tablespoons finely chopped fresh rosemary or 1 teaspoon dried — fragrant, rustic herb note. Use fresh if available.
- 1-1/2 tablespoons finely chopped fresh thyme or 1 teaspoon dried — bright, slightly lemony herbal tone that complements rosemary.
- 1/4 teaspoon pepper — optional — adds subtle warmth if you like a little bite.
- 1 tablespoon + 1 teaspoon olive oil — divided — the tablespoon coats the dough so it stays moist while rising; the teaspoon is drizzled on top before baking for a shiny crust.
- Butter — optional, for serving — soft butter is a classic finish.
- Flaky sea salt — optional, for serving — sprinkle on sliced warm bread for crunch and pops of saltiness.
Mastering Herb Bread (No-Knead): How-To
- In a medium bowl, whisk together 2 teaspoons instant yeast, 2 teaspoons honey, and 1-1/2 cups warm water. Let sit 5 minutes until creamy or foamy. If it does not foam, the yeast may be inactive—discard and start again.
- In a large bowl, stir together 3 cups flour, 1-3/4 teaspoons salt, 2 teaspoons minced garlic, 1-1/2 tablespoons finely chopped fresh rosemary (or 1 teaspoon dried), 1-1/2 tablespoons finely chopped fresh thyme (or 1 teaspoon dried), and 1/4 teaspoon pepper (optional) until evenly combined.
- Add the yeast mixture to the flour mixture and stir with a rubber spatula until a shaggy dough forms and there are no dry flour streaks.
- Use the spatula to pull the dough to one side and drizzle 1 tablespoon olive oil over it. Turn the dough in the bowl to coat it in oil (the dough will be sticky). Cover the bowl tightly with plastic wrap.
- Let the bowl sit at room temperature (about 70°F / 21°C) for 10–18 hours to rise.
- When ready to bake, move an oven rack to the center position and preheat the oven to 450°F (230°C). Place a lidded cast-iron pot (oven-safe) in the oven to heat for 30 minutes.
- Sprinkle 1 tablespoon flour on a clean work surface. Use a spatula to scrape the dough from the bowl onto the floured surface. Sprinkle the remaining 1 tablespoon flour over the top. Gently fold the sides inward with a spatula or dough scraper about six times to form a rough ball.
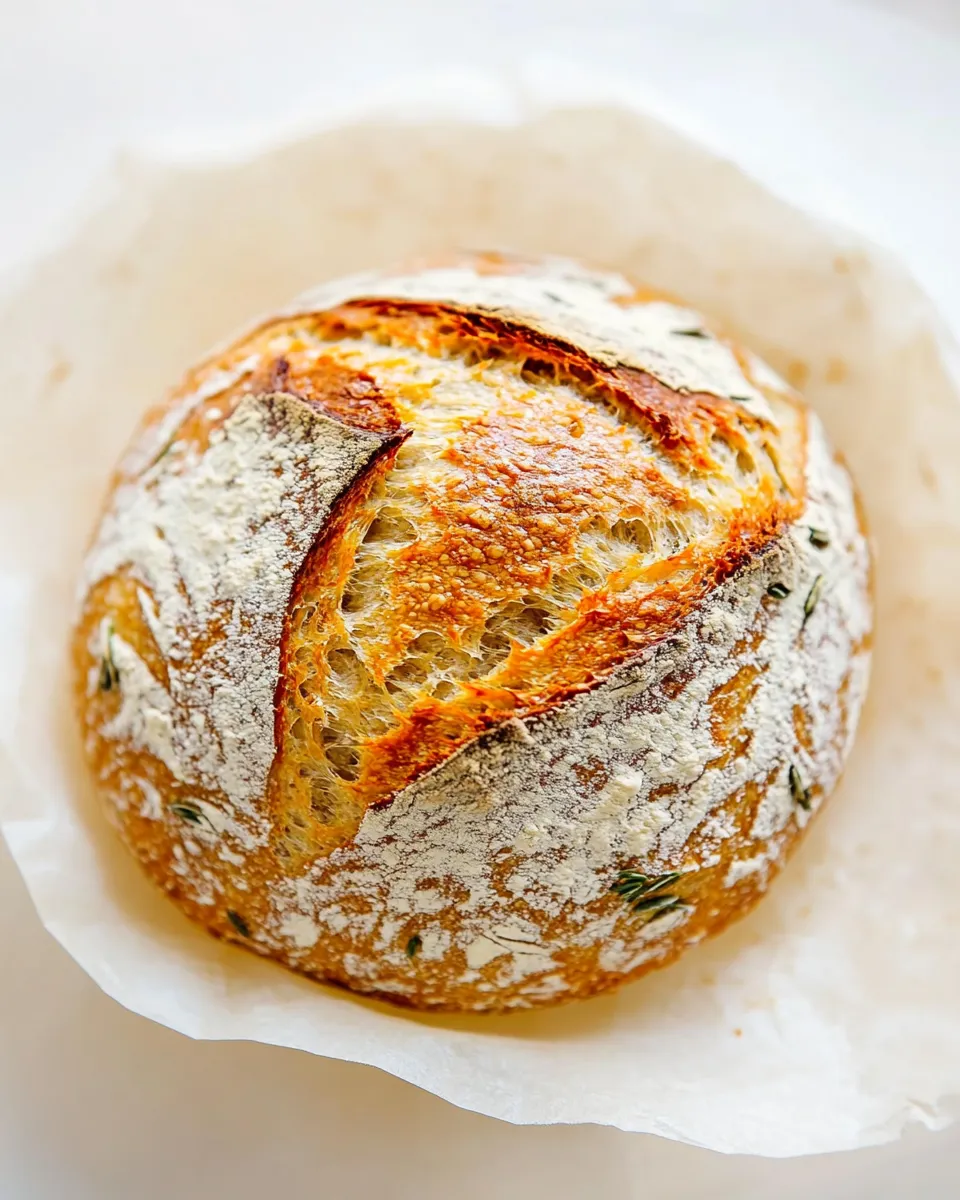
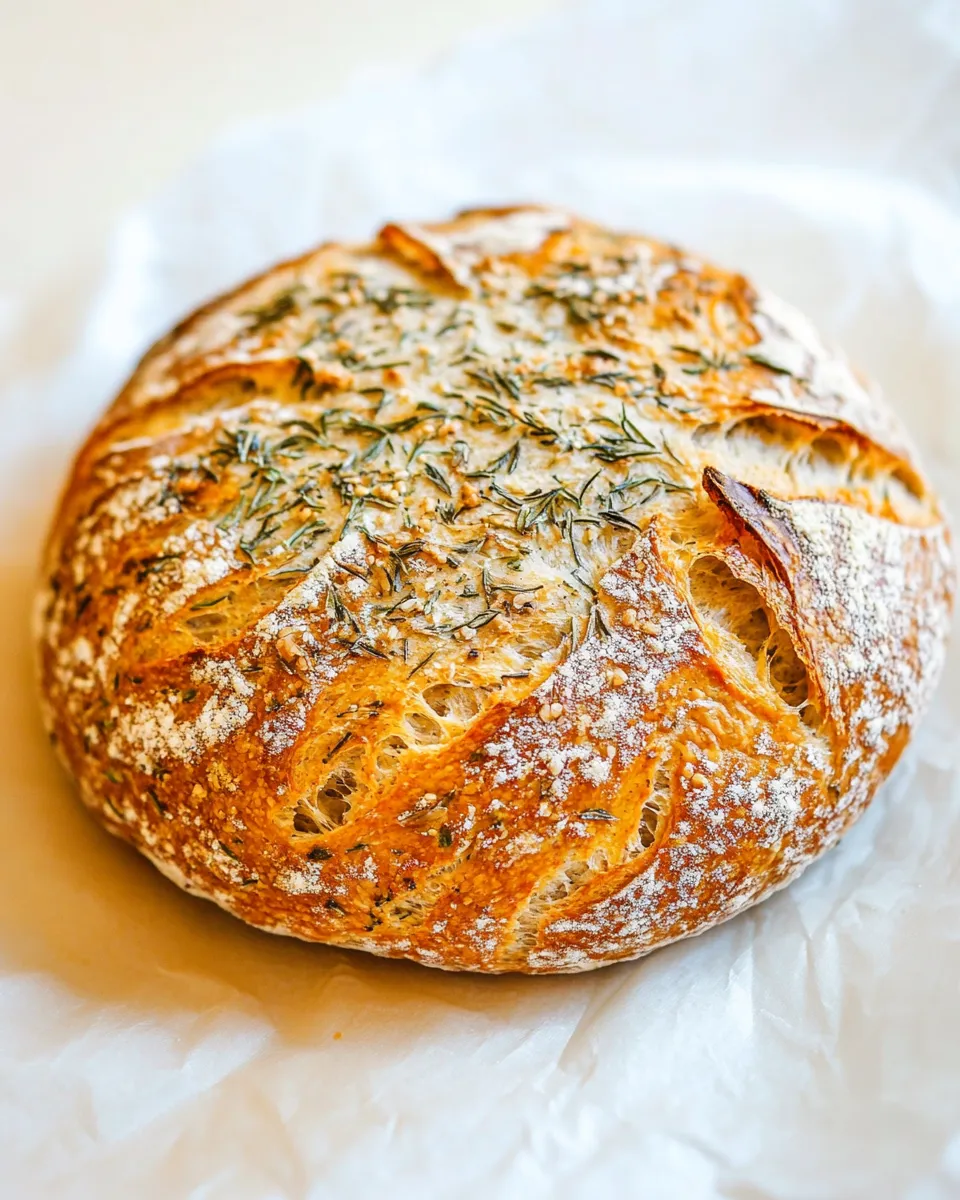
- Transfer the dough ball onto a large piece of parchment paper, flipping it so the seam side is down. Gently shape it into a round. Optional: score the top with 3–5 slashes using a sharp knife or lame.
- Carefully remove the heated pot from the oven. Lift the parchment with the dough and place both into the hot pot. Drizzle the remaining 1 teaspoon olive oil over the top of the dough. Cover with the lid.
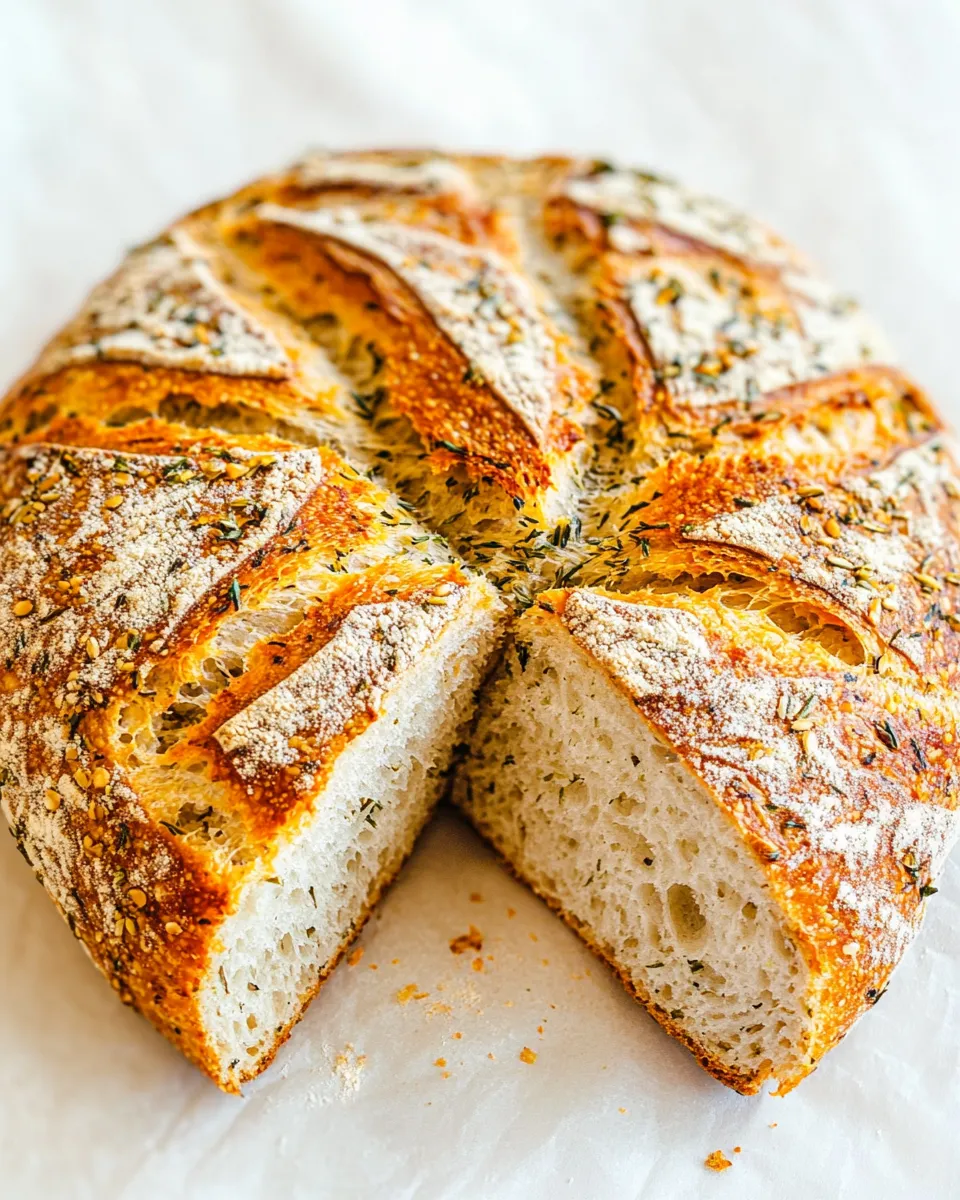
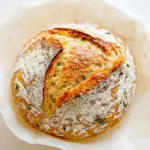
- Bake covered for 30 minutes. Remove the lid and continue baking 13–20 minutes more, until the top is a deep golden brown and the loaf sounds hollow when tapped in the center.
- Using the parchment, lift the bread from the pot and transfer it to a wire cooling rack. Let cool for 30 minutes before slicing. Serve with butter and flaky sea salt if desired.
Why You’ll Love This Recipe
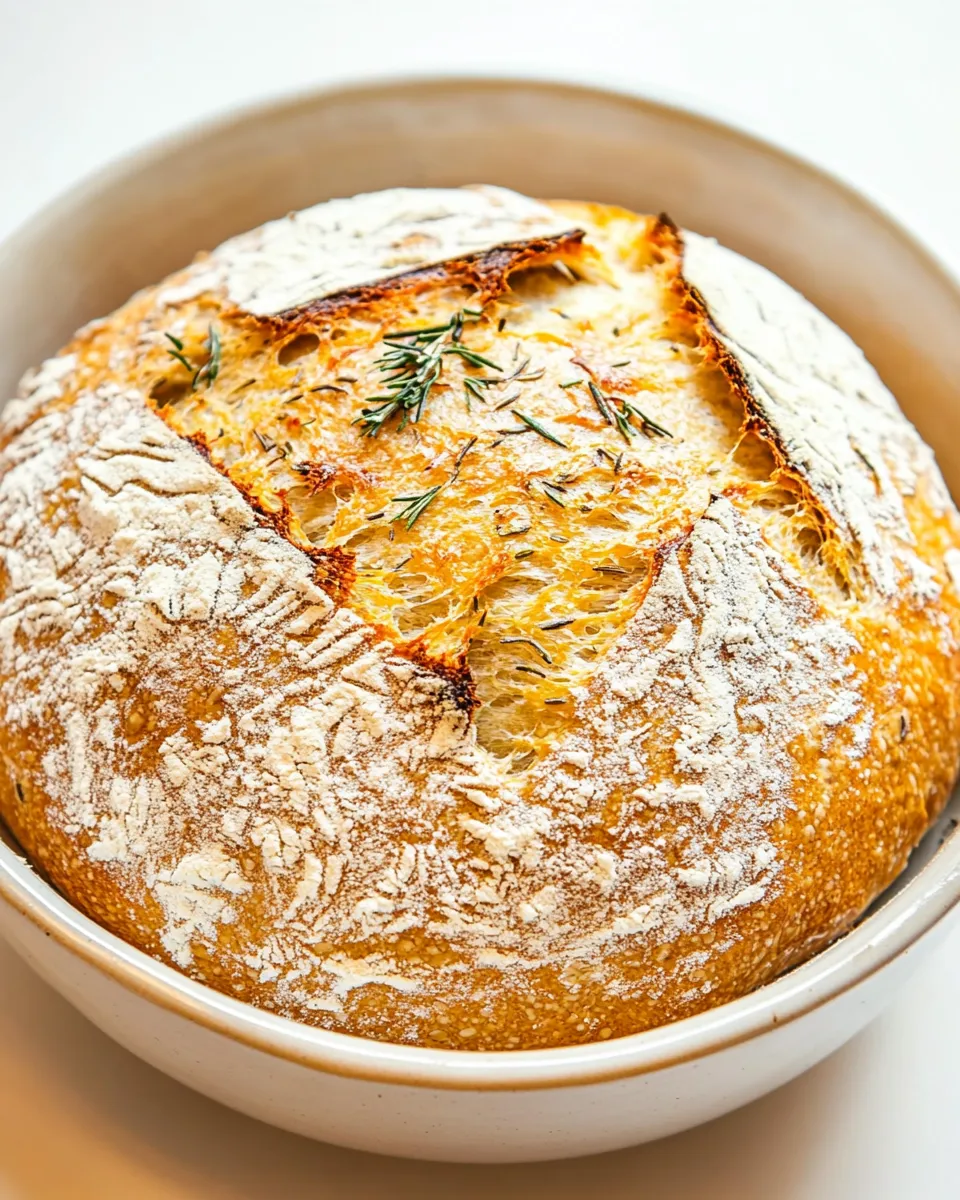
This loaf is low-effort with a high return. The long, slow rise concentrates flavor without demanding kneading. A hot, enclosed pot creates steam that develops a glossy, blistered crust and a tender crumb inside. Herbs and garlic are folded into the dough so every bite is aromatic and savory.
You can mix the dough the night before and come back to bake the next day. It’s forgiving on timing—10–18 hours of rise time lets you adjust to your schedule without wrecking the result. The method is perfect for someone who wants bakery results without hours at the counter.
Low-Carb/Keto Alternatives
This recipe is built around wheat flour and depends on gluten structure and hydration. Low-carb or keto substitutions (higher-ratio nut flours, fiber-based blends) behave differently: they don’t absorb water the same way and won’t develop the same open crumb or crust using this method.
If you need a low-carb substitute for a herb-forward bread-like loaf, treat this recipe as a structural reference rather than a direct swap. Expect denser texture, different hydration, and altered bake times. If you proceed with alternative flours, reduce water gradually, work in small test batches, and don’t assume the same rise or aroma. The flavor profile with the rosemary, thyme, and garlic will still work well in low-carb loaves; just be prepared for a different texture.
Equipment Breakdown
Minimal but specific gear will make this simple method work reliably.
- Medium bowl — for activating the yeast and combining wet ingredients.
- Large bowl — enough room for the dough to expand during the long rise.
- Rubber spatula or dough scraper — for mixing and gentle folding; the dough will be sticky.
- Plastic wrap — seals the bowl to retain moisture during the long rise.
- Oven-safe lidded cast-iron pot (about 4–6 quarts) — critical. The heavy pot traps steam and intensifies crust development.
- Parchment paper — makes transferring the dough to the hot pot safe and simple.
- Sharp knife or lame — optional, for scoring the top to control expansion.
- Wire cooling rack — lets the loaf cool evenly and prevents a soggy bottom.
Watch Outs & How to Fix
Here are the most common things I see and the quick fixes I use.
- Yeast doesn’t foam — if your initial yeast-honey-water mixture stays flat after 5 minutes, the yeast may be old or the water too hot or cold. Discard and start with fresh yeast and water that’s comfortably warm (not hot).
- Dough is too wet to handle — that’s normal. Use floured hands or the two-tablespoon flour trick in step 7. Keep folding gently; surface tension forms a rough ball without overworking.
- Loaf is pale after baking — extend the uncovered bake time 5–10 minutes until golden. Keep an eye so it doesn’t burn.
- Crust too soft — make sure you preheat the pot thoroughly. The trapped steam is key early on; finishing uncovered sets a crisp crust.
- Dense crumb despite proper timing — check your yeast expiry and water temperature; also make sure you mixed until there were no dry streaks. Undermixing can leave dry pockets that affect structure.
- Bottom too brown or scorched — use parchment and ensure your oven rack is centered. If your oven runs hot, reduce temperature 10–20°F and add a couple extra minutes to bake time.
Spring to Winter: Ideas
This loaf adapts to seasons by way of pairings and small adjustments that don’t change the technique.
- Spring — serve with soft fresh cheeses and a drizzle of high-quality olive oil. The bright herbs pair well with lighter toppings.
- Summer — use it for sandwiches with grilled vegetables or caprese-style layers; the herb bread stands up to bold fillings.
- Autumn — pair with soups and stews; the garlic and rosemary complement roasted root vegetables and squash.
- Winter — add more garlic or brush slices with softened butter while still warm. The loaf’s aroma is comforting alongside hearty stews and braises.
Behind-the-Scenes Notes
No-knead bread relies on time for structure: the long fermentation allows enzymes to develop gluten slowly, producing flavor and a tender crumb without manual work. The hot, covered pot mimics the steam ovens in commercial bakeries—steam gelatinizes the outer starches and encourages oven spring.
Herbs mixed in the dough distribute flavor throughout the crumb rather than sitting only on the surface. Fresh herbs will give the most vibrant result; dried herbs are perfectly acceptable and concentrated, so the recipe provides equivalents.
Prep Ahead & Store
To prep ahead: mix the dough and let it rise for 10–18 hours at room temperature as written. If you need extra delay, you can refrigerate the covered bowl for up to 24 hours after the initial 1–2 hour room-temperature rest. Bring the dough back to room temperature before shaping and baking — cold dough bakes more slowly and may need extra time.
Storage: cool completely, then keep the loaf wrapped loosely in a kitchen towel or paper bag for 2–3 days. For longer storage, slice and freeze in an airtight bag for up to 3 months. Reheat slices in a toaster or warm whole loaf in a 350°F oven for 10–15 minutes to refresh the crust.
Quick Questions
Can I use active dry yeast instead of instant? Yes. Use the same amount, but dissolve it in the warm water with the honey and let it bloom a few minutes longer until foamy.
Do I have to use a cast-iron pot? Heavy, oven-safe lidded pots are best because they hold heat and steam. A Dutch oven is ideal. Glass or thin metal won’t trap heat the same way and may yield a different crust.
Can I double the recipe? You can, but bake in two pots or a larger vessel in stages. Too large a mass can affect heat penetration and crust development.
Why is the dough sticky? It should be. Stickiness indicates proper hydration, which gives an open crumb. Use spatulas and flour on your work surface rather than adding a lot of extra flour into the dough.
Next Steps
Once you’re comfortable with this loaf, experiment with small variations: swap the herb ratio slightly, double the garlic for a more pronounced savory profile, or try baking single-serve rolls using the same dough and shorter bake times. Keep notes on timing and herb amounts so you can repeat your favorite version.
When you slice into that warm, fragrant loaf, spread on butter and sprinkle a little flaky sea salt. Then make a pot of soup or a simple salad and enjoy the easy, big reward of a no-knead herb bread.
Herb Bread (No-Knead)
Ingredients
Ingredients
- 2 teaspoonsinstant yeast
- 2 teaspoonshoney
- 1-1/2 cupswarm watersee note 3
- 3 cupsflour
- 1-3/4 teaspoonssalt
- 2 teaspoonsminced garlic
- 1-1/2 tablespoonsfinely chopped fresh rosemaryor 1 teaspoon dried
- 1-1/2 tablespoonsfinely chopped fresh thymeor 1 teaspoon dried
- 1/4 teaspoonpepperoptional
- 1 tablespoon + 1 teaspoonolive oildivided
- Butteroptional for serving
- Flaky sea saltoptional for serving
Instructions
Instructions
- In a medium bowl, whisk together 2 teaspoons instant yeast, 2 teaspoons honey, and 1-1/2 cups warm water. Let sit 5 minutes until creamy or foamy. If it does not foam, the yeast may be inactive—discard and start again.
- In a large bowl, stir together 3 cups flour, 1-3/4 teaspoons salt, 2 teaspoons minced garlic, 1-1/2 tablespoons finely chopped fresh rosemary (or 1 teaspoon dried), 1-1/2 tablespoons finely chopped fresh thyme (or 1 teaspoon dried), and 1/4 teaspoon pepper (optional) until evenly combined.
- Add the yeast mixture to the flour mixture and stir with a rubber spatula until a shaggy dough forms and there are no dry flour streaks.
- Use the spatula to pull the dough to one side and drizzle 1 tablespoon olive oil over it. Turn the dough in the bowl to coat it in oil (the dough will be sticky). Cover the bowl tightly with plastic wrap.
- Let the bowl sit at room temperature (about 70°F / 21°C) for 10–18 hours to rise.
- When ready to bake, move an oven rack to the center position and preheat the oven to 450°F (230°C). Place a lidded cast-iron pot (oven-safe) in the oven to heat for 30 minutes.
- Sprinkle 1 tablespoon flour on a clean work surface. Use a spatula to scrape the dough from the bowl onto the floured surface. Sprinkle the remaining 1 tablespoon flour over the top. Gently fold the sides inward with a spatula or dough scraper about six times to form a rough ball.
- Transfer the dough ball onto a large piece of parchment paper, flipping it so the seam side is down. Gently shape it into a round. Optional: score the top with 3–5 slashes using a sharp knife or lame.
- Carefully remove the heated pot from the oven. Lift the parchment with the dough and place both into the hot pot. Drizzle the remaining 1 teaspoon olive oil over the top of the dough. Cover with the lid.
- Bake covered for 30 minutes. Remove the lid and continue baking 13–20 minutes more, until the top is a deep golden brown and the loaf sounds hollow when tapped in the center.
- Using the parchment, lift the bread from the pot and transfer it to a wire cooling rack. Let cool for 30 minutes before slicing. Serve with butter and flaky sea salt if desired.
Equipment
- Large cast-iron potsee note 1
- Parchment papersee note 2
Notes
Note 1:
Here is a great affordable
cast-iron pot
and here is my personal favorite
pot
! For alternatives to a cast-iron pot, see right above the recipe card.
Note 2
: Ensure you use parchment paper, not foil or wax paper, as wax paper will melt in the oven.
Note 3
: Test the water temperature by drizzling a few drops on your wrist. It should feel warm and comfortable, not hot.
Note 4:
No-Knead Bread In a Hurry: After 2–3 hours, you can bake the bread immediately. The flavor and texture won’t be as developed as after a long rest but will still be tasty.
Note 5:
Allowing the bread to cool is crucial to ensure it’s fully baked inside. Cutting too early can result in a mushy interior.
Storage
: This bread is best on days 1 and 2. On the first day, leave it out uncovered with the cut side down on a cutting board to keep the crust crisp. After that, store it in an airtight container or bag. The crust may lose its crispness, but the bread will still be great toasted.


