

I love the ritual of making these at home: it’s hands-on, forgiving, and the payoff is reliably decadent. This version captures the crunchy, nutty center and chocolate shell without complicated techniques or hard-to-find ingredients. You control the sweetness and the coating. You can make them for a party, a gift box, or a quiet evening when you need a little something special.
Expect about an hour from start to finish if your hazelnuts are raw and need roasting; much less if you start with already-roasted nuts. I’ll walk you through the exact steps I follow, the tools that make the process painless, and the common mistakes to avoid. I test recipes until they’re dependable, and this one consistently delivers a crunchy, chocolatey bite that’s very close to the store-bought original.
Read through the ingredient notes and the step-by-step directions before you begin. A short chill in the fridge at two different points makes shaping and coating far easier. Put on some music, line a tray with parchment, and let’s get to work.
What We’re Using
Ingredients
- 2 cups hazelnuts — the base and the main flavor; roast if raw to deepen the flavor and make the skins easier to remove.
- 1/4 cup cocoa powder or cacao powder — adds chocolate depth without extra moisture; use cacao for a more intense, slightly bitter note.
- 1/4 cup sugar or granulated sweetener of choice — sweetens and helps the mixture bind; fine granulated sugar works best for texture.
- 1/4 tsp salt — balances sweetness and brings out the nutty flavors.
- 1/8 tsp pure vanilla extract — small but important for rounding the flavor.
- whole and chopped roasted hazelnuts (optional for garnish) — whole nuts are optional centers; chopped nuts add crunch to the coating.
- 1/2 cup chocolate chips (optional for coating) — melts into the shell; choose a flavor you like (milk, dark, or semi-sweet).
Homemade Ferrero Rocher: From Prep to Plate
- If using raw hazelnuts: preheat oven to 400°F. Spread 2 cups hazelnuts in a single layer on a parchment-lined baking sheet and roast 6 minutes or until they begin to brown and smell toasted. Let cool slightly, then place in a clean kitchen towel or paper towel and rub to remove most of the skins. It’s fine if some skins remain. If using already-roasted hazelnuts, skip this step.
- Place the roasted hazelnuts in a food processor or high-speed blender. Process until the nuts are very finely chopped and crumbly, about 20 seconds (timing may vary). Scrape down the sides as needed.
- Add 1/4 cup cocoa powder (or cacao powder), 1/4 cup sugar (or granulated sweetener), 1/4 tsp salt, and 1/8 tsp pure vanilla extract to the processor. Pulse or blend just until everything is evenly incorporated and the mixture holds together when pressed. Avoid over-processing into a smooth paste.
- Using a teaspoon or tablespoon, portion and roll the mixture into balls between your palms (about 1 inch or your preferred size). If the mixture is too soft to shape, refrigerate it 15–30 minutes and then shape.
- Optional: if you want a hazelnut center, press one whole roasted hazelnut into the center of each ball and reshape around it so the nut is enclosed or slightly embedded.
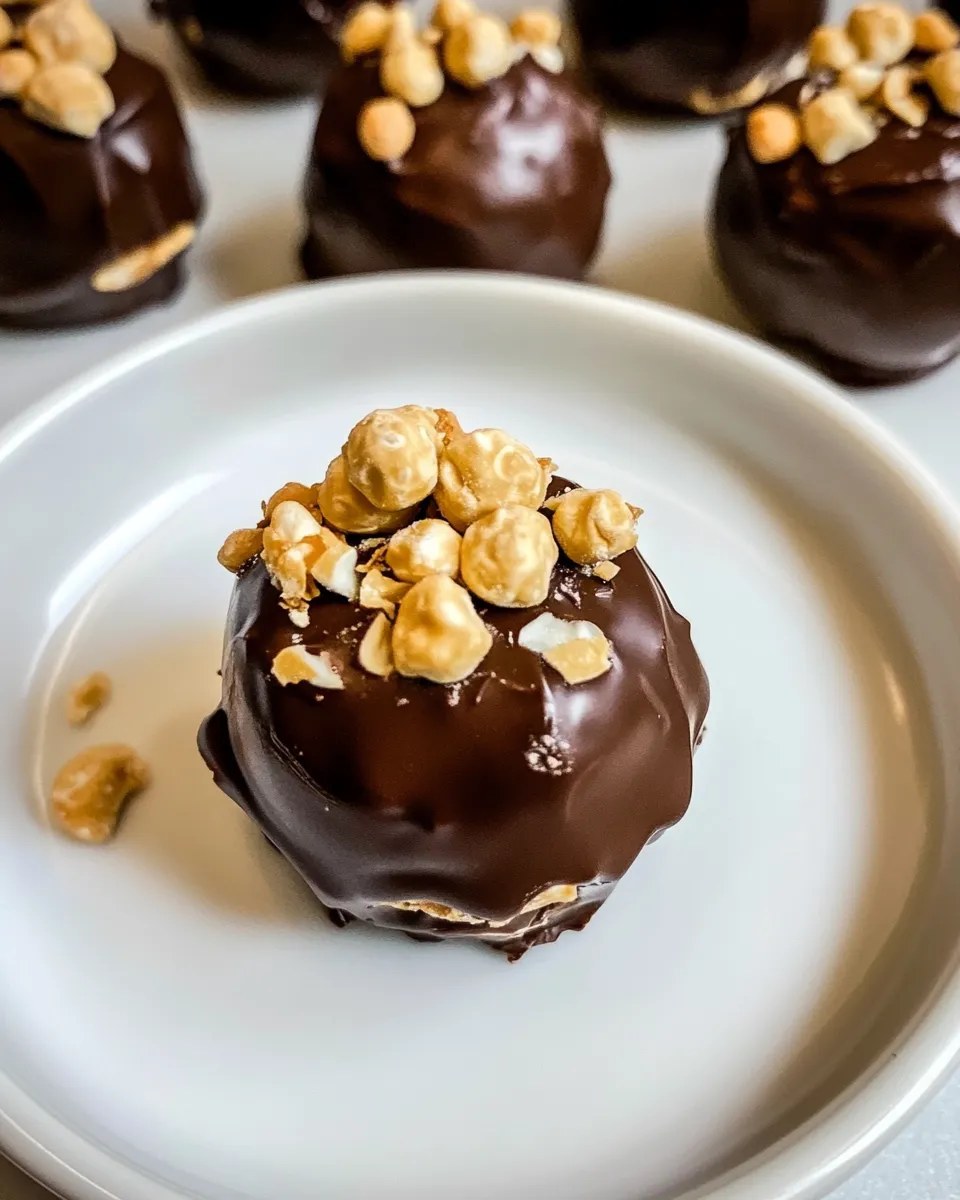
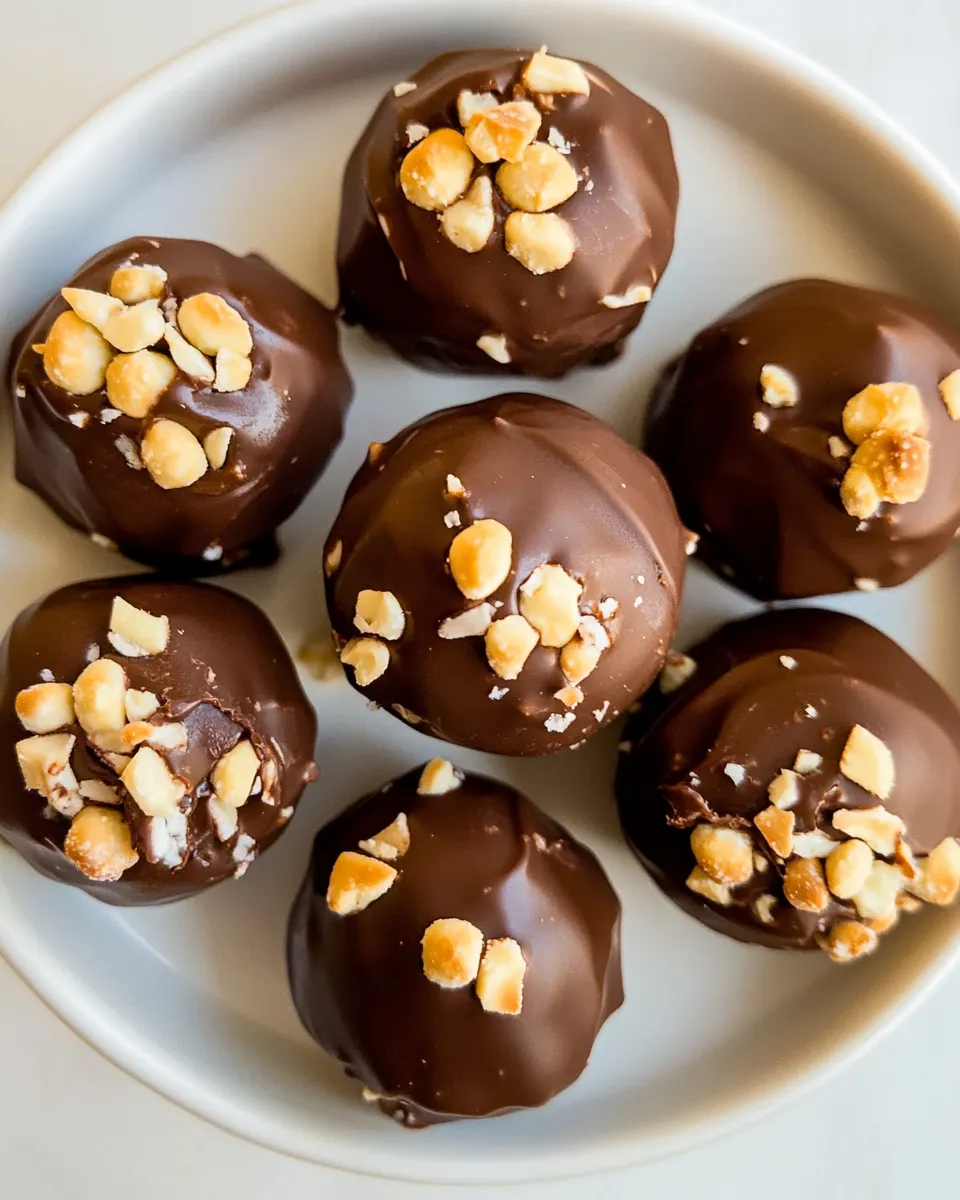
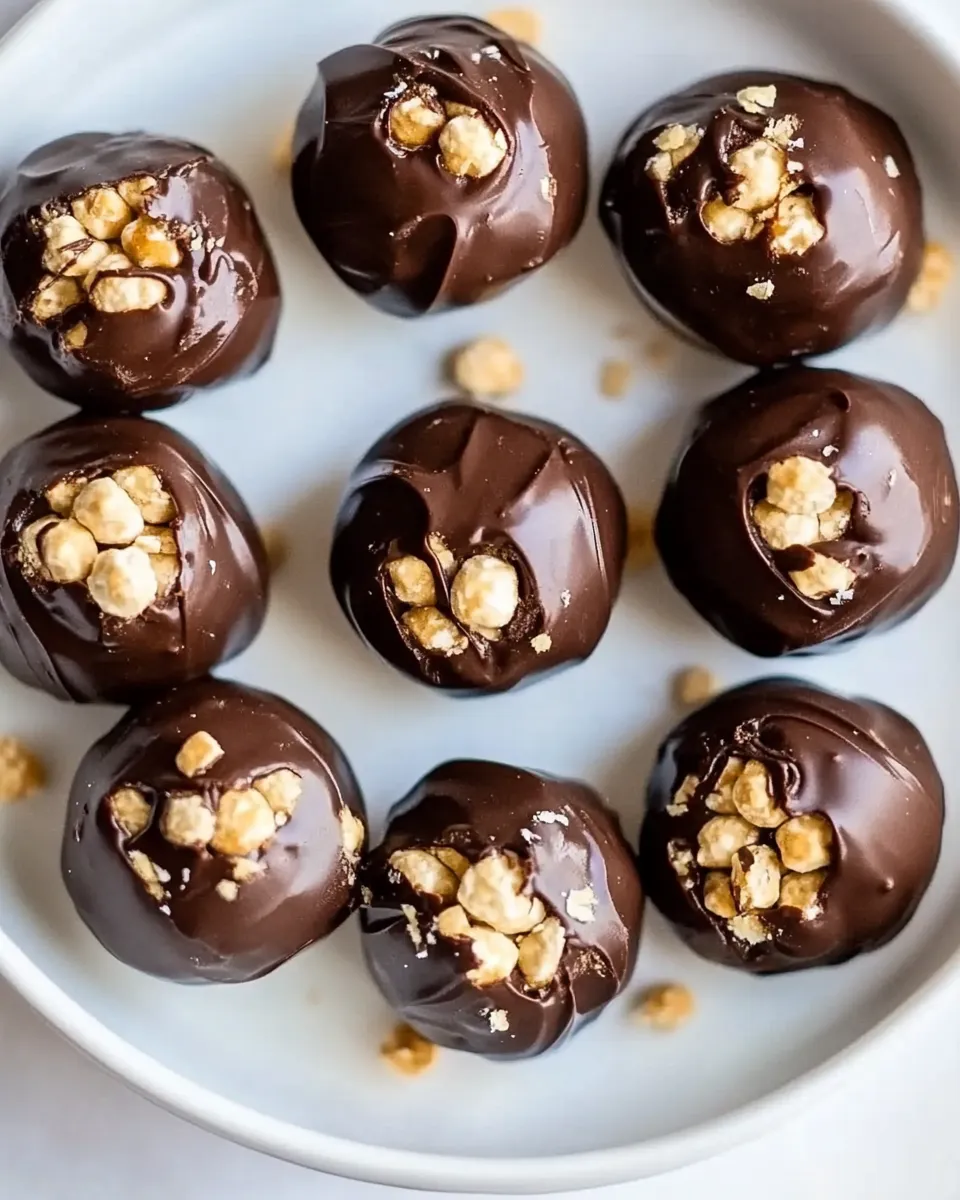
- Optional coating: melt 1/2 cup chocolate chips in the microwave in 20–30 second intervals, stirring between intervals until smooth, or melt in a heatproof bowl set over simmering water (double boiler). Dip each ball into the melted chocolate, letting excess drip off.
- Optional garnish: while the chocolate is still wet, roll or sprinkle the coated balls with chopped roasted hazelnuts as desired.
- Place finished candies on parchment and chill 15–30 minutes or until the chocolate is set. Store in an airtight container.
Why Homemade Ferrero Rocher is Worth Your Time
First, texture. You get control over the crunch level and how deeply roasted the hazelnuts are. Store-bought versions can be overly sweet or have a waxy coating; homemade lets you choose chocolate quality and sweetness. Second, customization. You can make them slightly larger or smaller, hide a whole hazelnut center, or skip the center entirely. Third, they make excellent gifts. A small box of neatly chilled, uniformly coated chocolates looks impressive and feels personal.
Finally, these are simple. The technique is straightforward: roast, pulse, bind, shape, dip. There’s no tempering required unless you want a very glossy shell. For most home cooks, the slightly rustic homemade finish is part of the charm.
If You’re Out Of…
Out of roasted hazelnuts? Roast raw ones quickly at 400°F for about 6 minutes as the recipe says; it makes a big difference. If you don’t have cocoa powder, you can still make a nutty truffle — skip the cocoa and expect a milder, more praline-like flavor. No chocolate chips for coating? Use any melting chocolate or even a high-quality bar chopped finely. If you’re short on time, make the centers and skip the chocolate dip — they’re still delicious rolled in chopped nuts or a dusting of cocoa.
Essential Tools for Success
- Food processor or high-speed blender — you need good chopping power to get fine, crumbly hazelnuts; a weak blender will leave big chunks.
- Baking sheet and parchment — for roasting and for setting the finished candies.
- Small spoon or tablespoon — for portioning uniform balls.
- Microwave-safe bowl or double boiler — for melting chocolate without burning it.
- Kitchen towel or paper towel — for rubbing skins off roasted hazelnuts.
- Airtight container — for storing the finished chocolates properly.
Things That Go Wrong
Mixture too soft to shape: If the nut-cocoa combination feels oily or sticky, chill it 15–30 minutes. Cold firms the fats and makes rolling easy. Over-processed paste: If you go too far in the processor the nuts will turn into a smooth nut butter. Stop pulsing when the mixture holds together under light pressure.
Chocolate seizes or becomes grainy: This happens if water gets into the melted chocolate or it’s overheated. Use fully dry utensils, and melt gently in short bursts while stirring. If it seizes, add a small amount of neutral oil or warm cream to loosen it, but do so sparingly.
Burnt hazelnuts: Watch the oven closely at 400°F; nuts can go from toasted to bitter quickly. The smell and light browning are your cues to stop roasting.
Allergy-Friendly Swaps
Nut allergies are common, so here are a few options. Substitute toasted sunflower seeds in place of hazelnuts to mimic the crunchy center; process them the same way and adjust the sugar to taste. For the coating, use dairy-free or soy-based chocolate chips labeled suitable for allergies. If cross-contamination is a concern, choose seeds and chocolates that are certified nut-free.
If cocoa is an issue, omit it and make small nut-free “praline” bites by processing seeds with a bit of sugar and vanilla. Keep in mind that changing the base ingredient will alter flavor and texture; taste as you go.
What I Learned Testing
Less is more with processing. You want crumbly, not buttery. When I over-processed batches in early testing, the centers became dense and oily. Stopping while the mixture still held some texture produced a much better contrast between the inner chew and the outer chocolate shell.
Another lesson: a brief chill solves many problems. Chilling before shaping helps the mixture form clean spheres. Chilling the coated candies makes the chocolate set faster and prevents fingerprints and smudges. Finally, whole nuts as centers are delightful but optional; I like them for the classic Ferrero Rocher aesthetic, but many people prefer the consistent bite of a nut-embedded center.
Storing Tips & Timelines
Store the finished chocolates in an airtight container in the fridge if your kitchen is warm. They’ll keep well for about 1 week refrigerated. At cooler room temperatures (under 70°F) you can store them in an airtight container for 3–4 days. Avoid direct sunlight and strong odors; chocolate absorbs smells easily.
Freezing is possible for longer storage: place the chilled candies in a single layer on a tray to freeze solid, then transfer to a sealed container with parchment between layers. Thaw in the refrigerator before serving to avoid condensation forming on the chocolate.
Popular Questions
Are these the same as store-bought Ferrero Rocher?
They capture the core elements — hazelnut center, chocolate coating, crunchy exterior — but won’t be identical. Store-bought versions use specialized processes and specific fillings. Homemade has fresher flavor and allows customization.
Can I use a food processor instead of a high-speed blender?
Yes. A food processor is preferred for this recipe because it handles the nuts well. Pulse in short bursts and scrape the sides for even texture.
Do I have to use a whole hazelnut center?
No. The whole hazelnut is optional (step 5). The balls are tasty without it and sometimes hold together better for smaller sizes.
How do I prevent the chocolate from becoming dull after setting?
For a glossy finish, tempering is the professional route, but for most home cooks a clean melt and quick chill are fine. Use good-quality chocolate and avoid moisture. If you want shine without tempering, melt slowly and stir thoroughly, then set quickly in a cool environment.
Can I make these ahead for gift-giving?
Yes. Make them and chill fully, then pack in a sturdy box with parchment. Keep them cool during transport. If you’re worried about melting, store and transport in a cooler with an ice pack, especially in warm weather.
Hungry for More?
If you enjoyed these, try making small variations: roll the centers in finely chopped toasted hazelnuts before chilling, or experiment with different chocolate percentages for the coating. You can also use the same hazelnut-cocoa mixture as a filling for tartlets or folded into whipped cream for an easy mousse. Keep a small batch recipe handy — they disappear fast.

Homemade Ferrero Rocher
Ingredients
Ingredients
- 2 cupshazelnuts
- 1/4 cupcocoa powderor cacao powder
- 1/4 cupsugaror granulated sweetener of choice
- 1/4 tspsalt
- 1/8 tsppure vanilla extract
- whole and chopped roasted hazelnuts optional for garnish
- 1/2 cupchocolate chips optional for coating
Instructions
Instructions
- If using raw hazelnuts: preheat oven to 400°F. Spread 2 cups hazelnuts in a single layer on a parchment-lined baking sheet and roast 6 minutes or until they begin to brown and smell toasted. Let cool slightly, then place in a clean kitchen towel or paper towel and rub to remove most of the skins. It’s fine if some skins remain. If using already-roasted hazelnuts, skip this step.
- Place the roasted hazelnuts in a food processor or high-speed blender. Process until the nuts are very finely chopped and crumbly, about 20 seconds (timing may vary). Scrape down the sides as needed.
- Add 1/4 cup cocoa powder (or cacao powder), 1/4 cup sugar (or granulated sweetener), 1/4 tsp salt, and 1/8 tsp pure vanilla extract to the processor. Pulse or blend just until everything is evenly incorporated and the mixture holds together when pressed. Avoid over-processing into a smooth paste.
- Using a teaspoon or tablespoon, portion and roll the mixture into balls between your palms (about 1 inch or your preferred size). If the mixture is too soft to shape, refrigerate it 15–30 minutes and then shape.
- Optional: if you want a hazelnut center, press one whole roasted hazelnut into the center of each ball and reshape around it so the nut is enclosed or slightly embedded.
- Optional coating: melt 1/2 cup chocolate chips in the microwave in 20–30 second intervals, stirring between intervals until smooth, or melt in a heatproof bowl set over simmering water (double boiler). Dip each ball into the melted chocolate, letting excess drip off.
- Optional garnish: while the chocolate is still wet, roll or sprinkle the coated balls with chopped roasted hazelnuts as desired.
- Place finished candies on parchment and chill 15–30 minutes or until the chocolate is set. Store in an airtight container.
Equipment
- Oven
- Baking Sheet
- Parchment Paper
- Kitchen Towel
- Food processor or high-speed blender
- microwave or double boiler
- Heatproof bowl
Notes
Serve them at your next party, along with these
Lemon Truffles
.


