
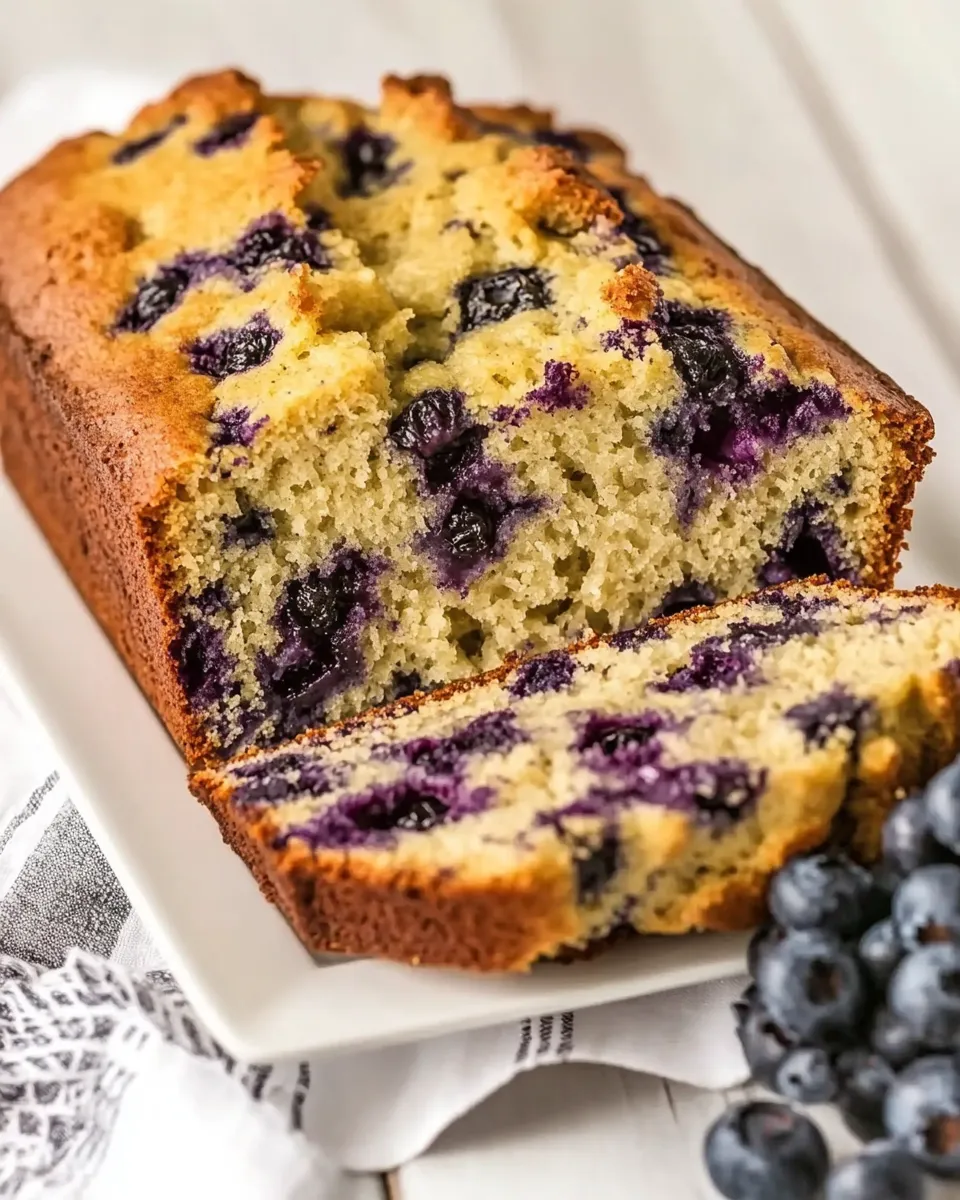
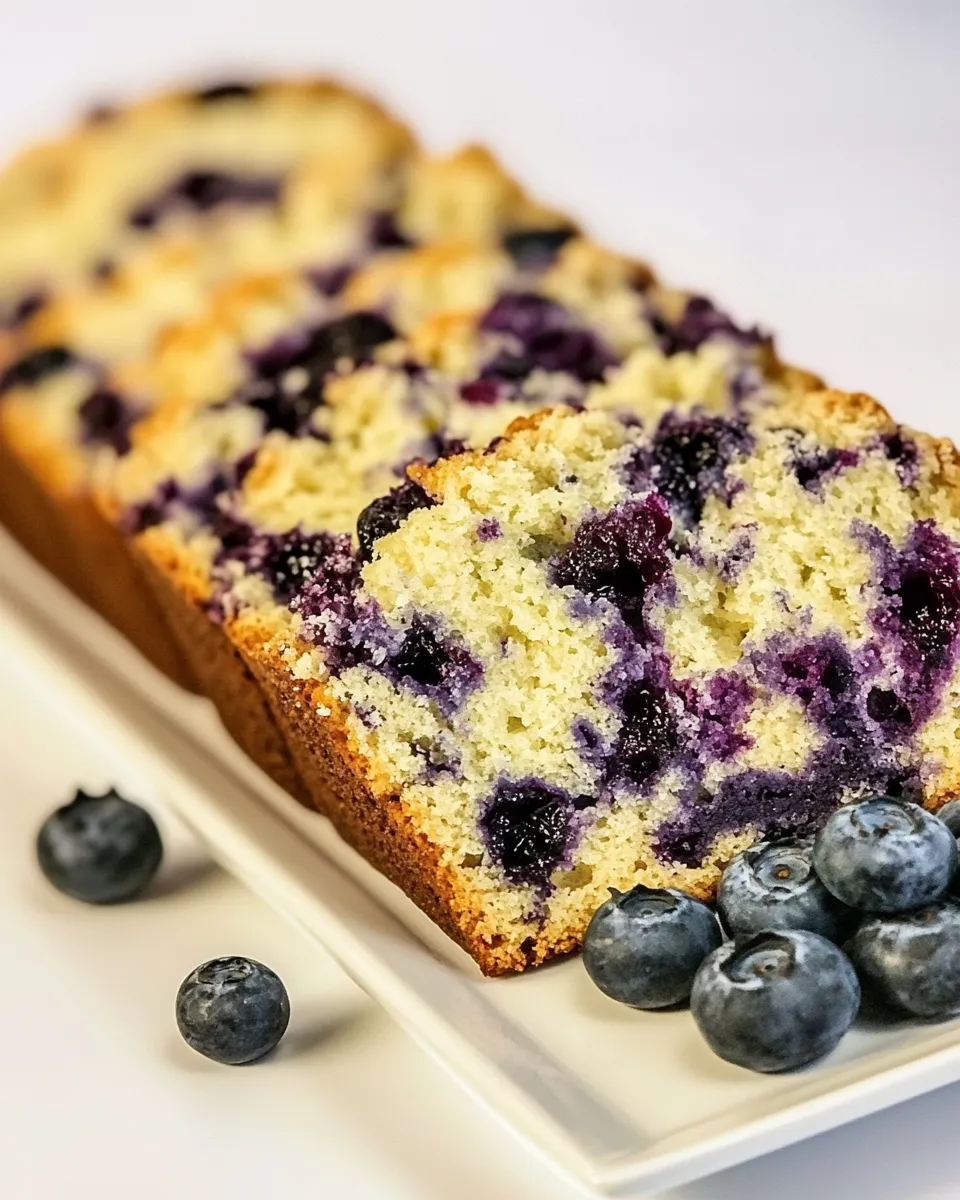
This bread is exactly what the title promises: moist, straightforward, and studded with bright berries. It doesn’t rely on tricks—just a simple batter, a little patience, and a quick brush of butter at the end for a glossy finish. The crumb is tender, the top is slightly crackly if you sprinkle a bit of sugar, and the blueberries keep every slice lively.
I test this loaf often when I want something that feels homemade without drama. It comes together in one wet bowl and one dry bowl, so cleanup stays light. Follow the steps in order, watch the bake time, and you’ll have a loaf that slices cleanly and keeps well for several days.
Below you’ll find a compact shopping guide, the exact ingredient list and method, plus practical tips for substitutions, troubleshooting, and storage. Read the ingredients and directions once, then work steadily—this bread rewards a calm, measured approach.
Your Shopping Guide

When you shop for this loaf, prioritize fresh berries and basic pantry staples you know you’ll use again. You don’t need specialty items. Pick blueberries that are firm and plump—avoid any that look mushy or shriveled. The extra-fresh berries make the biggest difference in texture and flavor.
Buy ingredients in amounts that match your planned baking frequency. A standard 9×5-inch loaf pan is the size this recipe assumes, so if you don’t have one, pick one up. The leavening and sugar amounts are tuned to this pan size and oven temperature, so measure carefully.
Moist Blueberry Bread, Made Easy
Ingredients
- 2 cups fresh blueberries (washed and dried) — the star: fresh berries hold shape best and give fresh bursts of flavor.
- 2 teaspoons all-purpose flour (to coat the blueberries) — keeps berries from sinking to the bottom of the loaf.
- 2 cups all-purpose flour — structure for the loaf; measure by spooning into the cup and leveling off.
- ¾ cup granulated sugar — sweetens and helps with browning and tenderness.
- 2½ teaspoons baking powder — primary leavener to give the loaf lift.
- ½ teaspoon baking soda — works with the other leavener to balance rise and crumb.
- ½ teaspoon salt — enhances flavor and balances sweetness.
- 2 large eggs — provide structure and moisture; room temperature eggs blend more smoothly.
- ½ cup whole milk (plus 2 teaspoons) — adds richness and moisture.
- ½ cup vegetable oil — keeps the crumb tender and stays moist as the loaf cools.
- 2 teaspoons pure vanilla extract — flavor backbone; use good-quality vanilla for the best result.
- 2 teaspoons granulated sugar (for garnish (optional)) — optional crunch and sparkle on the top.
- 1 tablespoon melted butter (to brush on bread after removing from the oven) — brushes the crust soft and adds a bit of shine and richness.
- Preheat the oven to 350°F. Lightly spray a 9×5-inch loaf pan with nonstick spray and set it aside.
- Place the 2 cups washed and dried blueberries in a bowl, sprinkle the 2 teaspoons all-purpose flour over them, and gently toss until the berries are evenly coated. Shake off any loose excess flour and set the coated blueberries aside.
- In a large mixing bowl, whisk together 2 cups all-purpose flour, 3/4 cup granulated sugar, 2 1/2 teaspoons baking powder, 1/2 teaspoon baking soda, and 1/2 teaspoon salt until evenly combined.
- In a medium mixing bowl, whisk together the 2 large eggs, 1/2 cup plus 2 teaspoons whole milk, 1/2 cup vegetable oil, and 2 teaspoons pure vanilla extract until smooth.
- Pour the wet mixture into the dry ingredients and gently stir with a wooden spoon or rubber spatula until no dry streaks remain. Stir only until combined—do not overmix.
- Fold the coated blueberries into the batter carefully to avoid crushing them.
- Spoon the batter into the prepared loaf pan and smooth the top. If using, sprinkle the 2 teaspoons granulated sugar evenly over the top of the batter.
- Bake for 45 to 50 minutes, or until a knife or toothpick inserted into the center comes out clean or with a few moist crumbs.
- Remove the pan from the oven and let the bread rest in the pan for 20 minutes.
- After 20 minutes, transfer the bread from the pan to a cooling rack. Using a pastry brush, brush the top with 1 tablespoon melted butter.
- Allow the bread to cool completely on the rack before slicing and serving.
The Upside of Moist Blueberry Bread
This loaf hits the sweet spot between quick bread and comfort baking. It’s fast to assemble, forgiving on small measurement slips, and versatile: serve it at breakfast with coffee, cut it for an afternoon snack, or bring it to a potluck. Because of the oil in the batter, the crumb stays tender for days—no dry edges after the first day.
Texture matters here: the combination of baking powder and a touch of baking soda creates reliable lift without coarseness. Coating the blueberries in a little flour keeps them suspended in the batter so each slice shows beautiful, evenly distributed berries. A light brush of butter after baking adds sheen and flavor without weighing the top down.
Smart Substitutions
If you need to tweak the recipe, choose swaps that preserve fat and liquid so the texture stays right.
- Whole milk — swap for any unsweetened plant-based milk (oat, soy, or almond) if you need dairy-free results.
- Vegetable oil — swap for a neutral oil like canola or a mild-flavored olive oil. You can also use melted butter for a richer flavor.
- Fresh blueberries — if frozen is all you have, do not thaw completely and toss them in the flour the same way; expect a slightly bluer crumb and increased moisture.
- Granulated sugar — light brown sugar can be used, but expect a slightly denser crumb and a hint of caramel flavor.
Kitchen Gear Checklist
- 9×5-inch loaf pan (the recipe’s rise and timing depend on this size).
- Mixing bowls — one large for dry ingredients, one medium for wet.
- Measuring cups and spoons — accurate measuring keeps the balance between liquid and dry.
- Whisk and rubber spatula or wooden spoon — whisk for dry and wet, spatula for folding.
- Pastry brush — for brushing the melted butter on the cooled loaf.
- Cooling rack — allows the loaf to cool evenly and avoids soggy bottoms.
- Toothpick or thin knife — for testing doneness.
Problems & Prevention
Here are common issues and how to avoid them.
- Dense loaf: Overmixing after the wet and dry are combined is the usual culprit. Mix only until the ingredients are incorporated—some small lumps are fine.
- Soggy bottom: Underbaking or removing the loaf too soon from the pan can cause excess moisture. Use a toothpick test and allow the 20-minute rest in the pan before unmolding.
- Berries sank to the bottom: Make sure the berries are well coated in the 2 teaspoons of flour and shake off loose flour before folding them in. Also, folding gently keeps them suspended.
- Top cracks excessively or browns too fast: If your oven runs hot, tent the loaf loosely with foil for the last 10–15 minutes.
- Crumb is too crumbly: Check that you measured the flour correctly. Spoon the flour into the cup and level it off rather than scooping directly with the measuring cup.
Allergy-Friendly Swaps
Quick ideas to adapt the loaf for common dietary needs. If you try these, keep an eye on texture and adjust bake time as needed.
- Dairy-free: Use unsweetened plant-based milk in place of the whole milk and a dairy-free butter or oil for brushing after baking.
- Egg-free: Try a commercial egg replacer following the package instructions, or use an egg substitute recommended by your preferred product—some require different ratios, so follow packaging guidance.
- Gluten-free: Use a cup-for-cup gluten-free all-purpose flour blend that contains xanthan gum. The loaf may be slightly denser; watch the bake time and test with a toothpick.
Behind-the-Scenes Notes
A few technique notes that explain why the recipe works the way it does. First, oil keeps the crumb softer and gives the loaf better keeping qualities compared with butter used entirely inside the batter. The little added milk (the extra 2 teaspoons) rounds measurements so wet and dry combine smoothly; it’s small but intentional.
Coating blueberries in flour is an old baker’s trick. The thin flour layer gives berries something to cling to and helps prevent them from sinking. The brief 20-minute rest in the pan lets internal structure set so the loaf unmolds without collapsing. Brushing melted butter after baking softens the crust and carries a subtle richness onto the surface—plus it makes the color look professional.
Save It for Later
Storage is simple. Room temperature: wrapped tightly in plastic wrap or stored in an airtight container, the loaf keeps well for 2–3 days. Refrigerate for up to a week; bring slices to room temperature or warm briefly before serving for best texture.
Freezing: wrap the cooled loaf tightly in plastic wrap, then again in foil or a freezer bag. Freeze up to three months. Thaw overnight in the refrigerator or at room temperature for a few hours. Rewarm slices in a toaster oven or microwave for a few seconds to refresh texture.
Handy Q&A
Q: Can I use frozen blueberries?
A: Yes. Do not thaw completely; fold the still-frozen berries into the batter and expect a slightly bluer crumb. Coat them in the 2 teaspoons of flour the same way to reduce sinking.
Q: How can I check for doneness without overbaking?
A: Insert a toothpick or thin knife into the center at 45 minutes. If it comes out clean or with a few moist crumbs, the loaf is done. If wet batter clings, give it another 3–5 minutes and test again.
Q: My bread is browning too quickly. What should I do?
A: Tent the top with foil loosely during the final 10–15 minutes of baking to prevent over-browning while the center finishes rising and cooking.
Save & Share
If you make this loaf, take a photo of the cross-section—those berry pockets and tender crumb are what you’re aiming for. Share the result with friends or leave a note on the blog about any tweaks you tried. Baking is iterative; small changes to timing, oven temperature, or berry choice will personalize the loaf.
This recipe is reliable and forgiving. With clean bowls, measured ingredients, gentle mixing, and a bit of patience, you’ll have a moist blueberry bread that feels like a warm kitchen in every slice. Enjoy.
Moist Blueberry Bread
Ingredients
Ingredients
- 2 cupsfresh blueberries washed and dried
- 2 teaspoonsall-purpose flour to coat the blueberries
- 2 cupsall-purpose flour
- 3/4 cupgranulated sugar
- 2 1/2 teaspoonsbaking powder
- 1/2 teaspoonbaking soda
- 1/2 teaspoonsalt
- 2 large eggs
- 1/2 cupwhole milk plus 2 teaspoons
- 1/2 cupvegetable oil
- 2 teaspoonspure vanilla extract
- 2 teaspoonsgranulated sugar for garnish (optional)
- 1 tablespoonmelted butter to brush on bread after removing from the oven
Instructions
Instructions
- Preheat the oven to 350°F. Lightly spray a 9×5-inch loaf pan with nonstick spray and set it aside.
- Place the 2 cups washed and dried blueberries in a bowl, sprinkle the 2 teaspoons all-purpose flour over them, and gently toss until the berries are evenly coated. Shake off any loose excess flour and set the coated blueberries aside.
- In a large mixing bowl, whisk together 2 cups all-purpose flour, 3/4 cup granulated sugar, 2 1/2 teaspoons baking powder, 1/2 teaspoon baking soda, and 1/2 teaspoon salt until evenly combined.
- In a medium mixing bowl, whisk together the 2 large eggs, 1/2 cup plus 2 teaspoons whole milk, 1/2 cup vegetable oil, and 2 teaspoons pure vanilla extract until smooth.
- Pour the wet mixture into the dry ingredients and gently stir with a wooden spoon or rubber spatula until no dry streaks remain. Stir only until combined—do not overmix.
- Fold the coated blueberries into the batter carefully to avoid crushing them.
- Spoon the batter into the prepared loaf pan and smooth the top. If using, sprinkle the 2 teaspoons granulated sugar evenly over the top of the batter.
- Bake for 45 to 50 minutes, or until a knife or toothpick inserted into the center comes out clean or with a few moist crumbs.
- Remove the pan from the oven and let the bread rest in the pan for 20 minutes.
- After 20 minutes, transfer the bread from the pan to a cooling rack. Using a pastry brush, brush the top with 1 tablespoon melted butter.
- Allow the bread to cool completely on the rack before slicing and serving.
Equipment
- 9x5-inch loaf pan
- Mixing bowls
- Whisk
- wooden spoon or rubber spatula
- Spatula
- Pastry Brush
Notes
Coating the blueberries in flour will help keep them suspended in the bread while baking, so you will have a nice distribution throughout.
Be very gentle folding in the blueberries to minimize streaking in the bread or crushing the berries
Oven temperatures vary and may need to be recalibrated periodically to ensure they are accurate. Make sure to check your bread at the lower end of the recommended baking time.


