
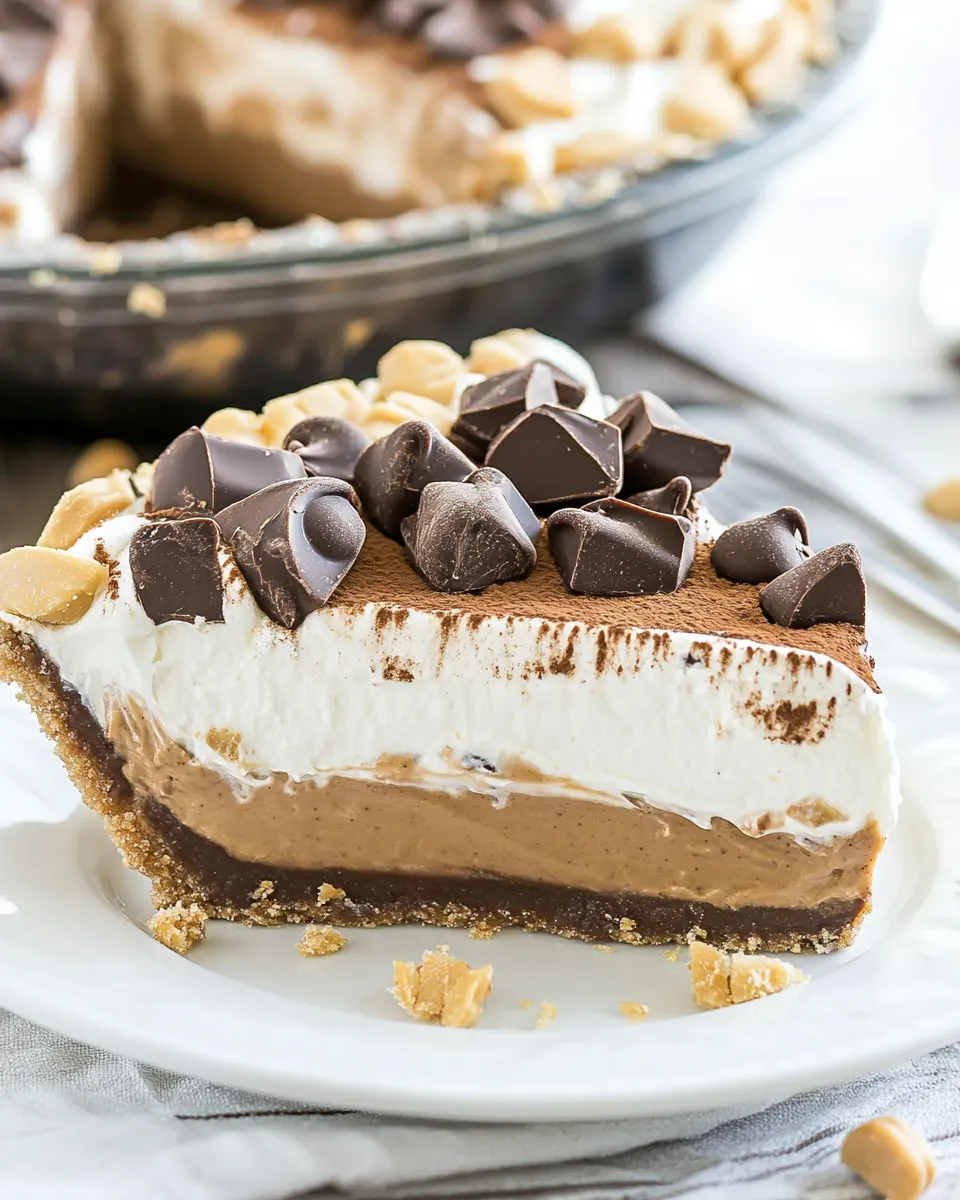
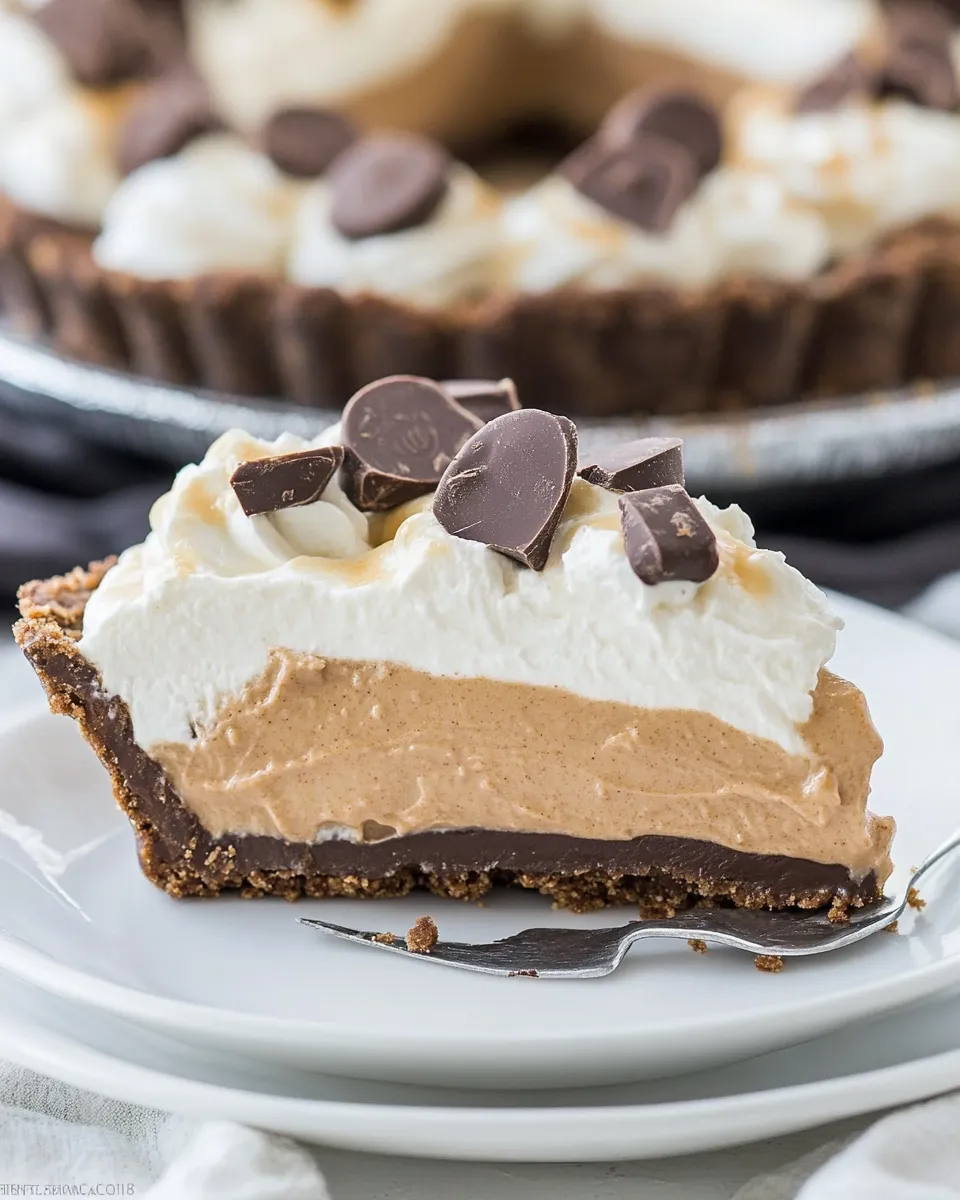
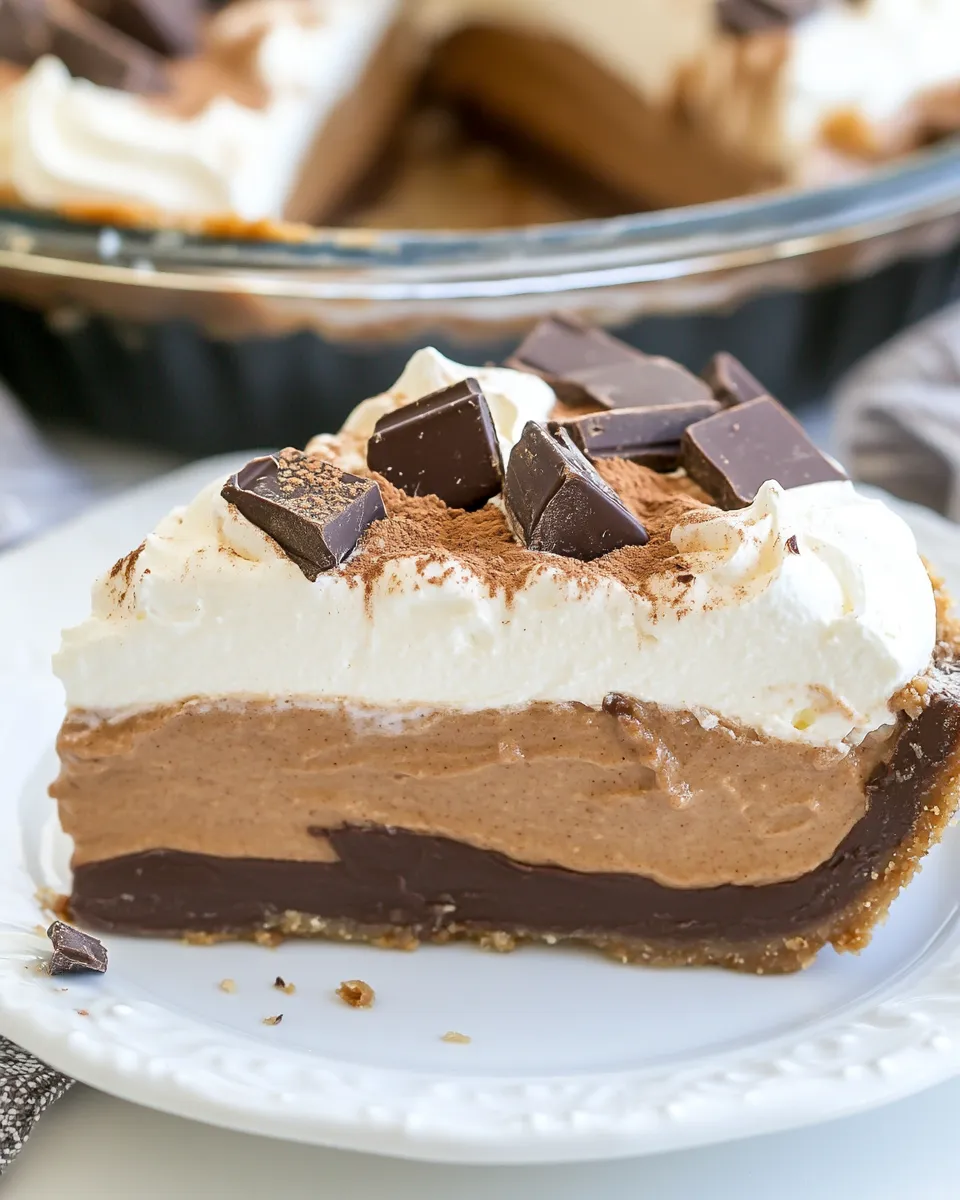
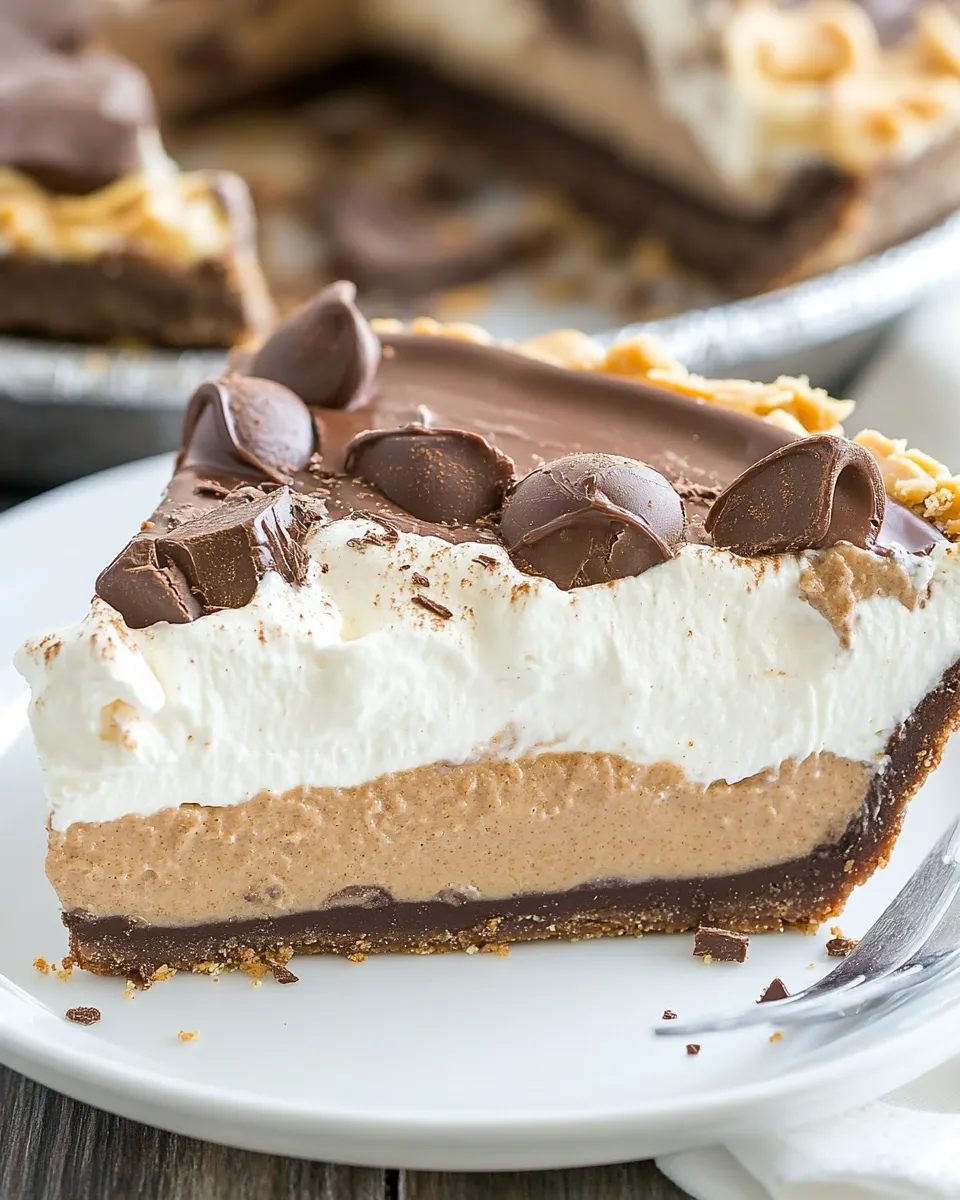
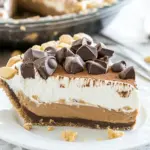
This is one of those desserts that looks like it took a lot of work but actually doesn’t. Layers of Oreo crust, a creamy peanut butter filling, rich chocolate, and a cloud of whipped cream—everything comes together without turning on the oven. I make this for potlucks, weeknight treats, and whenever someone mentions “peanut butter and chocolate” like it’s an emergency.
I’ll walk you through the exact ingredients and steps I use, explain why each step matters, and give practical fixes if anything goes sideways. No fluff. Just clear guidance so the first slice looks as good as the last.
If you like a sturdy crust, bold peanut butter flavor, and a silky chocolate layer that isn’t too sweet, you’re in the right place. Stick to the order in the recipe and chill times, and this pie will slice cleanly and taste even better the next day.
The Ingredient Lineup
- 25 Oreo Cookies — Crushed into fine crumbs to form the base and structure of the crust.
- 6 tablespoons butter, melted — Binds the crumbs and firms the crust when chilled.
- 1 14 ounce can sweetened condensed milk, divided — Half goes into the chocolate layer for creaminess and sweetness; the other half blends with peanut butter for a smooth, spreadable filling.
- 4 ounces semi-sweet baking chocolate — Provides the chocolate layer; reserve 1 ounce for shavings and chop/melt the remaining 3 ounces.
- 3 teaspoons vanilla extract, divided — Adds depth; split across chocolate, peanut butter mixture, and whipped cream as directed.
- 1/2 cup peanut butter — I use Skippy Naturals; combines with condensed milk for a rich peanut butter layer.
- 2 cups heavy whipping cream, cold — Whipped to stiff peaks to lighten both fillings and top the pie.
- 3 tablespoons powdered sugar — Sweetens and stabilizes the whipped cream so it holds shape on top.
Directions: No-Bake Peanut Butter Chocolate Cream Pie
- Place 25 Oreo cookies in a large resealable plastic bag and crush with a rolling pin to fine crumbs, or pulse to crumbs in a food processor.
- Put the crumbs in a medium bowl, add 6 tablespoons melted butter, and stir with a fork until the crumbs are evenly moistened. Press the mixture into the bottom and up the sides of a 9-inch pie plate to form a crust. Chill in the refrigerator while you make the fillings.
- Reserve 1 ounce of the 4 ounces semi-sweet baking chocolate for shavings and set it aside. Chop the remaining 3 ounces of chocolate.
- Melt the chopped 3 ounces of chocolate in a medium bowl according to package directions: microwave in short intervals, stirring every 30 seconds, or melt over a double boiler, until smooth.
- Stir half of the 14-ounce can of sweetened condensed milk into the melted chocolate until smooth. Stir in 1 teaspoon vanilla extract. Let the chocolate mixture sit a few minutes, stirring occasionally to keep it spreadable.
- In a separate medium bowl, combine the remaining half of the sweetened condensed milk with 1/2 cup peanut butter and 1 teaspoon vanilla extract. Stir until smooth and uniform.
- In a chilled mixing bowl, whip 2 cups cold heavy whipping cream on high speed until it begins to thicken. Add 3 tablespoons powdered sugar and the remaining 1 teaspoon vanilla extract, then continue whipping to stiff peaks.
- Gently fold 1 cup of the whipped cream into the peanut butter mixture until combined but still light. Spread this peanut butter layer evenly into the prepared crust.
- Stir the chocolate mixture until smooth again. Gently fold 1 cup of the whipped cream into the chocolate mixture until combined and light. Spread the chocolate layer evenly over the peanut butter layer.
- Spread the remaining whipped cream over the top of the pie. Use a potato peeler on the reserved 1 ounce of chocolate to make shavings and sprinkle them over the whipped cream.
- Chill the pie in the refrigerator for at least 4 hours or overnight before slicing. Store loosely covered in the refrigerator and eat within 3 days.
The Upside of No-Bake Peanut Butter Chocolate Cream Pie
This pie is fast to assemble and requires no oven time, which is huge in summer or when you’ve already used the oven for the main course. The layered approach means clear, distinct flavors: a crunchy Oreo base, an unapologetically peanut-buttery middle, and a dark chocolate layer that pulls the whole thing together. The whipped cream brightens and lightens the overall texture so the pie never feels dense.
It’s also forgiving. Most of the effort is waiting for the pie to chill. If you over-whip a little, you can rescue it by folding in a spoonful of the reserved whipped cream or a splash of condensed milk. The structure comes from the crust and chilling, so short of melting the chocolate completely or skipping the chill time, you’ll still end up with a very good slice.
Low-Carb/Keto Alternatives
If you need to adapt this for lower carbs, the original is not low-carb friendly because of Oreos and sweetened condensed milk. Reasonable swaps to approximate the flavor while reducing carbs:
- For the crust: use crushed low-carb chocolate cookies or a mix of almond flour and cocoa with a keto-friendly sweetener and melted butter to form a firm crust.
- Replace sweetened condensed milk with a homemade reduced-carb condensed milk alternative (heavy cream + powdered erythritol reduced down) or a commercial keto condensed milk if you have one. Be cautious—texture and sweetness will differ.
- Use sugar-free peanut butter (no added sugar) and a sugar-free chocolate that behaves well when melted.
These swaps change texture and sweetness balance. Expect a slightly different mouthfeel and adjust sweeteners to taste.
Tools & Equipment Needed
- Large resealable plastic bag or food processor — for crushing the Oreos.
- Rolling pin (if using the bag) — to make fine crumbs.
- 9-inch pie plate — the recipe is scaled for this size.
- Medium bowls (2–3) — one for crust, one for chocolate, one for peanut butter mixture.
- Mixing bowl and electric mixer or stand mixer — to whip 2 cups heavy cream to stiff peaks.
- Fork or spatula — for mixing crumbs and folding whipped cream.
- Microwave-safe bowl or double boiler — to melt the chocolate safely.
- Potato peeler — for making chocolate shavings from the reserved 1 ounce.
- Refrigerator space — the pie needs at least 4 hours chilling.
Frequent Missteps to Avoid
Skip the chill and the pie will be too soft to slice. Give it the full 4 hours or overnight. Don’t try to speed-melt chocolate by blasting it in the microwave for too long; short bursts and stirring avoid seizing. When folding whipped cream into the chocolate or peanut butter mixtures, be gentle. Overworking will deflate the air and flatten the layers.
Another common slip: not reserving the 1 ounce of chocolate for shavings. It’s a small step but those shavings give the pie a finished, professional look. Finally, use cold cream and a chilled bowl for whipping—warm cream won’t reach stiff peaks reliably.
Fit It to Your Goals
Want a bolder peanut butter flavor? Use a natural peanut butter with strong peanut notes, but be aware it may be slightly oilier—stir it well so it blends smoothly with the condensed milk. Want a lighter pie? Whip the cream a touch longer for a fluffier texture, but stop at stiff peaks to keep structure. If you prefer more chocolate, fold a bit more chopped chocolate into the melted chocolate mixture (keep it smooth) or sprinkle extra shavings on top.
For a party, make the pie the day before. It’s one less thing to juggle and the flavors deepen overnight. For single servings, assemble in small jars or ramekins and shorten the crust press-in time; chilling still applies.
Testing Timeline
Follow this practical timeline when you’re making the pie for the first time so you don’t feel rushed:
- 0–10 minutes: Crush cookies and make crust; press into a 9-inch plate and chill.
- 10–25 minutes: Chop and melt chocolate; mix chocolate with half the condensed milk and vanilla.
- 25–35 minutes: Combine remaining condensed milk with peanut butter and vanilla.
- 35–50 minutes: Whip the cold heavy cream with powdered sugar and vanilla to stiff peaks.
- 50–70 minutes: Fold whipped cream into peanut butter mixture and spread into chilled crust; fold whipped cream into chocolate mixture and spread on top; top with remaining whipped cream and chocolate shavings.
- Chill 4 hours to overnight: Hands-off time. Longer chilling improves slicing.
Storage Pro Tips
Store loosely covered in the refrigerator and eat within 3 days for best texture. A tight cover can slightly compress the whipped cream, so a loose tent of plastic wrap or a pie dome works well. If you must freeze, slice into individual portions, wrap tightly, and freeze for up to a month; thaw in the fridge overnight. Note that freezing can change the whipped cream texture slightly, so fresh or refrigerated slices are preferable.
Top Questions & Answers
- Can I use a different cookie for the crust? Yes. Chocolate sandwich cookies give the familiar flavor and color, but a chocolate wafer or graham alternative works—just keep the amount to 25 cookies by volume and adjust crumbs to achieve the same consistency.
- What if my chocolate seizes while melting? Remove from heat and stir in a teaspoon of oil or a small splash of condensed milk to smooth it. Heat gently and stir frequently.
- Can I make the whipped cream more stable? Yes—use a stabilizer like a small amount of gelatin or a commercial whipped cream stabilizer if the pie will sit out longer than a few hours, though the recipe’s sugar helps stabilize it for normal use.
- Why divide the condensed milk? Dividing it balances sweetness and texture across the two main layers. The peanut butter layer needs the sweetness and binding ability, while the chocolate layer benefits from creaminess without becoming overly sweet.
Final Thoughts
This No-Bake Peanut Butter Chocolate Cream Pie is dependable and crowd-pleasing. It scales easily; double the filling for a deeper pie, or halve it for a smaller plate. The method—create a firm crust, build two airy but rich layers, and finish with whipped cream—works every time if you stick to the steps and respect chill time. Make it the night before for best results. Then serve confident slices and enjoy the way peanut butter and chocolate always bring people together.
No-Bake Peanut Butter Chocolate Cream Pie
Ingredients
Ingredients
- 25 Oreo Cookies
- 6 tablespoonsbuttermelted
- 114 ounce can sweetened condensed milk divided
- 4 ouncessemi-sweet baking chocolate
- 3 teaspoonsvanilla extractdivided
- 1/2 cuppeanut butterI use Skippy Naturals
- 2 cupsheavy whipping creamcold
- 3 tablespoonspowdered sugar
Instructions
Instructions
- Place 25 Oreo cookies in a large resealable plastic bag and crush with a rolling pin to fine crumbs, or pulse to crumbs in a food processor.
- Put the crumbs in a medium bowl, add 6 tablespoons melted butter, and stir with a fork until the crumbs are evenly moistened. Press the mixture into the bottom and up the sides of a 9-inch pie plate to form a crust. Chill in the refrigerator while you make the fillings.
- Reserve 1 ounce of the 4 ounces semi-sweet baking chocolate for shavings and set it aside. Chop the remaining 3 ounces of chocolate.
- Melt the chopped 3 ounces of chocolate in a medium bowl according to package directions: microwave in short intervals, stirring every 30 seconds, or melt over a double boiler, until smooth.
- Stir half of the 14-ounce can of sweetened condensed milk into the melted chocolate until smooth. Stir in 1 teaspoon vanilla extract. Let the chocolate mixture sit a few minutes, stirring occasionally to keep it spreadable.
- In a separate medium bowl, combine the remaining half of the sweetened condensed milk with 1/2 cup peanut butter and 1 teaspoon vanilla extract. Stir until smooth and uniform.
- In a chilled mixing bowl, whip 2 cups cold heavy whipping cream on high speed until it begins to thicken. Add 3 tablespoons powdered sugar and the remaining 1 teaspoon vanilla extract, then continue whipping to stiff peaks.
- Gently fold 1 cup of the whipped cream into the peanut butter mixture until combined but still light. Spread this peanut butter layer evenly into the prepared crust.
- Stir the chocolate mixture until smooth again. Gently fold 1 cup of the whipped cream into the chocolate mixture until combined and light. Spread the chocolate layer evenly over the peanut butter layer.
- Spread the remaining whipped cream over the top of the pie. Use a potato peeler on the reserved 1 ounce of chocolate to make shavings and sprinkle them over the whipped cream.
- Chill the pie in the refrigerator for at least 4 hours or overnight before slicing. Store loosely covered in the refrigerator and eat within 3 days.
Equipment
- Resealable Plastic Bag
- Rolling Pin
- Food Processor
- Medium Bowl
- Fork
- 9-inch pie plate
- Refrigerator
- Microwave
- Double Boiler
- chilled mixing bowl
- Electric Mixer
- Potato peeler
Notes
Store loosely covered in the refrigerator and eat within 3 days.


