
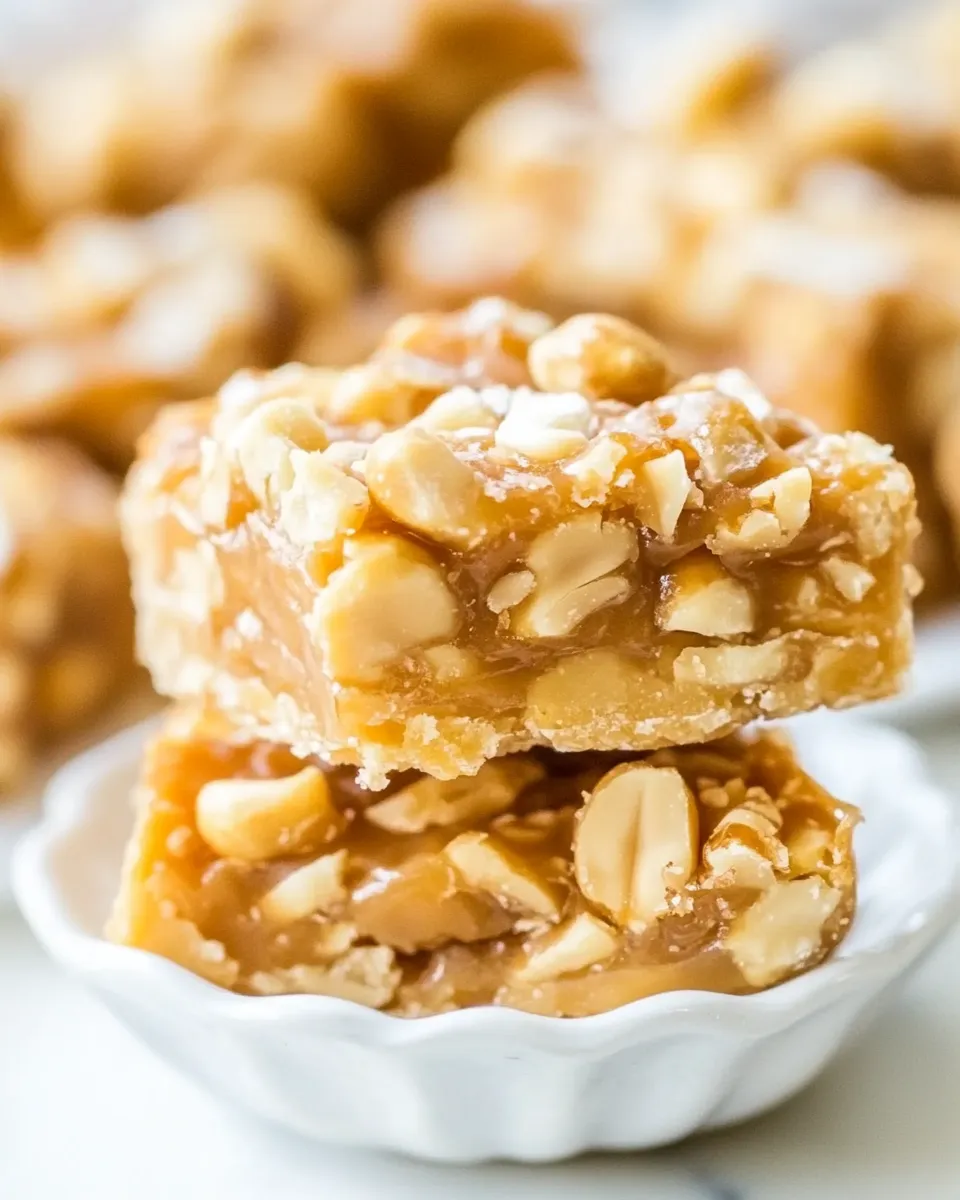
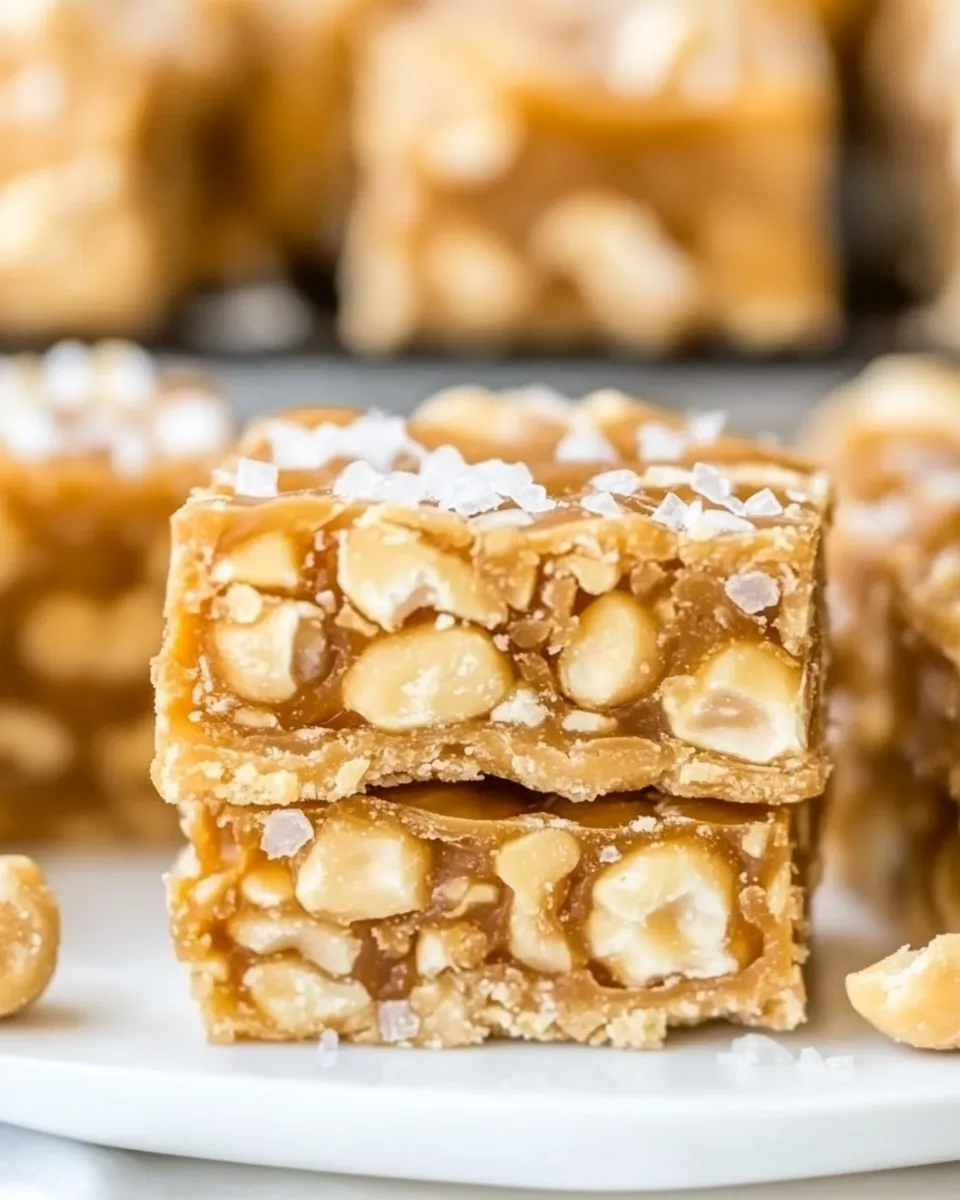
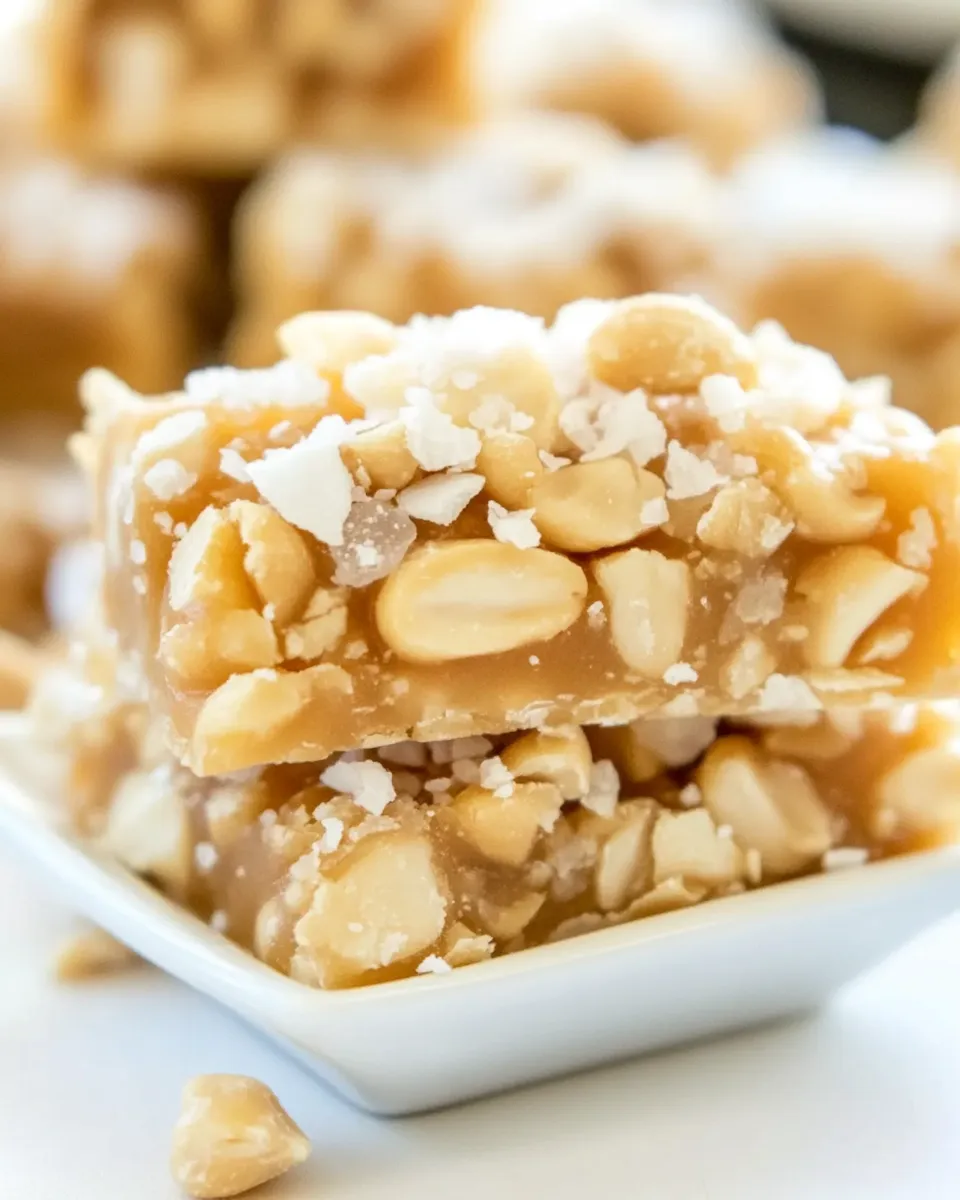
These bars are the kind of dessert I reach for when I want something that feels both nostalgic and a little grown-up. They’re crunchy, chewy, salty, and unapologetically peanut-forward. The base is a simple shortbread-style crust, topped with a layer of puffed marshmallows, and finished with a glossy peanut-butter-chip mixture loaded with Rice Krispies and salted peanuts. The contrast—soft marshmallow meeting crisp cereal and crunchy nuts—keeps every bite interesting.
I like to make these when I need a portable treat for a picnic, school bake sale, or a care package. They hold together well, slice cleanly when fully chilled, and travel without falling apart. You can scale up by doubling and using a 9×13 pan, but the 8×8 slab yields perfectly snackable bars that vanish fast.
No complicated tempering, no candy thermometer, no long chilling traps. The method is straightforward and forgiving if you follow a couple of timing tips. Read through the ingredient list and the steps before you start so the marshmallow stage and the melted-chip stage sync up without stress.
Ingredients at a Glance
- 1 cup all-purpose flour — provides the structure for the shortbread-like crust.
- 1/4 cup confectioners’ sugar — lightens the crust and adds a touch of sweetness without grit.
- 1/4 cup creamy peanut butter — deepens the peanut flavor and helps bind the crust.
- 1/2 cup unsalted butter, softened — creates tender, rich crust; use softened, not melted.
- about 2 heaping cups marshmallows (most of one 10-ounce bag) — the gooey middle layer; large marshmallows for thicker bars, mini for thinner.
- one 10-ounce bag peanut butter chips — the base for the crunchy, sticky topping; melts smoothly with the syrup and butter.
- 1/3 cup light-colored corn syrup (not ‘lite’) — keeps the topping glossy and pliable so it sets with a chewy snap.
- 2 tablespoons unsalted butter — adds richness to the melted chip mixture and helps emulsify.
- 2 teaspoons vanilla extract — rounds and brightens the peanut butter chips and corn syrup.
- 1 1/2 cups Rice Krispies or similar crispy rice cereal — gives the topping lift and crunch; it also soaks up some of the melted mixture so the bars hold together.
- 1 1/2 cups salted peanuts (or salted honey roasted peanuts) — delivers the salty counterpoint and extra crunch; salted peanuts balance the sweetness.
The Method for Salted Peanut Chews
- Preheat oven to 350°F (175°C). Line an 8×8-inch baking pan with aluminum foil, leaving some foil overhang to lift the bars out later, and spray the foil with cooking spray; set pan aside.
- Make the crust: in a large bowl combine 1 cup all-purpose flour and 1/4 cup confectioners’ sugar. Add 1/4 cup creamy peanut butter and 1/2 cup unsalted butter (softened).
- Cut the butter into the dry ingredients and peanut butter using two forks, a pastry cutter, or your fingertips until the mixture forms pea-sized crumbs and is evenly combined.
- Turn the crust mixture into the prepared pan and press it down firmly and evenly with your fingertips or the bottom of a measuring cup to form a smooth, compact layer.
- Bake the crust for 15 to 17 minutes, or until the crust is set (do not overbake or brown it). Remove the pan from the oven.
- Immediately and evenly sprinkle about 2 heaping cups marshmallows (most of one 10-ounce bag; use large marshmallows for thicker bars or mini marshmallows for thinner bars) over the hot crust.
- Return the pan to the oven and bake 2 to 4 minutes, watching closely after 2 minutes, until the marshmallows have puffed but are not browned. Remove the pan from the oven as soon as marshmallows are puffed.
- While the marshmallows are puffing, prepare the topping: in a large microwave-safe bowl combine one 10-ounce bag peanut butter chips, 1/3 cup light-colored corn syrup (not “lite”), and 2 tablespoons unsalted butter.
- Microwave the peanut butter chip mixture on high in 30-second intervals, stirring between intervals, until the mixture is fully melted and smooth (about 1.5–2 minutes total, depending on your microwave). Be careful not to overheat.
- Stir 2 teaspoons vanilla extract into the melted mixture until combined.
- Add 1 1/2 cups Rice Krispies (or similar crispy rice cereal) and 1 1/2 cups salted peanuts (or salted honey roasted peanuts) to the melted mixture and stir until the cereal and peanuts are evenly coated.
- Pour and spread the peanut-chip/cereal/peanut mixture over the puffed marshmallows in the pan, smoothing the top with a spatula and pressing down lightly so the layers adhere.
- Cover the pan with foil and refrigerate for at least 2 hours, or until the bars are fully set.
- Use the foil overhang to lift the set slab from the pan. Transfer to a cutting surface and slice into bars. Store bars airtight at room temperature for up to 5 days or freeze for up to 6 months.
Why This Recipe is a Keeper
There are a few reasons I keep this one in rotation. First, it’s fast—nothing fussy or time-consuming—and yet it tastes like something you might buy in a boutique candy shop. The texture layers are the real selling point: a tender, slightly salty crust; a marshmallow cushion that’s soft but not gummy; and a crunchy, sticky topping with toasted, salty peanuts. That interplay makes these bars addictive.
Second, the recipe is resilient. If your marshmallows puff a little more or your peanut-chip mixture needs an extra stir, the bars still set once chilled. The refrigerator step is forgiving, and the foil overhang trick makes removing and slicing tidy and predictable.
Finally, it’s crowd-pleasing. Kids love the gooey-top look. Adults appreciate the salted-peanut contrast and the crunch. These bars span potlucks and lunchboxes without drama.
Substitutions by Category

- Peanut base: The recipe relies on peanut butter chips and salted peanuts for the signature flavor—swap neither if you want the same taste. If you must change, try a chocolate-peanut hybrid by using half peanut butter chips and half milk chocolate chips, but expect a softer, sweeter top.
- Marshmallows: Large marshmallows yield a thicker, softer middle; mini marshmallows give thinner bars. Do not replace entirely with marshmallow fluff—its moisture changes set time.
- Cereal: Rice Krispies are recommended for light crunch. Avoid denser cereals (e.g., granola) unless you want chewier, heavier bars.
- Sweetener binder: Use light-colored corn syrup as written. Dark corn syrup changes color and flavor; “lite” varieties may alter texture and setting.
- Nuts: Salted peanuts are specified for balance. If you prefer a different nut, use salted cashews or salted almonds, but remember the flavor profile will shift away from classic peanut chews.
Prep & Cook Tools
- 8×8-inch baking pan: the recipe is sized for this; scaling changes bake and chill times.
- Aluminum foil: for lining and creating an overhang to lift the slab out cleanly.
- Cooking spray: prevents sticking to the foil.
- Large mixing bowl: for crust assembly.
- Forks, pastry cutter, or fingertips: to cut butter into the dry mix.
- Measuring cups and spoons: accuracy matters for the crust and topping.
- Microwave-safe bowl: for melting the peanut butter chips safely.
- Spatula: to spread the topping and smooth layers.
- Refrigerator: for setting the bars, at least 2 hours.
Steer Clear of These
Do not overbake the crust. The directions call for 15 to 17 minutes and explicitly warn against browning. If the crust browns, it becomes dry and breaks the texture balance of the bars.
Watch the marshmallows closely in the oven. Puffing happens fast after the first two minutes. Remove the pan as soon as they’re puffed—not browned—so the top stays soft and the melted-chip layer adheres smoothly.
When microwaving the peanut butter chip, stir between intervals and avoid overheating. Overheated chips can seize or become grainy. Aim for smooth, glossy melted chips before adding vanilla and mix-ins.
Variations for Dietary Needs
- Nut-free: This recipe is inherently peanut-forward. For a nut-free version, you’d need to replace peanut butter chips and peanuts with sunflower seed butter chips and roasted sunflower seeds; note the texture and flavor will differ. I recommend testing a small batch first.
- Gluten-free: Use a certified gluten-free all-purpose flour for the crust and gluten-free crispy rice cereal for the topping. Double-check labels on confectioners’ sugar and other processed items.
- Vegan: Significant swaps are required: use vegan butter, vegan peanut butter chips, and a vegan marshmallow alternative. Most commercial marshmallows contain gelatin, so a vegan-friendly marshmallow is essential. Expect the texture to change—especially the marshmallow layer.
- Lower sugar: This recipe is candy-like and not easily reduced for sugar without changing texture. Replacing corn syrup or chips isn’t recommended if you want the same consistency.
Flavor Logic
Each ingredient has a job. The flour, confectioners’ sugar, peanut butter, and softened butter create a shortbread-like crust that’s rich without being heavy. Confectioners’ sugar gives a silkier crumb than granulated sugar would. Creamy peanut butter adds fat and nut flavor into the crust, tying the base to the peanut-dominated topping.
The marshmallow layer functions like a glue and a marshmallow cushion. Puffing the marshmallows slightly softens them without browning, which gives a marshmallow bite that’s pleasant under the crunchy topping.
The melted peanut butter chips with corn syrup and butter make a glossy binder that coats the Rice Krispies and peanuts. Corn syrup prevents recrystallization and keeps that topping slightly chewy rather than brittle. Salted peanuts provide the salt contrast that makes the bars taste balanced rather than cloyingly sweet.
Shelf Life & Storage
Once set and sliced, store the bars airtight at room temperature for up to 5 days. Keep them in a single layer or separate layers with parchment if stacking to avoid sticking. The texture is best within the first 48 hours—marshmallow remains soft and the topping stays crisp.
For longer storage, freeze the bars in an airtight container for up to 6 months. To freeze, wrap individual bars in plastic wrap and then place them in a freezer-safe container or bag. Thaw in the refrigerator or at room temperature for 30–60 minutes before serving so they soften slightly and cut cleanly.
Popular Questions
Q: Can I toast the peanuts first?
A: Toasting intensifies flavor but isn’t necessary. If you toast, allow the peanuts to cool completely before mixing into the melted-chip mixture so you don’t melt the chips prematurely.
Q: My topping looks oily after cooling—why?
A: If the melted mixture sits too long before combining with the cereal and nuts, the fats can separate slightly. Stir quickly and press the topping down while warm so it adheres to the marshmallow layer. Refrigeration helps set it firmly.
Q: Can I make the topping on the stovetop instead of the microwave?
A: Yes. Use a double boiler or a heavy-bottomed saucepan over low heat, stirring constantly until smooth. Remove from heat, then stir in vanilla and mix-ins.
Q: Why is corn syrup necessary?
A: Light-colored corn syrup keeps the topping elastic and glossy. It prevents crystallization and helps the melted chips bind the cereal and peanuts. Substituting honey or maple syrup will change texture and flavor.
Q: The marshmallows didn’t puff much—now what?
A: If they don’t puff, you can briefly return the pan to the oven a minute or two longer, watching closely. Alternatively, microwave the marshmallow-topped pan in short bursts (careful—pan will be hot) until they puff.
Q: Can I double the recipe?
A: Yes. For a larger batch use a 9×13 pan and increase ingredients proportionally. Bake times and chilling times may vary; monitor crust doneness and set time carefully.
Before You Go
If you make these, slice them once fully chilled for the cleanest edges. I like to line up the bars on a plate and sprinkle a few extra salted peanuts over the top just before serving for a little theater—optional, but it looks nice. Leave feedback below, tell me how you tweaked the recipe, or tag a photo if you share on social—seeing your versions is my favorite part of posting a recipe.

Salted Peanut Chews
Ingredients
Ingredients
- 1 cupall-purpose flour
- 1/4 cupconfectioners sugar
- 1/4 cupcreamy peanut butter
- 1/2 cupunsalted butter softened
- about 2 heaping cups marshmallows most of one 10-ounce bag; I used large marshmallows, use mini if you prefer bars not as thick
- one 10-ounce bag peanut butter chips
- 1/3 cuplight-colored corn syrup not ‘lite’
- 2 tablespoonsunsalted butter
- 2 teaspoonsvanilla extract
- 1 1/2 cupsRice Krispies or similar crispy rice cereal
- 1 1/2 cupssalted peanuts or salted honey roasted peanuts
Instructions
Instructions
- Preheat oven to 350°F (175°C). Line an 8x8-inch baking pan with aluminum foil, leaving some foil overhang to lift the bars out later, and spray the foil with cooking spray; set pan aside.
- Make the crust: in a large bowl combine 1 cup all-purpose flour and 1/4 cup confectioners’ sugar. Add 1/4 cup creamy peanut butter and 1/2 cup unsalted butter (softened).
- Cut the butter into the dry ingredients and peanut butter using two forks, a pastry cutter, or your fingertips until the mixture forms pea-sized crumbs and is evenly combined.
- Turn the crust mixture into the prepared pan and press it down firmly and evenly with your fingertips or the bottom of a measuring cup to form a smooth, compact layer.
- Bake the crust for 15 to 17 minutes, or until the crust is set (do not overbake or brown it). Remove the pan from the oven.
- Immediately and evenly sprinkle about 2 heaping cups marshmallows (most of one 10-ounce bag; use large marshmallows for thicker bars or mini marshmallows for thinner bars) over the hot crust.
- Return the pan to the oven and bake 2 to 4 minutes, watching closely after 2 minutes, until the marshmallows have puffed but are not browned. Remove the pan from the oven as soon as marshmallows are puffed.
- While the marshmallows are puffing, prepare the topping: in a large microwave-safe bowl combine one 10-ounce bag peanut butter chips, 1/3 cup light-colored corn syrup (not “lite”), and 2 tablespoons unsalted butter.
- Microwave the peanut butter chip mixture on high in 30-second intervals, stirring between intervals, until the mixture is fully melted and smooth (about 1.5–2 minutes total, depending on your microwave). Be careful not to overheat.
- Stir 2 teaspoons vanilla extract into the melted mixture until combined.
- Add 1 1/2 cups Rice Krispies (or similar crispy rice cereal) and 1 1/2 cups salted peanuts (or salted honey roasted peanuts) to the melted mixture and stir until the cereal and peanuts are evenly coated.
- Pour and spread the peanut-chip/cereal/peanut mixture over the puffed marshmallows in the pan, smoothing the top with a spatula and pressing down lightly so the layers adhere.
- Cover the pan with foil and refrigerate for at least 2 hours, or until the bars are fully set.
- Use the foil overhang to lift the set slab from the pan. Transfer to a cutting surface and slice into bars. Store bars airtight at room temperature for up to 5 days or freeze for up to 6 months.
Equipment
- 8x8-inch baking pan
- Aluminum Foil
- Cooking spray
- Mixing Bowl
- Measuring Cups
- Measuring Spoons
- forks or pastry cutter
- Microwave-safe Bowl
- Spatula


