
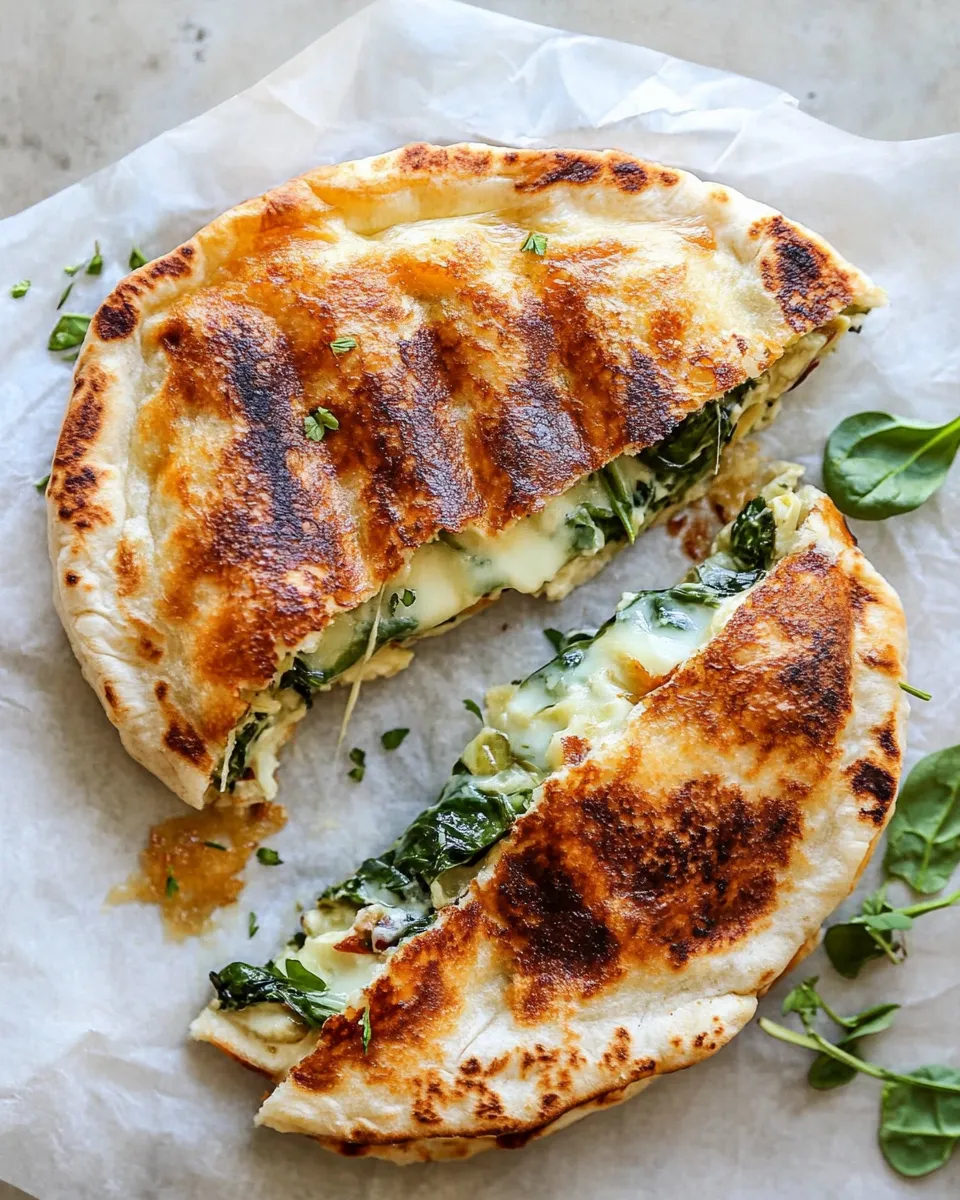
I love recipes that feel indulgent but are quick to pull together on a weeknight. This spinach and artichoke pita grilled cheese hits that sweet spot: melty cheese, bright herbs, tangy artichokes, and a crisp buttery shell all in a handheld package. It’s the kind of sandwich that fixes dinner and doubles as the best warmed-up snack the next day.
The technique is straightforward and forgiving, which makes it perfect for busy cooks and cheese lovers alike. You can use what you have on hand — the recipe intentionally leaves room for small swaps — but the core method stays the same: a compact, well-drained filling, a snug pita pocket, buttered outside, and a hot skillet to crisp and melt.
Below you’ll find a clear ingredient rundown, the exact step-by-step process, troubleshooting tips, storage advice, and a few creative variations. Read through once, then you’ll be ready to make these pitas in about 20 minutes from start to finish.
Ingredient Rundown
Ingredients
- 3/4 cup frozen spinach, thawed, and squeezed of excess water — removes excess moisture so the filling doesn’t make the pita soggy.
- 1 cup marinated jarred artichokes, chopped — adds tang and texture; use the jarred kind and chop for even distribution.
- 1 cup shredded gouda or fontina cheese — provides rich, melty flavor; choose gouda for smokier notes, fontina for creaminess.
- 1/2 cup shredded mozzarella cheese — stretches and melts smoothly to bind the filling.
- 1/4 cup grated parmesan cheese — gives a salty, savory finish that lifts the other cheeses.
- 1 clove garlic, grated — a small amount that delivers big aromatic impact; grating disperses it evenly.
- 1/4 cup fresh basil, chopped — bright, herbal contrast to the cheeses and artichokes.
- red pepper flakes — a pinch for heat; adjust to taste or omit for no spice.
- 4 small pitas — create pockets to hold the filling; if your pitas don’t have a pocket you’ll slice them in half as directed below.
- 3 tablespoons salted butter — spreads on the outside for a golden, crispy crust; salted butter seasons the exterior as it browns.
- honey, for serving — optional drizzle to balance savory with a touch of sweetness when serving.
Cooking (Spinach and Artichoke Pita Grilled Cheese): The Process
- If your frozen spinach is still frozen, thaw it and squeeze out as much excess water as possible; set the 3/4 cup spinach aside.
- In a medium bowl, combine the squeezed spinach, 1 cup chopped marinated artichokes, 1 cup shredded gouda or fontina, 1/2 cup shredded mozzarella, 1/4 cup grated parmesan, 1 grated garlic clove, 1/4 cup chopped fresh basil, and a pinch of red pepper flakes. Mix until evenly distributed.
- Prepare the pitas: cut open one side of each pita to create a pocket. If a pita has no pocket or you prefer, slice that pita in half so you have two open rounds to fill.
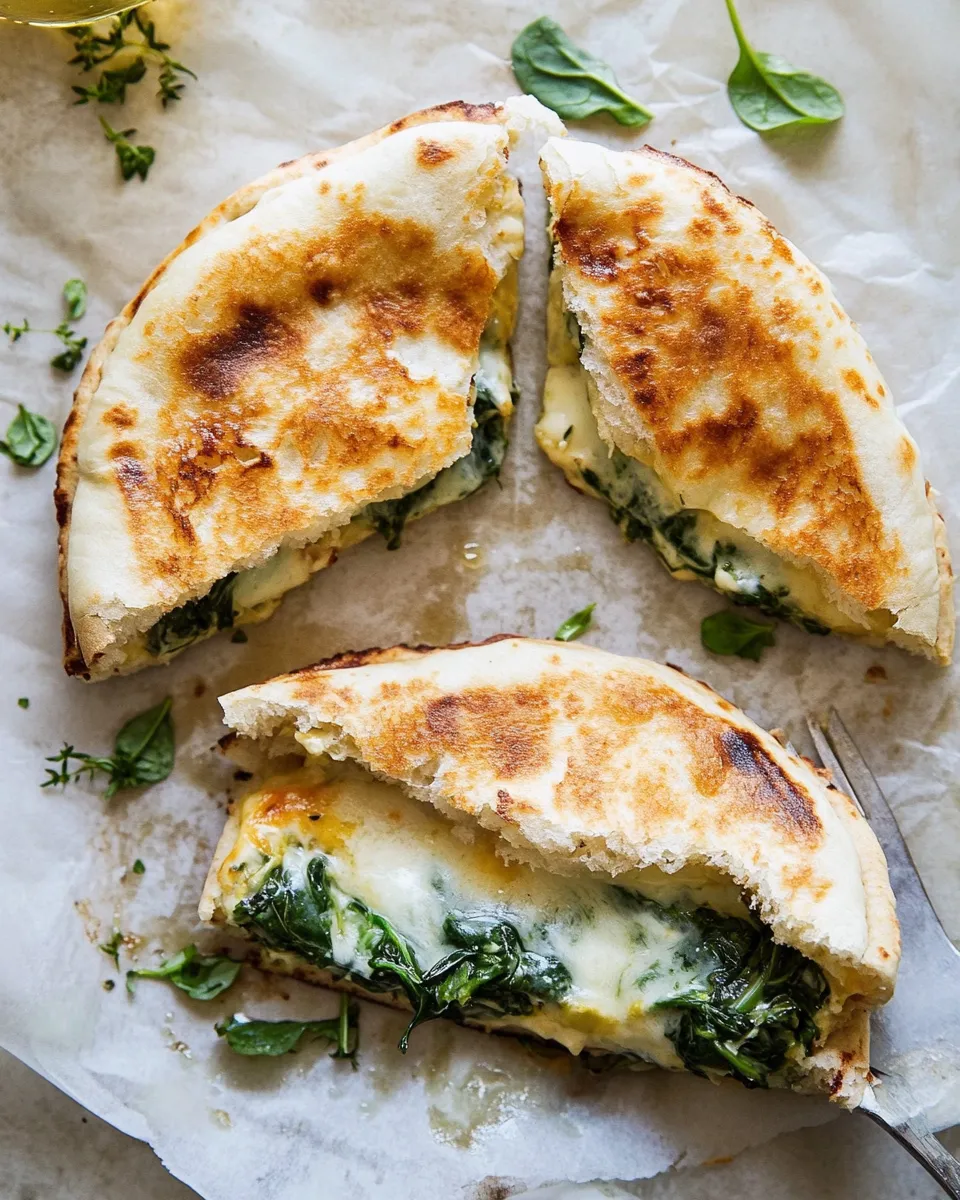
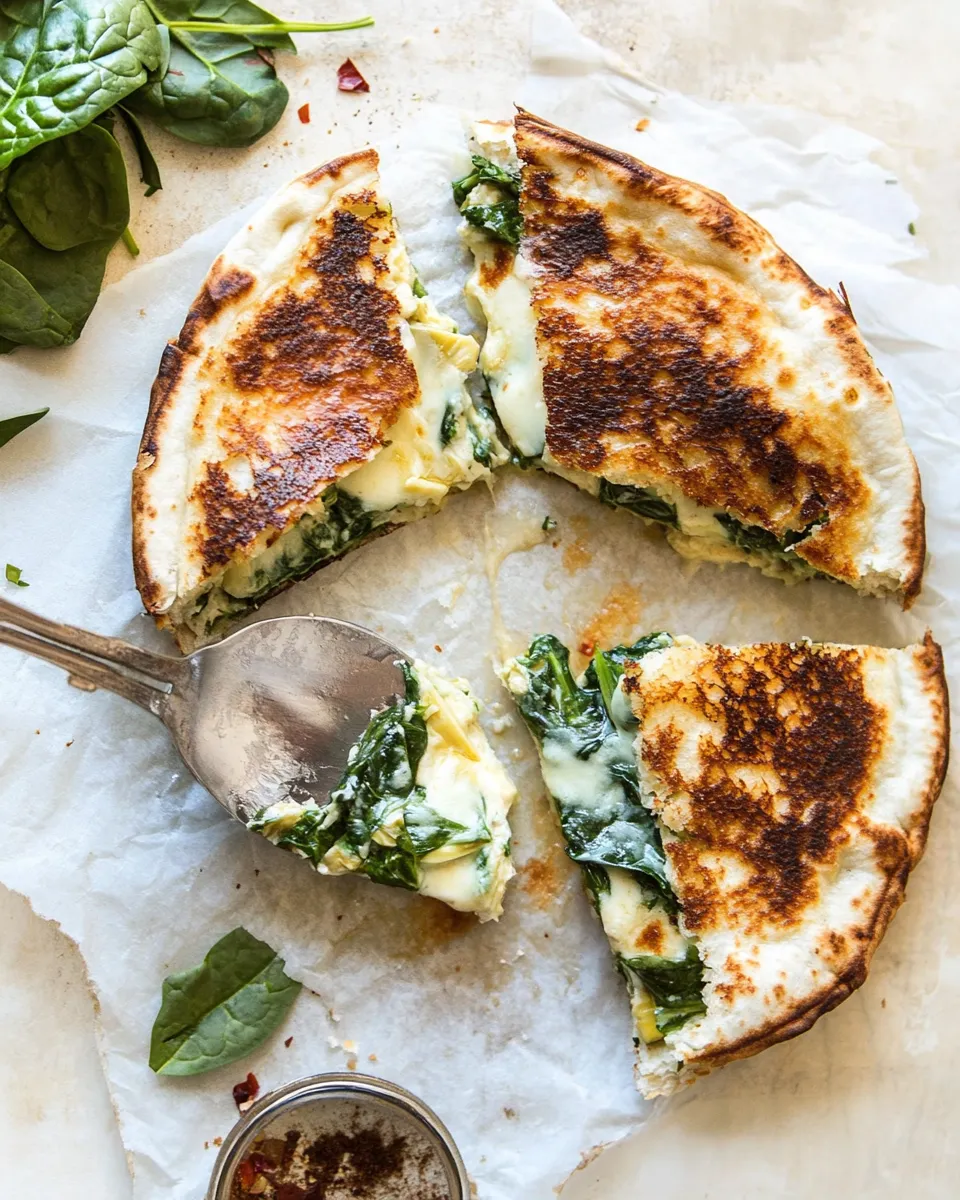
- Divide the cheese-and-vegetable mixture into four equal portions and stuff each pita pocket (or each open pita half) with one portion, pressing gently so the filling is compact but not overflowing.
- Spread the 3 tablespoons salted butter evenly over the outside surfaces of each filled pita (both sides). Use softened or slightly melted butter if needed to make spreading easier.
- Heat a large skillet over medium heat. Working in batches so the pan isn’t overcrowded (1–2 pitas at a time, depending on pan size), place the buttered pitas in the skillet and cook until golden and the cheese is melted, about 3–4 minutes per side, pressing lightly with a spatula as they cook.
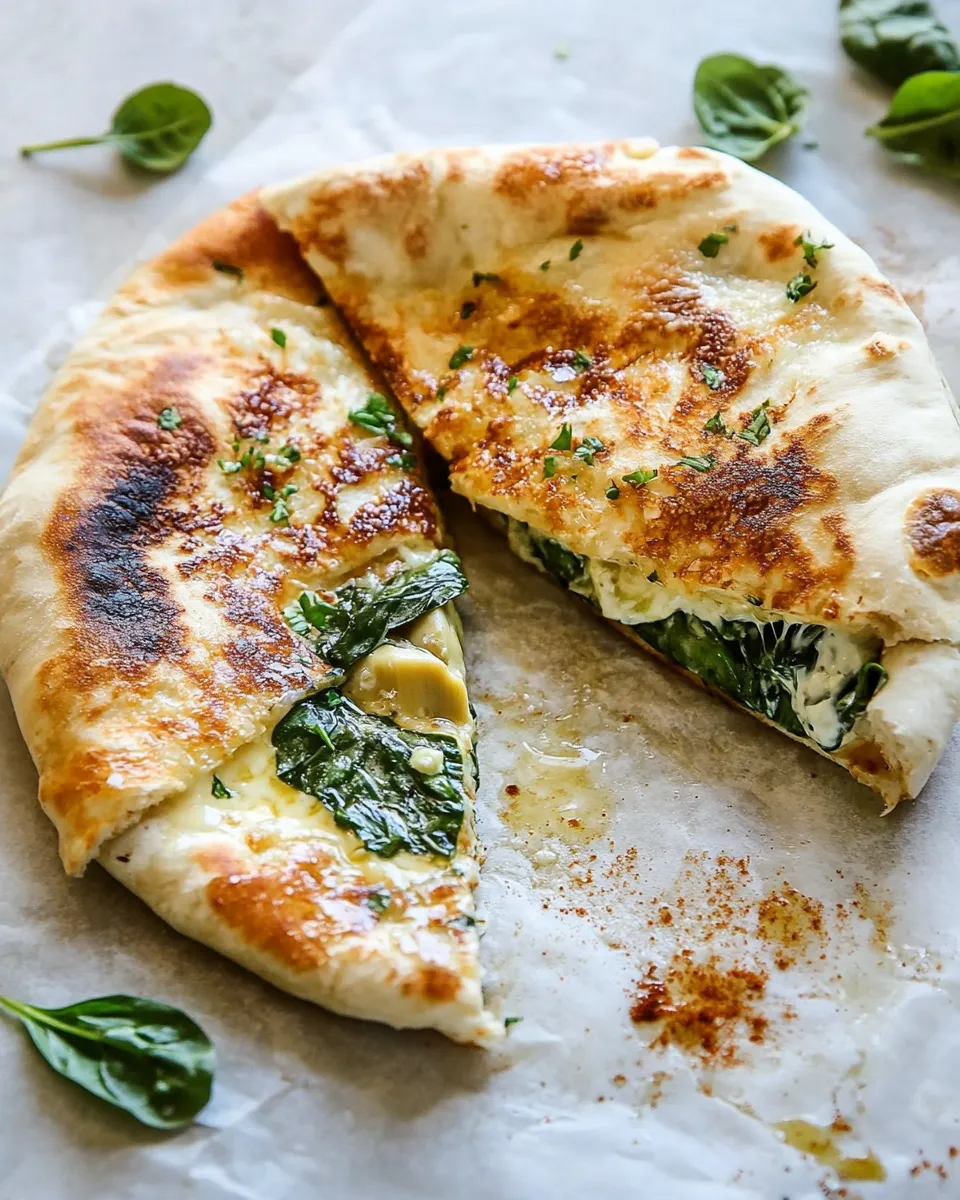
- Transfer cooked pitas to a cutting board, let rest briefly, then slice if desired. Serve drizzled with honey and with extra red pepper flakes for sprinkling, if you like.
Why It’s Crowd-Pleasing
There are three simple reasons people reach for this sandwich again and again: texture contrast, familiar flavors, and the novelty of a sandwich that feels both cozy and a little fancy. The crisp, browned exterior from the buttered pita gives a satisfying crunch. Inside, the blend of melting cheeses makes the filling seriously indulgent, while the artichokes and basil keep it from feeling one-note.
Honey at the end is optional but strategic — the brief touch of sweetness brightens the savory and tames any bitterness from the greens. Red pepper flakes add a subtle lift without overpowering. Taken together, those small contrasts make every bite interesting, which is exactly what a crowd-pleasing comfort food should do.
International Equivalents
This sandwich sits comfortably between several international concepts. Think of it as a Mediterranean take on a grilled cheese: the artichokes and basil echo antipasti flavors, similar to an Italian panini with a cheesy filling. If you replace the pita with flatbread or naan, you edge toward Middle Eastern street-food territory. With the stretchy mozzarella and buttery crust, it also resembles a compact quesadilla in technique, but with Mediterranean fillings rather than classic Mexican flavors.
None of those are direct replacements, but each gives a quick mental shortcut: if you like panini, you’ll like this; if you like spinach and artichoke dips, you’ll love it. It’s a fusion of familiar formats adapted to the ingredients listed here.
Setup & Equipment
Gather these tools before you start to streamline the process: a medium mixing bowl, a grater or microplane for the garlic and parmesan, a sturdy spatula for pressing and flipping, a large skillet (nonstick or cast-iron both work), a cutting board, and a knife to open the pitas. Measuring spoons are handy for the butter if you want precision, but you can eyeball softened butter as well.
Prep the filling in the bowl first, then assemble the pitas. That sequence keeps your hands clean and the cooktop free while you measure and mix. If you prefer, have a plate or wire rack ready to rest the cooked pitas so they don’t steam and lose crispness.
Pitfalls & How to Prevent Them
Common issues are easy to avoid if you know what to watch for.
- Soggy pita interior: make sure the spinach is thoroughly squeezed and the artichokes are well-drained. Excess moisture is the fastest route to a limp sandwich.
- Filling falls out: divide and pack the filling so it’s compact but not overflowing. Press gently when stuffing so the pocket stays intact during cooking.
- Butter burns on the pan: keep heat at medium rather than high. Butter browns best at moderate temperatures; if the pan is too hot the exterior will darken before the cheese melts.
- Cheese not fully melted: cook long enough on the first side, pressing lightly with your spatula. If your pan runs hot, reduce the flame slightly and give each side the full 3–4 minutes called for.
Seasonal Adaptations
Spring: swap frozen spinach for fresh baby spinach—blanch it quickly and squeeze dry, or wilt it gently in a pan before mixing. Add a few lemon zest shavings to the filling for brightness.
Summer: layer in chopped sun-dried tomatoes for an extra hit of umami and sweetness. Fresh basil is at its best in summer; don’t skimp.
Fall/Winter: use smoked gouda for a cozier, smokier profile and consider swapping basil for chopped parsley or oregano if basil isn’t at peak. You can also fold in a spoonful of ricotta to make the filling creamier — but keep it light so the pita stays crisp.
If You’re Curious
Curious cooks often ask how rigid the cheese choices are. The combination in this recipe balances melt (gouda/fontina and mozzarella) with salt and sharpness (parmesan). If you only have one melting cheese, use a full cup of it and a quarter cup of a sharper cheese if possible. The texture matters more than the exact varieties: creamy, melty cheeses plus a flavorful finishing cheese.
Another common curiosity: can you make these ahead? You can assemble the filled pitas and refrigerate them unbuttered for a few hours. Butter the outside and cook just before serving. Freezing is possible, but the texture of the filling and pita changes; reheat from frozen in a hot skillet or oven to help the exterior regain crispness.
Best Ways to Store
Store leftover cooked pitas in an airtight container in the refrigerator for up to 2 days. Reheat in a skillet over medium heat, flipping once, until warmed through and crisped on both sides. The oven or toaster oven at 375°F (190°C) for 8–10 minutes also works well and keeps the crust crisp.
Do not microwave if you want to preserve texture; it will soften the pita and make the filling gummy. If you must microwave, give it a quick 20–30 seconds then transfer to a hot skillet to re-crisp the exterior.
Questions People Ask
- Can I use fresh spinach instead of frozen? — Yes. Blanch fresh spinach briefly, squeeze out the water, and measure 3/4 cup for the filling. The goal is a dry, compact spinach portion.
- What if my pita has no pocket? — Slice the pita in half so you have open rounds and fill each half as directed; you’ll still get the same texture and melting.
- Can I make these vegetarian/vegan? — The recipe as written is vegetarian. For vegan, use plant-based butter and dairy-free cheeses that melt well, though flavor and melt will differ from the original.
- Is the honey necessary? — No, it’s optional. A light drizzle complements the savory filling, but the sandwich is satisfying without it.
- How do I know when the cheese is melted enough? — The exterior should be golden and you’ll feel the pita become slightly soft when you press it; that signals internal heat and melting. Give each side the 3–4 minutes suggested if your pan is at medium heat.
Final Bite
These spinach and artichoke pita grilled cheeses are uncomplicated, satisfying, and adaptable. They come together fast and reward you with a rich, layered filling and a golden, buttery crust. Make a batch, serve them with a simple salad or soup, and keep a jar of honey close by for drizzling. They’re an easy way to elevate everyday ingredients into something special.
Try them once as written, then play: swap cheeses, add sun-dried tomatoes, or fold in a spoonful of ricotta for silkiness. No matter the tweaks, focus on keeping the filling dry and the pan at medium heat — that’s the secret to consistently great results.

Spinach and Artichoke Pita Grilled Cheese.
Ingredients
Ingredients
- 3/4 cupfrozen spinach thawed, and squeezed of excess water
- 1 cupmarinated jarred artichokes chopped
- 1 cupshredded gouda or fontina cheese
- 1/2 cupshredded mozzarella cheese
- 1/4 cupgrated parmesan cheese
- 1 clovegarlic grated
- 1/4 cupfresh basil chopped
- red pepper flakes
- 4 small pitas
- 3 tablespoonssalted butter
- honey for serving
Instructions
Instructions
- If your frozen spinach is still frozen, thaw it and squeeze out as much excess water as possible; set the 3/4 cup spinach aside.
- In a medium bowl, combine the squeezed spinach, 1 cup chopped marinated artichokes, 1 cup shredded gouda or fontina, 1/2 cup shredded mozzarella, 1/4 cup grated parmesan, 1 grated garlic clove, 1/4 cup chopped fresh basil, and a pinch of red pepper flakes. Mix until evenly distributed.
- Prepare the pitas: cut open one side of each pita to create a pocket. If a pita has no pocket or you prefer, slice that pita in half so you have two open rounds to fill.
- Divide the cheese-and-vegetable mixture into four equal portions and stuff each pita pocket (or each open pita half) with one portion, pressing gently so the filling is compact but not overflowing.
- Spread the 3 tablespoons salted butter evenly over the outside surfaces of each filled pita (both sides). Use softened or slightly melted butter if needed to make spreading easier.
- Heat a large skillet over medium heat. Working in batches so the pan isn’t overcrowded (1–2 pitas at a time, depending on pan size), place the buttered pitas in the skillet and cook until golden and the cheese is melted, about 3–4 minutes per side, pressing lightly with a spatula as they cook.
- Transfer cooked pitas to a cutting board, let rest briefly, then slice if desired. Serve drizzled with honey and with extra red pepper flakes for sprinkling, if you like.
Equipment
- Mixing Bowl
- Large Skillet
- Spatula
- Cutting Board


