
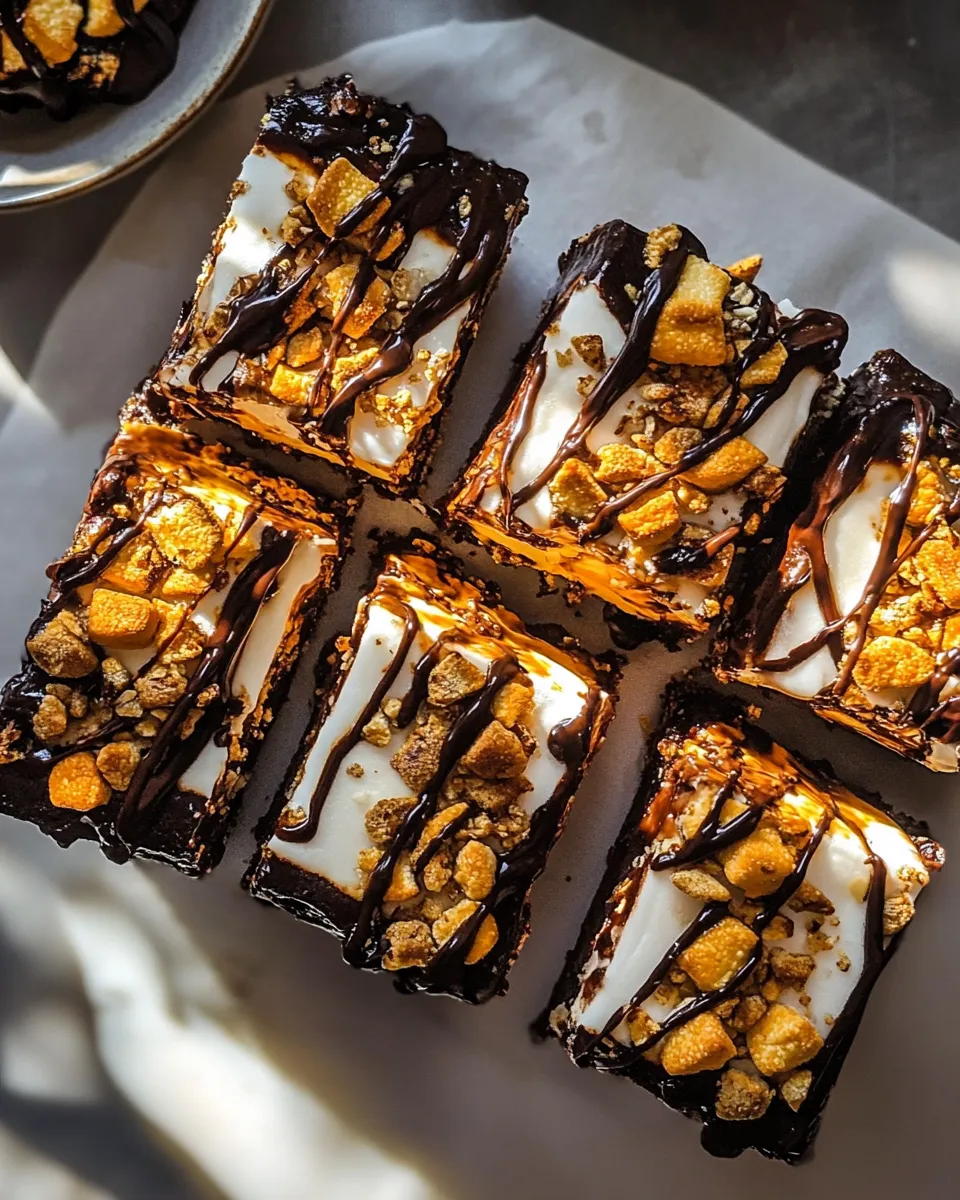
I make these Toasted Marshmallow K-Bars anytime I want something that tastes like a campfire without leaving the kitchen. They hit the same nostalgic notes — toasted marshmallow, crunchy cereal, creamy peanut butter, and a bittersweet chocolate top — but assemble in one pan. No skewers, no open flame, just a broiler and a steady hand.
They’re forgiving, which I love. The cereal gives structure, the melted mini marshmallows act like glue, and the toasted regular marshmallows folded in at the end are the surprise pockets of goo. Press the slab firmly and you’ll have bars that slice cleanly and travel well.
This post walks through what goes into these bars, step-by-step instructions you can rely on, troubleshooting I’ve learned the hard way, and quick swaps if your pantry is lacking one item or another. Make a batch for a party, or keep them in the fridge for an afternoon sweet fix.
What Goes Into Toasted Marshmallow K-Bars

Ingredients
- 1/2 cup (1 stick) salted butter, at room temperature — adds richness and helps bind the bars.
- 1 bag (10 ounce) mini marshmallows — melts into a marshmallow glue that holds the cereal together.
- 1 cup creamy peanut butter — brings flavor, creaminess, and chew to the bars.
- 5 cups Corn Flakes or Rice Krispies cereal — provides the crunchy backbone and light texture.
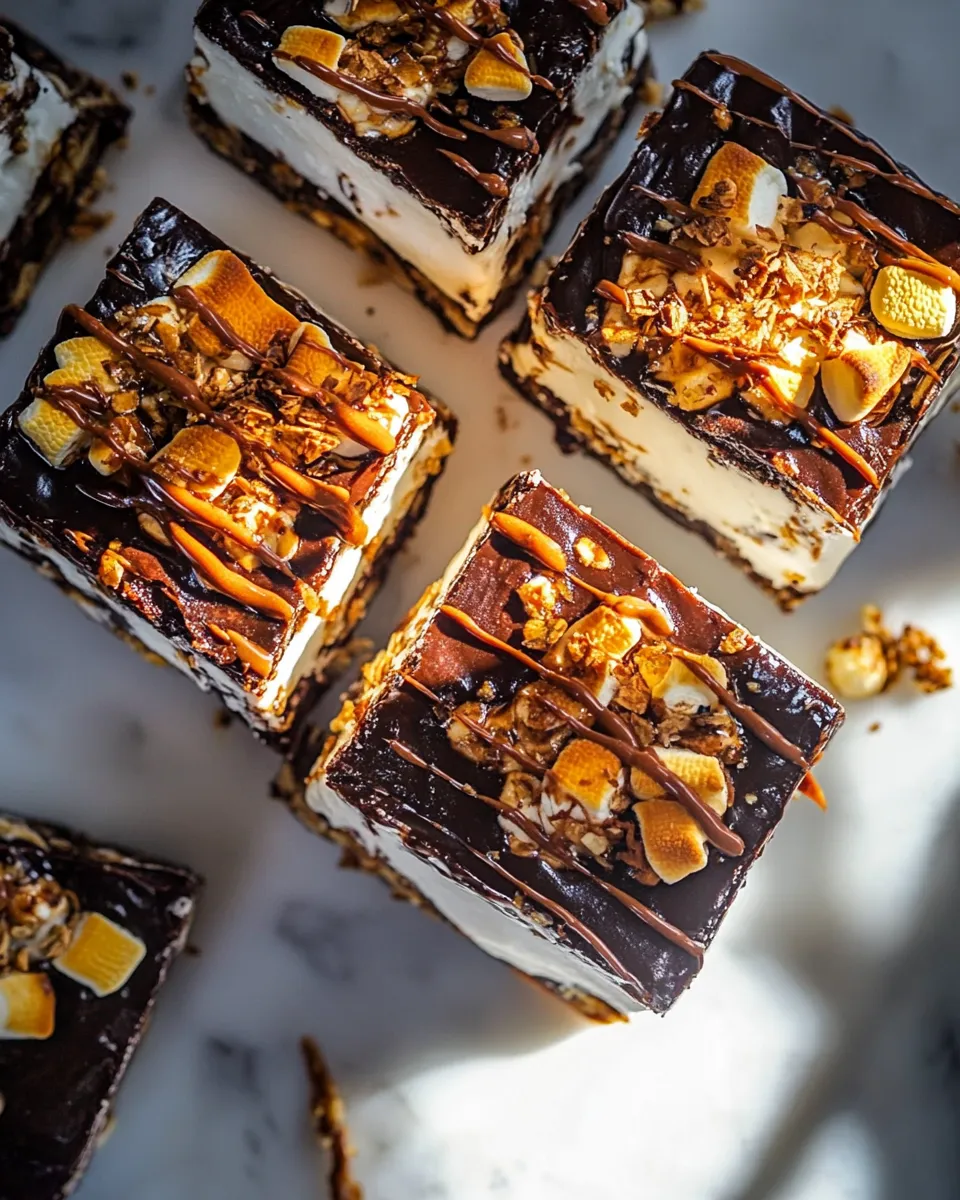
- 2 cups regular marshmallows — toasted separately to add that campfire flavor and soft pockets inside the bars.
- 20 ounces semi-sweet or dark chocolate, melted — a glossy topping that seals the bars and adds richness.
- Flaky sea salt (optional) — a finishing touch that balances sweetness and brightens flavors.
How to Prepare Toasted Marshmallow K-Bars
- Line a 9×13-inch pan with parchment paper, leaving an overhang on two sides for easy removal; set the pan aside. Preheat the broiler.
- In a large pot over medium heat add the 1/2 cup (1 stick) salted butter and 1 cup creamy peanut butter. Stir until the butter melts into the peanut butter and the mixture is smooth, then reduce the heat to low.
- Add the 1 bag (10 ounces) mini marshmallows to the pot and stir constantly until fully melted and smooth, about 4–6 minutes. Remove the pot from the heat.
- Stir 5 cups Corn Flakes or Rice Krispies cereal into the melted marshmallow mixture until the cereal is evenly coated.
- Arrange 2 cups regular marshmallows in a single layer on a baking sheet. Place the sheet under the preheated broiler 1–2 minutes, watching very closely, until the marshmallows are toasted to your liking. Remove immediately to avoid burning.
- Immediately add the toasted regular marshmallows to the cereal mixture and gently fold them in so they are distributed but not completely melted.
- Transfer the mixture to the prepared 9×13 pan. Using a spatula or the bottom of a measuring cup, press and pack the mixture firmly and evenly into the pan.
- Melt 20 ounces semi-sweet or dark chocolate until smooth (microwave in 20–30 second bursts stirring between, or melt over a double boiler). Pour the melted chocolate evenly over the packed cereal layer and spread to the edges. Sprinkle flaky sea salt on top, if desired.
- Refrigerate until the chocolate and bars are firm, at least 1–2 hours. Use the parchment overhang to lift the slab from the pan, then cut into bars and serve.
Why Toasted Marshmallow K-Bars is Worth Your Time
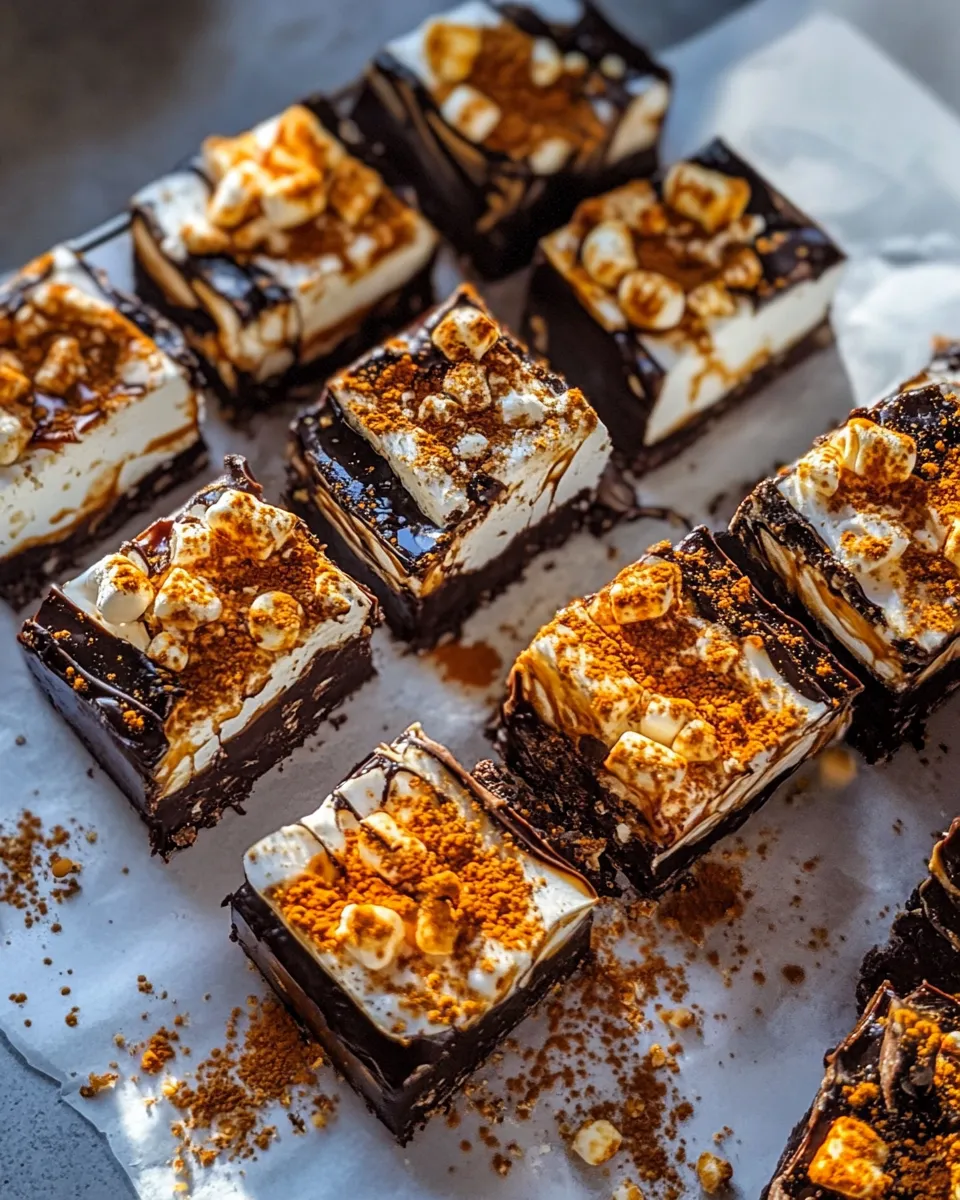
These bars are quick to assemble but deliver multi-layered texture and flavor that feels special. There’s crunch from the cereal, chew from the peanut butter–marshmallow matrix, and a rich chocolate finish. The toasted marshmallows give a smoky, caramelized note that lifts the whole thing.
They come together in roughly one pot plus a quick broil for the toasted marshmallows. Hands-on time is short; most of the wait is passive chilling. That makes them perfect for busy afternoons or last-minute desserts where you want a homemade treat without fuss.
They also travel well. Pack them in an airtight container and they’ll hold up for picnics or lunchboxes. If you like making sweets for friends, this recipe scales: double the pan count and you have party-ready trays in under an hour of active work.
If You’re Out Of…
- Peanut butter — almond butter or sunflower seed butter will work in texture though flavor will change.
- Mini marshmallows — you can chop regular marshmallows into small pieces and melt them; they’ll take slightly longer to become smooth.
- Corn Flakes or Rice Krispies — other crisp cereals can replace them, but pick a neutral-flavored, lightweight cereal to keep texture similar.
- Semi-sweet/dark chocolate — milk chocolate will be sweeter and softer; adjust salt accordingly.
- Flaky sea salt — skip it. The bars are still delicious without the finish.
Before You Start: Equipment
- 9×13-inch baking pan — for the right slab size and thickness.
- Parchment paper — essential for easy removal and clean slicing.
- Large pot — for melting butter, peanut butter, and mini marshmallows together.
- Baking sheet — to toast the regular marshmallows under the broiler.
- Spatula and measuring cup — for mixing and pressing the mixture evenly into the pan.
- Microwave-safe bowl or double boiler — to melt the chocolate smoothly.
- Knife or bench scraper — for cutting neat bars after chilling.
Learn from These Mistakes
- Not watching the broiler: marshmallows go from golden to burned in seconds. Stay by the oven and keep the rack near the broiler but not touching it.
- Under-pressing the slab: if you don’t press firmly, bars will fall apart when cut. Use the bottom of a measuring cup to compact the mixture evenly.
- Over-mixing toasted marshmallows: fold them in gently. You want pockets of toasted marshmallow, not a fully melted blanket.
- Skipping the parchment overhang: without it, removing the slab from the pan is fiddly and messy. Trust the overhang.
- Rushing the chocolate set: slicing too soon will smear chocolate. Chill at least 1–2 hours until firm.
Substitutions by Diet
Here are practical swaps when cooking for dietary needs. No measurements are changed; these are simple ingredient swaps.
- Gluten-free — use a certified gluten-free crisp cereal instead of Corn Flakes or Rice Krispies.
- Nut-free — replace peanut butter with sunflower seed butter or a seed-based spread to avoid tree nuts and peanuts.
- Dairy-free / Vegan — use a dairy-free butter substitute, vegan marshmallows (they exist and are gelatin-free), and dairy-free chocolate. The texture shifts a bit, but the method remains the same.
- Lower-sugar — pick a dark chocolate with higher cacao and use less or omit the flaky salt; also consider fewer marshmallows, though texture and chew will change.
Pro Tips & Notes
Timing and texture
Work fairly quickly when you add the toasted marshmallows to the cereal. They’ll begin to melt into the warm mixture, and you want to preserve some chew and those toasted edges.
Chocolate finish
For the smoothest finish, temper your chocolate slightly by cooling it until thick but still pourable. If the chocolate seizes, a very small splash of neutral oil can smooth it, but avoid adding liquid unless necessary.
Slicing
Cut bars after they’ve chilled. Warm the knife under hot water, wipe it dry, and slice in one confident motion for clean edges.
Keep-It-Fresh Plan
Store the bars layered between parchment in an airtight container in the refrigerator. They’ll keep at least one week chilled. If you prefer room temperature and your home is cool, they’ll hold for a couple of days, but the chocolate may soften in warm weather.
For longer storage, freeze the uncut slab or individual bars wrapped tightly. Thaw in the refrigerator overnight before serving to avoid condensation on the chocolate.
Questions People Ask
Q: Can I skip the toasted marshmallows and just mix everything together? A: Yes, but you’ll miss the caramelized, campfire flavor and the pockets of soft marshmallow that give the bars personality. Toasting is quick and worth the step.
Q: Will the peanut butter make the bars greasy? A: If you press the mixture firmly and chill well, the texture balances out. Use creamy peanut butter as instructed for a smooth bind.
Q: Can I double the recipe in one larger pan? A: It’s safer to keep the same thickness by using two pans or adjusting time and packing evenly. Overly thick slabs can be harder to slice and chill through.
Ready to Cook?
These Toasted Marshmallow K-Bars are straightforward and forgiving, so dive in. Gather your butter, peanut butter, the two kinds of marshmallows, cereal, and chocolate. Toast those regular marshmallows carefully, fold them in, press the slab, and top with chocolate. Chill until firm, slice, and enjoy the nostalgic, crunchy-chewy bars.
Make them once as written. Then tweak: darker chocolate, different cereal, or an extra sprinkle of flaky salt. They’re a small project that rewards you with big flavor. Happy baking (and toasting).

Toasted Marshmallow K-Bars.
Ingredients
Ingredients
- 1/2 cup 1 sticksalted butter, at room temperature
- 1 bag 10 ouncemini marshmallows
- 1 cupcreamy peanut butter
- 5 cupsCorn Flakes or Rice Krispies cereal
- 2 cupsregular marshmallows
- 20 ouncessemi-sweet/dark chocolate melted
- flaky sea salt optional
Instructions
Instructions
- Line a 9×13-inch pan with parchment paper, leaving an overhang on two sides for easy removal; set the pan aside. Preheat the broiler.
- In a large pot over medium heat add the 1/2 cup (1 stick) salted butter and 1 cup creamy peanut butter. Stir until the butter melts into the peanut butter and the mixture is smooth, then reduce the heat to low.
- Add the 1 bag (10 ounces) mini marshmallows to the pot and stir constantly until fully melted and smooth, about 4–6 minutes. Remove the pot from the heat.
- Stir 5 cups Corn Flakes or Rice Krispies cereal into the melted marshmallow mixture until the cereal is evenly coated.
- Arrange 2 cups regular marshmallows in a single layer on a baking sheet. Place the sheet under the preheated broiler 1–2 minutes, watching very closely, until the marshmallows are toasted to your liking. Remove immediately to avoid burning.
- Immediately add the toasted regular marshmallows to the cereal mixture and gently fold them in so they are distributed but not completely melted.
- Transfer the mixture to the prepared 9×13 pan. Using a spatula or the bottom of a measuring cup, press and pack the mixture firmly and evenly into the pan.
- Melt 20 ounces semi-sweet or dark chocolate until smooth (microwave in 20–30 second bursts stirring between, or melt over a double boiler). Pour the melted chocolate evenly over the packed cereal layer and spread to the edges. Sprinkle flaky sea salt on top, if desired.
- Refrigerate until the chocolate and bars are firm, at least 1–2 hours. Use the parchment overhang to lift the slab from the pan, then cut into bars and serve.
Equipment
- 9x13-inch pan
- Parchment Paper
- Large Pot
- Spatula
- Measuring Cup
- Baking Sheet
- Broiler
- microwave or double boiler
- Refrigerator


