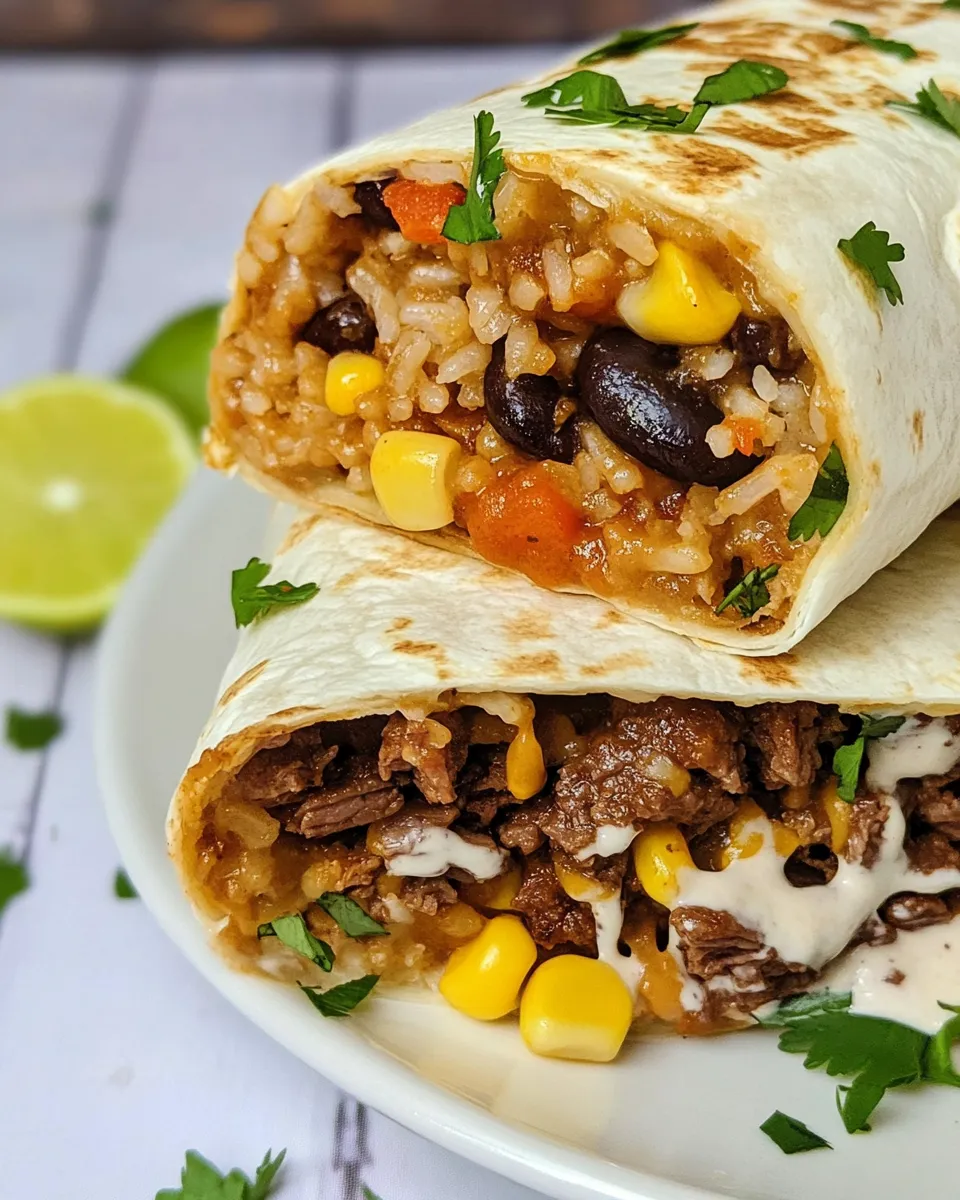
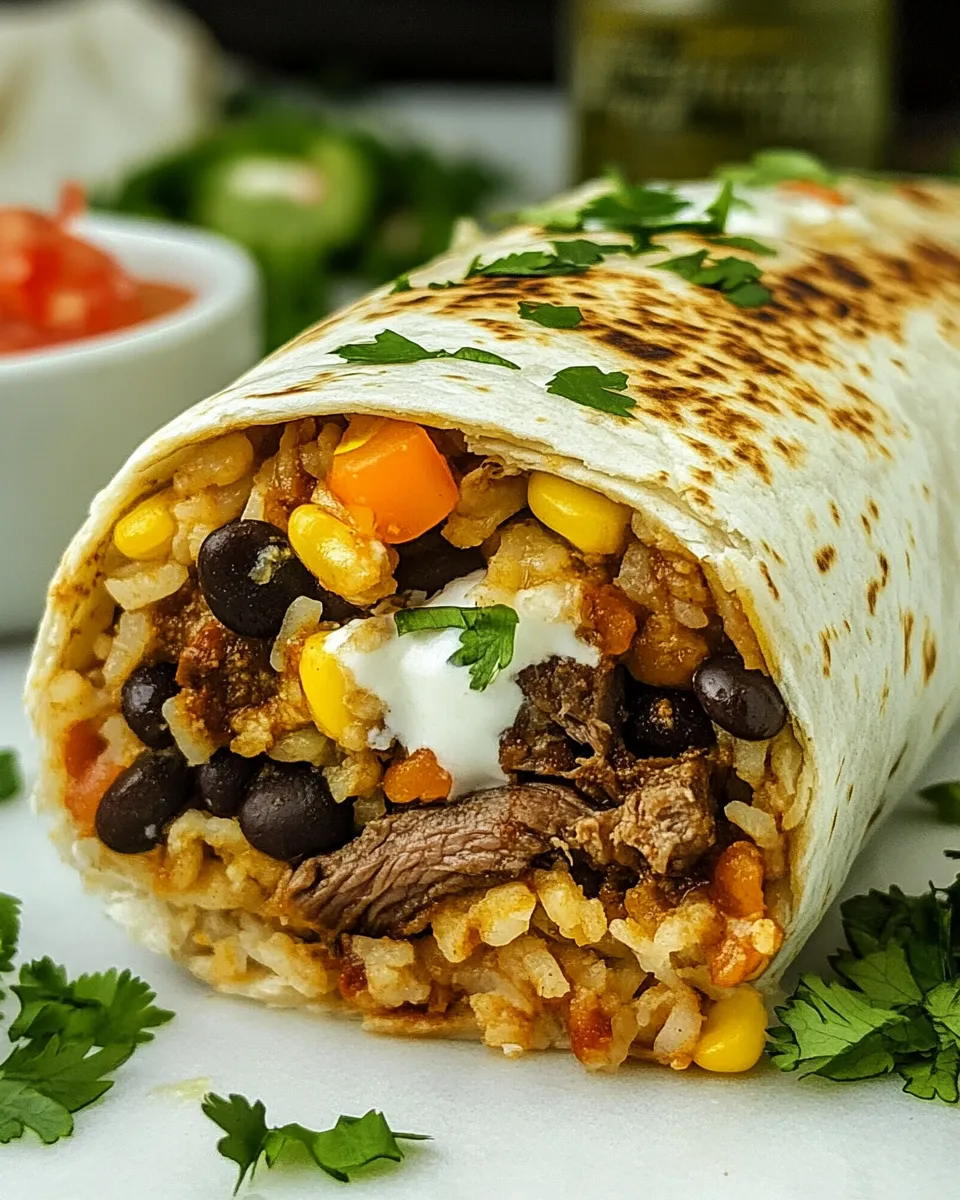
I make this Beef Burrito when I want dinner that’s quick, comforting, and feeds a crowd without fuss. It’s the kind of recipe that starts with a sizzling skillet and ends with warm, slightly crispy tortillas wrapped around a savory, saucy filling. You get protein, beans, rice, and a little brightness from avocado and lime — everything you want in one hand-held package.
No need for elaborate prep or specialty ingredients. The recipe relies on pantry staples and a simple sequence: brown the beef, add aromatics and seasoning, fold in beans and rice, then roll and crisp. It’s practical, forgiving, and easy to adapt to what you have on hand.
I’ll walk you through the exact steps and share tips for getting the filling moist but not soggy, how to keep tortillas pliable, and the best way to crisp them without losing the fillings. Think of this guide as a short, useful conversation you can reference while making dinner.
Gather These Ingredients
Ingredients
- 1 pound ground beef — browns into the savory base; drain excess fat after cooking.
- 1 small onion (finely chopped) — adds sweetness and texture when softened.
- 2 cloves garlic (minced) — provides aromatic depth; add with the onion so it doesn’t burn.
- 1 ounce taco seasoning (1 packet or homemade seasoning) — concentrates the classic taco flavors.
- ½ cup water — helps the seasoning turn into a light sauce that coats the beef.
- 15 ounces black beans (drained and rinsed) — protein and body; rinse to remove packing liquid.
- 1 cup cooked rice — stretches the filling and soaks up sauce.
- 1 cup cheddar (shredded, or Monterey Jack cheese) — melts into the filling for creaminess.
- 4 large flour tortillas — choose ones that are flexible for rolling.
- 1 cup salsa (or pico de gallo) — adds acidity and freshness; divided among the burritos.
- 1 cup sour cream — served on the side or atop for cooling richness.
- 1 avocado (sliced) — creamy contrast; slice just before serving to prevent browning.
- fresh cilantro (chopped (for garnish)) — bright finishing herb; chop roughly.
- lime wedges (for serving) — a squeeze wakes up the whole burrito.
The Method for Beef Burrito
- Heat a large skillet over medium-high. Add 1 pound ground beef and cook until browned, breaking it up with a spoon as it cooks. Drain off any excess fat and return the beef to the skillet.
- Add the finely chopped small onion and 2 cloves minced garlic to the skillet with the beef. Cook, stirring occasionally, about 3–4 minutes, until the onion is soft and translucent.
- Stir in 1 ounce taco seasoning and ½ cup water. Reduce heat to medium and cook about 2–3 minutes, stirring occasionally, until the seasoning coats the beef and the sauce thickens.
- Add 15 ounces black beans (drained and rinsed) and 1 cup cooked rice to the skillet. Stir to combine and cook 2–3 minutes, until the beans and rice are heated through. Remove the skillet from the heat and set aside.
- Warm the 4 large flour tortillas until pliable: either heat each briefly in a dry skillet over medium (about 15–30 seconds per side) or microwave stacked tortillas until warm (about 20–30 seconds).
- Divide the beef–bean–rice mixture evenly among the 4 warmed tortillas, placing the filling in the center of each tortilla.
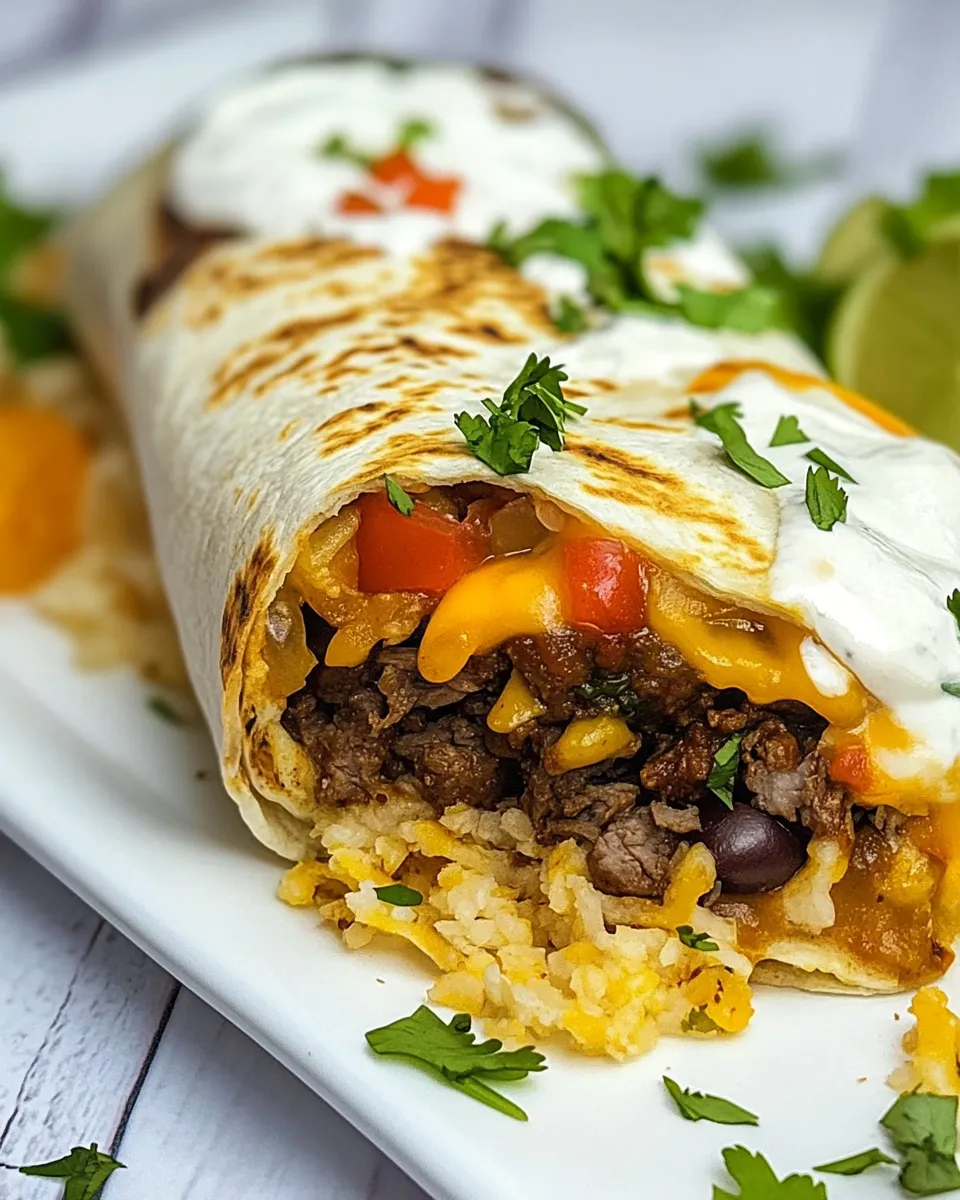
- Sprinkle the 1 cup shredded cheddar (or Monterey Jack) evenly over the filling on each tortilla, then add about 1/4 cup salsa (or pico de gallo) to each (using the 1 cup salsa total).
- Fold the sides of each tortilla toward the center, then roll each tortilla up from the bottom to fully enclose the filling. Place each rolled burrito seam-side down.
- Preheat an air fryer to 400°F (200°C). Place the rolled burritos seam-side down in the air fryer basket without overcrowding. Cook 3–5 minutes, until the tortillas are golden and crispy.
- If you do not have an air fryer, heat a nonstick skillet over medium and place the rolled burritos seam-side down in the skillet. Cook 2–3 minutes per side, turning carefully, until golden and crispy.
- Serve the burritos topped or served with 1 cup sour cream, sliced avocado from 1 avocado, chopped fresh cilantro for garnish, and lime wedges on the side.
Why It’s Crowd-Pleasing
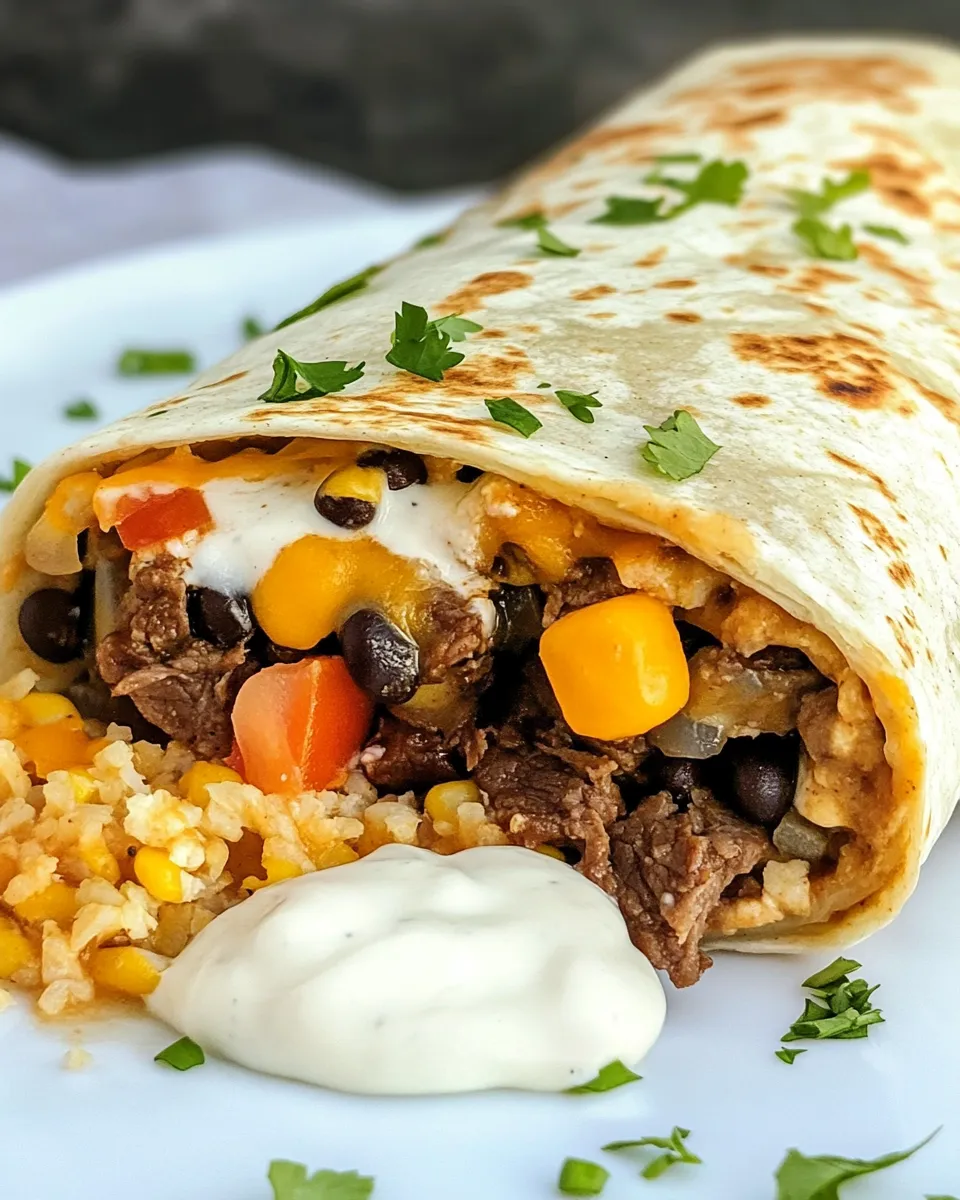
This Beef Burrito hits a lot of universal marks. It’s meaty and savory from the beef, comforting because of the rice and melted cheese, and lively thanks to salsa and lime. Texture matters: creamy beans and rice contrast with the slight crisp of the finished tortilla. For groups, it’s easy to scale and assemble on the fly.
People gravitate toward familiar flavors. Taco seasoning gives a recognizable profile and the components are modular — you can add a little extra salsa, more cheese, or a cooling dollop of sour cream to suit tastes. It’s an approachable meal that still feels like something you’d order out.
Low-Carb/Keto Alternatives
If you want to reduce carbs without losing the burrito experience, skip the flour tortilla and use one of these options: a large lettuce leaf or collard green for a looser wrap, or a low-carb/high-fiber tortilla if you prefer a closer mouthfeel to the original. You can replace rice with extra black beans if your plan allows legumes, or with riced cauliflower for a lower-carb swap.
Keep the beef, seasoning, and toppings the same; the main change is the vessel or the filler used in place of rice. The cooking and finishing steps still apply — warm the wrap and crisp gently if possible.
What’s in the Gear List
- Large skillet — for browning the beef and assembling the filling.
- Nonstick skillet (optional) — used if you don’t have an air fryer for crisping the burritos.
- Air fryer (optional) — quick, even crisping without extra oil.
- Spatula and spoon — for breaking up beef and stirring.
- Cutting board and chef’s knife — for chopping the onion, garlic, cilantro, and slicing avocado.
- Colander — to drain and rinse the black beans.
Frequent Missteps to Avoid
Overfilling the tortillas. Use the filling evenly and keep a margin at the edges so the tortillas fold and roll cleanly. If you overstuff, seams won’t stay closed and fillings may spill when crisping.
Skipping the drain step after browning beef. Excess fat makes the filling greasy and soggy. Drain and return the meat to the skillet before adding onions and garlic. Also, don’t add raw garlic to a screaming-hot pan or it will burn and taste bitter — add it with the softened onion.
Trying to crisp cold tortillas. Warm them first so they bend instead of cracking. Warm tortillas crisp more evenly and seal better when rolled.
Allergy-Friendly Swaps
Dairy: swap the cheddar and sour cream for dairy-free cheese and a plant-based yogurt or crema. Check meltability — some dairy-free cheeses don’t melt like cheddar but still add richness.
Gluten: use certified gluten-free tortillas or large greens for wrapping. Ensure taco seasoning is gluten-free if you’re using a pre-made packet.
Legume-free: if black beans are an issue, use extra rice and veggies, or substitute cooked lentils if tolerated. Adjust seasoning after swapping to maintain flavor balance.
Behind-the-Scenes Notes
I usually brown the beef right after getting home and refrigerate the cooked filling if I need a quick make-ahead option. It reheats well in a skillet with a splash of water to loosen the sauce. If I plan to crisp in an air fryer, I roll the burritos cold and crisp straight from the fridge — just add a minute or two to the cook time if they’re chilled.
For a cleaner finish, blot excess moisture from fresh salsa or pico de gallo before tucking it into the burritos. I often keep the salsa on the side so folks can spoon on what they like and the tortillas stay crispier longer.
Meal Prep & Storage Notes
To meal-prep: assemble the filling and store it in an airtight container in the refrigerator for up to 3–4 days. Tortillas are best kept separate and warmed just before rolling. If you roll burritos ahead of time, wrap each tightly in foil or plastic and refrigerate for up to 24 hours — the tortilla will soften with time but can be crisped again.
Freezing: fully wrapped burritos can be frozen for up to 2 months. Reheat from frozen in a 350°F oven until hot through, then finish in an air fryer or skillet to restore crispness. Thawing overnight in the fridge shortens the reheating time.
Troubleshooting Q&A
Q: My filling is too wet; the burrito falls apart.
A: Drain excess beef fat after browning and make sure beans are well drained. Cook the beef with the seasoning and water until the sauce thickens. If it’s still wet, simmer a bit longer on medium-low to reduce moisture.
Q: Tortilla cracks when I fold it.
A: Warm the tortilla briefly so it becomes more pliable. If tortillas are very dry, wrap them in a damp paper towel and microwave for 20–30 seconds before rolling.
Q: Cheese didn’t melt evenly.
A: Sprinkle cheese directly onto the hot filling so residual heat helps it melt. If you crisp in a skillet or air fryer, a minute or two after crisping usually melts the cheese nicely.
Final Thoughts
This Beef Burrito is a dependable weeknight solution that doesn’t overpromise. It’s fast, satisfying, and straightforward to customize. Follow the method, avoid the common missteps, and you’ll have dinner on the table with minimal stress. Keep the extras — sour cream, avocado, cilantro, lime — nearby so everyone can finish their burrito just the way they like it.
Make it once as written, then feel free to tweak: swap the cheese, add grilled vegetables, or change the finishing sauce. It adapts well, and that’s why it shows up in my rotation again and again.

Beef Burrito
Ingredients
Ingredients
- 1 poundground beef
- 1 smallonion finely chopped
- 2 clovesgarlic minced
- 1 ouncetaco seasoning 1 packet or homemade seasoning
- 1/2 cupwater
- 15 ouncesblack beans drained and rinsed
- 1 cupcooked rice
- 1 cupcheddar shredded, or Monterey Jack cheese
- 4 largeflour tortillas
- 1 cupsalsa or pico de gallo
- 1 cupsour cream
- 1 avocado sliced
- fresh cilantro chopped (for garnish)
- lime wedges for serving
Instructions
Instructions
- Heat a large skillet over medium-high. Add 1 pound ground beef and cook until browned, breaking it up with a spoon as it cooks. Drain off any excess fat and return the beef to the skillet.
- Add the finely chopped small onion and 2 cloves minced garlic to the skillet with the beef. Cook, stirring occasionally, about 3–4 minutes, until the onion is soft and translucent.
- Stir in 1 ounce taco seasoning and ½ cup water. Reduce heat to medium and cook about 2–3 minutes, stirring occasionally, until the seasoning coats the beef and the sauce thickens.
- Add 15 ounces black beans (drained and rinsed) and 1 cup cooked rice to the skillet. Stir to combine and cook 2–3 minutes, until the beans and rice are heated through. Remove the skillet from the heat and set aside.
- Warm the 4 large flour tortillas until pliable: either heat each briefly in a dry skillet over medium (about 15–30 seconds per side) or microwave stacked tortillas until warm (about 20–30 seconds).
- Divide the beef–bean–rice mixture evenly among the 4 warmed tortillas, placing the filling in the center of each tortilla.
- Sprinkle the 1 cup shredded cheddar (or Monterey Jack) evenly over the filling on each tortilla, then add about 1/4 cup salsa (or pico de gallo) to each (using the 1 cup salsa total).
- Fold the sides of each tortilla toward the center, then roll each tortilla up from the bottom to fully enclose the filling. Place each rolled burrito seam-side down.
- Preheat an air fryer to 400°F (200°C). Place the rolled burritos seam-side down in the air fryer basket without overcrowding. Cook 3–5 minutes, until the tortillas are golden and crispy.
- If you do not have an air fryer, heat a nonstick skillet over medium and place the rolled burritos seam-side down in the skillet. Cook 2–3 minutes per side, turning carefully, until golden and crispy.
- Serve the burritos topped or served with 1 cup sour cream, sliced avocado from 1 avocado, chopped fresh cilantro for garnish, and lime wedges on the side.
Equipment
- COSORI Air Fryer 5.8 Quart
- COOKLOVER Nonstick Saute Pan Induction Skillet with lid 9.5 inch – Black
Notes
Warm Tortillas: Warming the tortillas before filling them makes them more pliable and easier to roll without tearing.
Don’t Overfill: Avoid overstuffing the burritos to make sure they hold together well when cooking and eating.
Crispy Texture: Cooking the burritos in an air fryer or skillet gives them a nice crispy exterior while keeping the inside warm and melty.
Fresh Toppings: Adding fresh cilantro and a squeeze of lime juice right before serving brightens up the flavors and adds a fresh finish.
Meal Prep Friendly: These burritos are perfect for meal prepping. Make a batch on the weekend and enjoy them throughout the week by reheating as needed.