

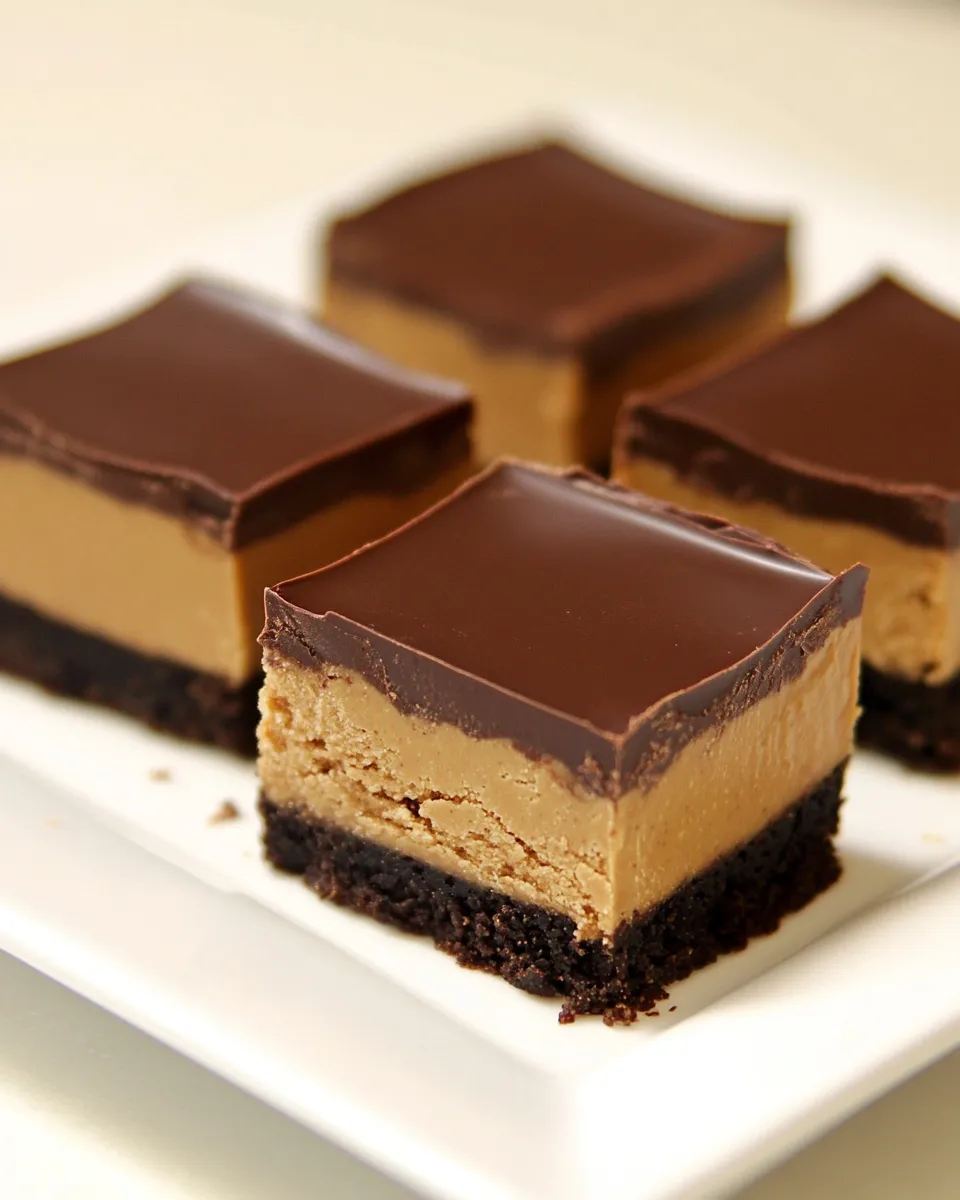
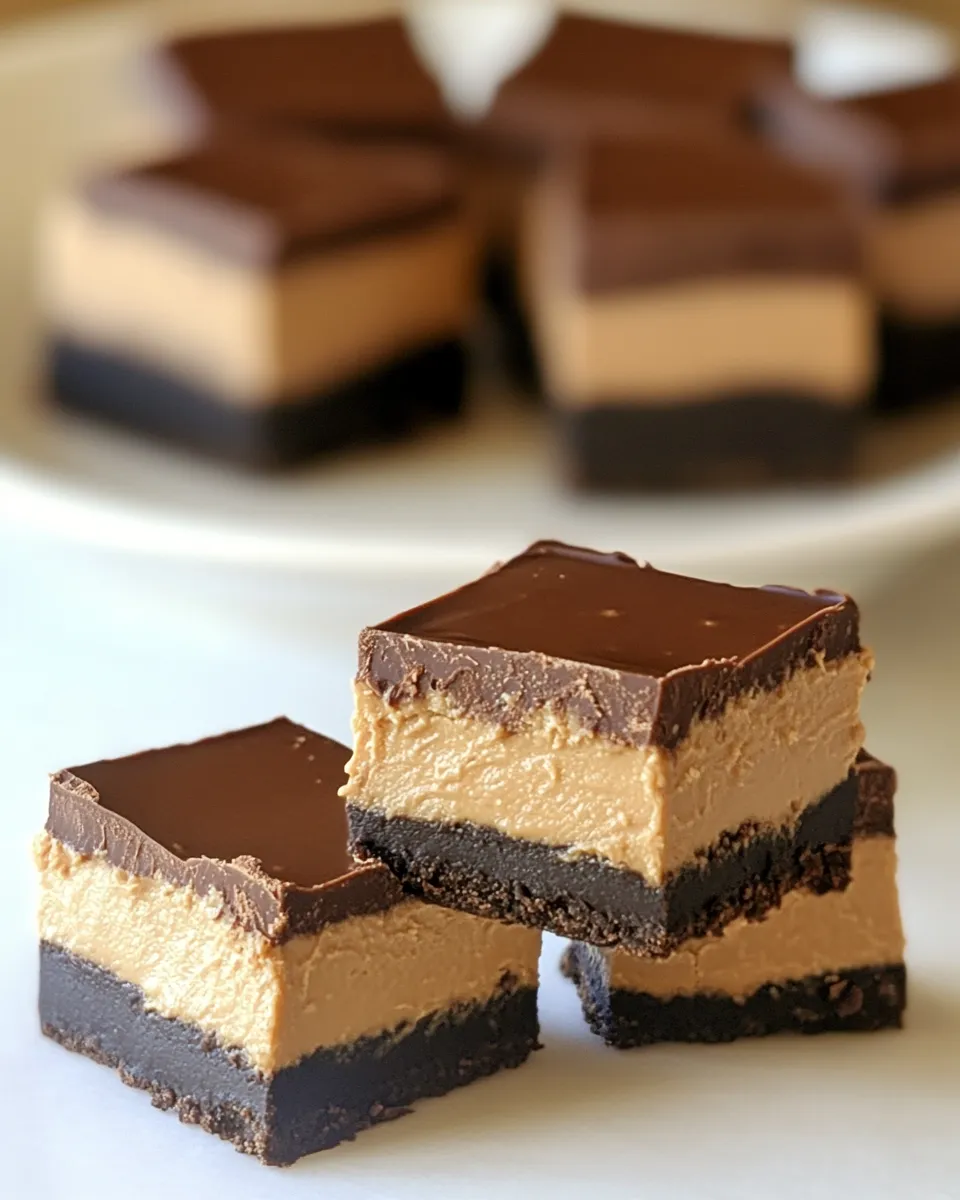
These squares are exactly what they sound like: a crunchy Oreo crust, a dense, creamy peanut butter layer, and a glossy milk chocolate top. They come together fast and keep well in the fridge, which makes them one of my go-to treats when I want something that feels special without a lot of drama.
The technique is straightforward: make a cookie crust, chill a no‑whip peanut butter filling, and finish with a double‑dipped chocolate layer so each bite is balanced — not too sweet, with that familiar peanut butter + chocolate comfort. I write recipes with small, practical notes so you can get consistent results the first time.
Below you’ll find the exact ingredient list and the step‑by‑step method I use, plus quick troubleshooting and storage advice. If you follow the directions in order, you’ll have clean cuts and bars that hold together every time.
What You’ll Gather
Gather your ingredients and a few basic tools. Read through the steps once before you start so the timing (freezer vs. fridge) is clear — you’ll be switching between cooling and melting stages.
Ingredients
- 22 Oreo cookies — the cookie base: use them with filling for extra structure and flavor.
- 3 tablespoons butter, softened — binds the crushed cookies into a pressable crust.
- 2 tablespoons creamy peanut butter (I like Skippy Natural “No Need to Stir”) — adds richness and helps the crust hold.
- ⅓ cup (packed) dark brown sugar — gives depth and a touch of chew to the peanut butter filling.
- 2 cups Confectioners’ sugar — sweetens and firms the peanut butter filling.
- 6 tablespoons unsalted butter, softened — gives the filling its creamy, spreadable texture.
- 1 ⅓ cups creamy peanut butter — the filling’s primary flavor and body.
- ⅛ teaspoon salt — balances sweetness and highlights peanut flavor.
- 1 (11.5-ounce bag) milk chocolate chips (preferably Ghirardelli or similar quality) — for the ganache top and thin seal layer.
- 6 tablespoons heavy cream — smooths the chocolate into a glossy, pourable ganache.
Build Chocolate Peanut Butter Squares Step by Step
- Preheat the oven to 375°F and place a rack in the middle position. Line a 9-inch square baking pan with heavy‑duty aluminum foil so there is a 2‑inch overhang on all sides; spray the foil with nonstick cooking spray.
- Make the crust: Place 22 Oreo cookies (with their filling), 3 tablespoons softened butter, and 2 tablespoons creamy peanut butter in the bowl of a food processor fitted with the blade. Pulse until the cookies are finely crushed and the mixture is uniform.
- Press the cookie mixture firmly and evenly into the prepared pan (spread with your hands, then tamp and smooth with the bottom of a measuring cup). Bake the crust for 6 minutes. Remove from the oven and set the pan on a wire rack to cool completely.
- While the crust cools, make the peanut butter filling: In the bowl of a stand mixer fitted with the paddle attachment combine 1/3 cup (packed) dark brown sugar, 2 cups confectioners’ sugar, 6 tablespoons unsalted butter (softened), 1 1/3 cups creamy peanut butter, and 1/8 teaspoon salt. Mix on medium‑low speed just until evenly combined (do not whip). Transfer the bowl to the refrigerator to chill while you prepare the chocolate.
- Make the chocolate ganache: Put the entire 11.5‑ounce bag of milk chocolate chips and 6 tablespoons heavy cream in a microwave‑safe bowl. Microwave at 50% power for 1 minute, then stir. Continue microwaving in 15‑second intervals at 50% power, stirring after each interval, until the chocolate is smooth and fully melted. (It may look slightly separated during melting but should finish smooth. Avoid overheating.)
- Measure out 1/3 cup of the melted chocolate mixture and drizzle it evenly over the cooled crust. Use an offset spatula to spread it into a thin layer (don’t press into the crust). Put the pan in the freezer until this chocolate layer is set, about 10 minutes.
- Remove the peanut butter filling from the refrigerator. Dollop the filling over the set chocolate in even spoonfuls. Use your hands to press the dollops into an even layer across the pan; if the filling is sticky, dust your hands lightly with confectioners’ sugar.
- Reheat the remaining chocolate ganache: microwave it on full power for 15–20 seconds, then stir until smooth. Pour the warmed ganache over the peanut butter layer and smooth it to the edges with an offset spatula.
- Chill the assembled bars until firm: place in the freezer for 1 hour or in the refrigerator for 2–3 hours.
- Use the foil overhang to lift the set slab from the pan onto a cutting board. Using a sharp chef’s knife, cut into small squares. Store the bars in the refrigerator and serve cold; they will keep up to 4 days.
Reasons to Love Chocolate Peanut Butter Squares

They hit several dessert goals at once: textural contrast (crumbly crust, creamy center, firm chocolate cap), reliable make‑ahead friendliness, and flavor familiarity. They’re not fussy to build but read like something elevated — guests assume more time went into them than actually did.
These squares are also forgiving. The no‑whip filling keeps things dense and sliceable, and using a prepackaged cookie base (Oreos) shortens prep while delivering consistent results every time. The chocolate seal prevents moisture migration, so the bars stay neat when refrigerated.
Flavor-Forward Alternatives
If you want to tweak the flavor profile without changing the structure, try one of these swaps or add‑ins:
- Swap milk chocolate chips for semi‑sweet or dark chocolate to cut sweetness and deepen chocolate notes.
- Mix 2 tablespoons of natural crunchy peanut butter into the filling for texture and a rustic bite.
- Fold in 1/3 cup finely chopped roasted peanuts into the peanut butter filling for crunch and salt contrast.
- For a salted top, sprinkle flaky sea salt on the warm ganache right after you pour it.
- Replace Oreos with chocolate wafer cookies if you prefer a lighter cookie texture.
Before You Start: Equipment
- 9-inch square baking pan — lined with foil for easy removal.
- Food processor with blade — for a consistent, fine cookie crumb.
- Stand mixer with paddle attachment (or a hand mixer and a bowl) — to combine the filling without whipping.
- Microwave‑safe bowl and spatula — for gently melting ganache.
- Offset spatula and measuring cups — for smoothing layers and accurate portioning.
- Sharp chef’s knife and cutting board — to slice clean squares.
Troubles You Can Avoid
Here are the common traps and how to dodge them:
- Soft or crumbling bars: press the crust very firmly and bake for the full 6 minutes. A loosely packed crust won’t hold when you slice.
- Sticky, hard-to-spread filling: chill the filling as instructed. If it gets too soft while working, pop it back in the fridge for 10–15 minutes.
- Grainy or seized chocolate: melt gently at 50% power as directed and stir between intervals. Avoid overheating and don’t add cold liquid to the ganache.
- Messy cuts: use a sharp knife and wipe it clean between cuts; chill the slab until firm (freeze or fridge) before slicing for the cleanest edges.
Make It Fit Your Plan
Need to scale or adapt? These squares are flexible. To serve fewer people, cut larger pieces; to feed a crowd, cut them small. The recipe is built around the pan size (9-inch square) — changing the pan size requires recalculating bake and chill times and the ingredient scale.
For a slightly lighter finish, use semi‑sweet chocolate and reduce the confectioners’ sugar by up to 1/4 cup in the filling, but expect a slightly softer texture. If you need the bars to travel, keep them chilled until just before serving and transport in a cooler bag with an ice pack.
Method to the Madness
The order matters because you rely on cooling and setting at precise moments. The thin chocolate layer in step 6 acts as a moisture barrier and stabilizer; freezing it ensures the peanut butter layer won’t sink into the crust. Chilling the peanut butter filling prevents it from melting the final ganache when you pour it on.
Work clean: line the pan with foil and spray it so you can lift the whole slab out easily. Measuring out 1/3 cup of melted chocolate for the seal helps you avoid starving the top layer of chocolate — save enough to fully cover the filling after you reheat the rest.
Meal Prep & Storage Notes
Once set, these bars store best in the refrigerator and are easiest to slice cold. They’ll keep up to 4 days in an airtight container. For longer storage, freeze individual squares in a single layer on a sheet pan until solid, then transfer to a freezer-safe container for up to 2 months. Thaw in the refrigerator before serving.
If you need to prepare ahead, you can make the crust and filling a day in advance and keep them chilled separately; assemble and ganache on the day you plan to serve for the freshest appearance.
Common Qs About Chocolate Peanut Butter Squares
Q: Can I use a different cookie for the crust?
A: Yes. Chocolate wafers or graham crackers will work, but the flavor and texture will change. Oreos provide sweetness and structure, so if you swap, consider adding a tablespoon of sugar for balance.
Q: My ganache looked separated when melting — is that okay?
A: A slight separation while melting is normal. Keep stirring off heat; it usually comes back together. If it doesn’t, warm gently in short bursts and stir until smooth.
Q: Can I skip the freezer steps and only refrigerate?
A: The freezer steps are quick and help set layers faster, but refrigeration (longer time) will still work. If you skip the freezer, allow more chilling time between layers.
Q: Will these be too sweet?
A: The recipe balances sweetness with brown sugar depth, salt, and the cookie base. If you prefer less sweet, use semi‑sweet chocolate chips and reduce the confectioners’ sugar slightly, noting the texture will be a touch softer.
That’s a Wrap
These Chocolate Peanut Butter Squares are a reliable, make‑ahead dessert that looks more complicated than it is. Follow the layer order and chill times, and you’ll have neat, rich bars that hold up when sliced. They’re perfect for a weeknight dessert, a potluck, or when you need a treat that travels well.
Make them once and you’ll understand why I keep these ingredients on hand. Happy baking — and don’t forget to chill before slicing for the best presentation.
Chocolate Peanut Butter Squares
Ingredients
Ingredients
- 22 Oreo cookies
- 3 tablespoonsbutter softened
- 2 tablespoonscreamy peanut butter I like Skippy Natural "No Need to Stir"
- 1/3 cup packed dark brown sugar
- 2 cupsConfectioners' sugar
- 6 tablespoonsunsalted butter softened
- 1 1/3 cupscreamy peanut butter
- 1/8 teaspoonsalt
- 1 11.5-ounce bag milk chocolate chips(preferably Ghirardelli or similar quality)
- 6 tablespoonsheavy cream
Instructions
Instructions
- Preheat the oven to 375°F and place a rack in the middle position. Line a 9-inch square baking pan with heavy‑duty aluminum foil so there is a 2‑inch overhang on all sides; spray the foil with nonstick cooking spray.
- Make the crust: Place 22 Oreo cookies (with their filling), 3 tablespoons softened butter, and 2 tablespoons creamy peanut butter in the bowl of a food processor fitted with the blade. Pulse until the cookies are finely crushed and the mixture is uniform.
- Press the cookie mixture firmly and evenly into the prepared pan (spread with your hands, then tamp and smooth with the bottom of a measuring cup). Bake the crust for 6 minutes. Remove from the oven and set the pan on a wire rack to cool completely.
- While the crust cools, make the peanut butter filling: In the bowl of a stand mixer fitted with the paddle attachment combine 1/3 cup (packed) dark brown sugar, 2 cups confectioners' sugar, 6 tablespoons unsalted butter (softened), 1 1/3 cups creamy peanut butter, and 1/8 teaspoon salt. Mix on medium‑low speed just until evenly combined (do not whip). Transfer the bowl to the refrigerator to chill while you prepare the chocolate.
- Make the chocolate ganache: Put the entire 11.5‑ounce bag of milk chocolate chips and 6 tablespoons heavy cream in a microwave‑safe bowl. Microwave at 50% power for 1 minute, then stir. Continue microwaving in 15‑second intervals at 50% power, stirring after each interval, until the chocolate is smooth and fully melted. (It may look slightly separated during melting but should finish smooth. Avoid overheating.)
- Measure out 1/3 cup of the melted chocolate mixture and drizzle it evenly over the cooled crust. Use an offset spatula to spread it into a thin layer (don’t press into the crust). Put the pan in the freezer until this chocolate layer is set, about 10 minutes.
- Remove the peanut butter filling from the refrigerator. Dollop the filling over the set chocolate in even spoonfuls. Use your hands to press the dollops into an even layer across the pan; if the filling is sticky, dust your hands lightly with confectioners' sugar.
- Reheat the remaining chocolate ganache: microwave it on full power for 15–20 seconds, then stir until smooth. Pour the warmed ganache over the peanut butter layer and smooth it to the edges with an offset spatula.
- Chill the assembled bars until firm: place in the freezer for 1 hour or in the refrigerator for 2–3 hours.
- Use the foil overhang to lift the set slab from the pan onto a cutting board. Using a sharp chef’s knife, cut into small squares. Store the bars in the refrigerator and serve cold; they will keep up to 4 days.
Equipment
- 9-inch square baking pan
- heavy-duty aluminum foil
- Nonstick Cooking Spray
- Food Processor
- stand mixer with paddle attachment
- Microwave-safe Bowl
- Offset Spatula
- Measuring Cup
- Wire Rack
- Sharp chef’s knife
Notes
Freezer-Friendly Instructions:
These can be frozen tightly covered for up to 3 months. Let them thaw overnight in the refrigerator before serving.


