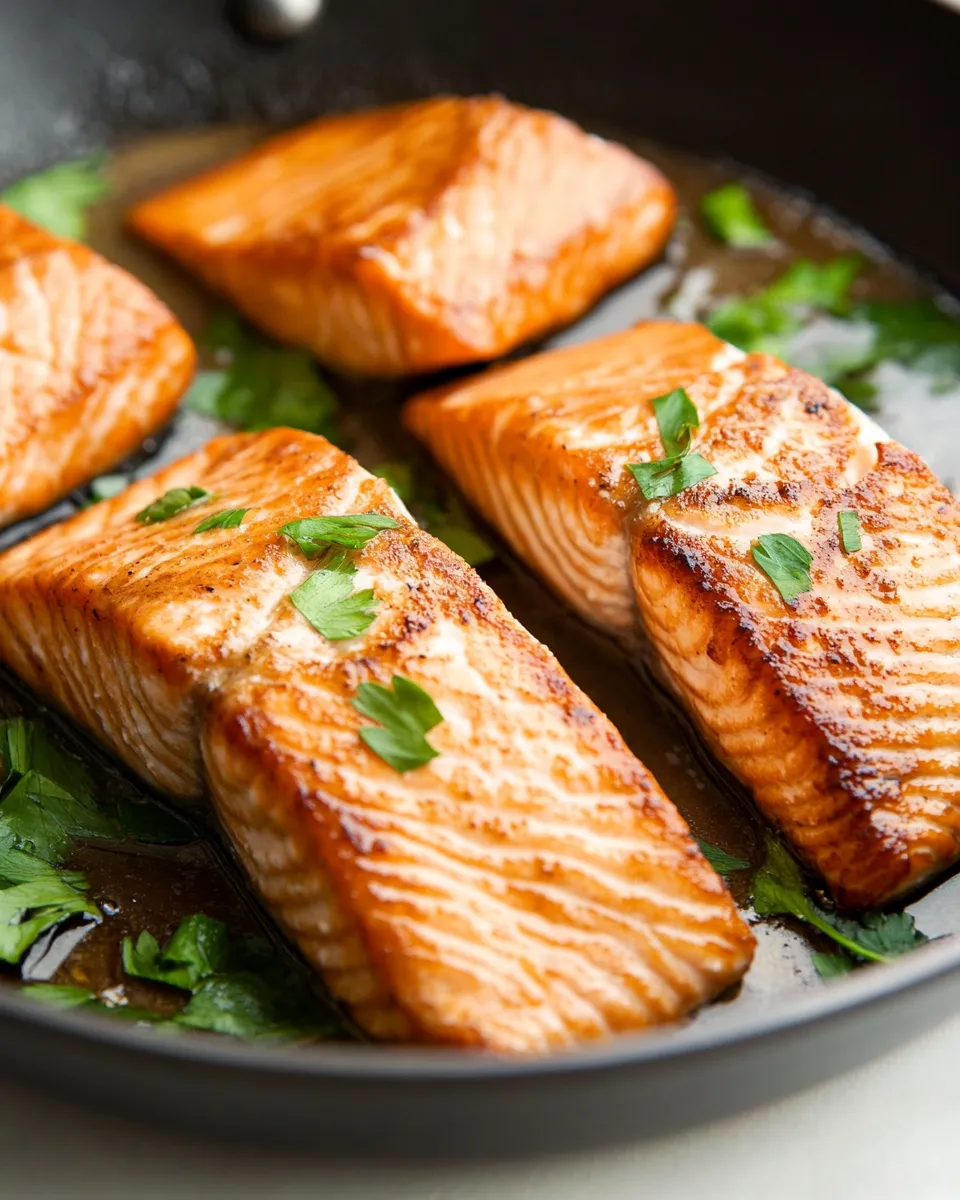
I love a meal that comes together quickly, looks beautiful on the plate, and actually delivers on texture. This Crispy Skillet Salmon Recipe does exactly that: a crisped exterior, tender interior, and a straightforward method you can trust on a weeknight or when friends drop by. I’ll walk you through what matters, what to watch for, and small tricks that make the difference between good salmon and the best salmon you’ll pan-sear at home.
No fuss seasoning. No complicated sauces. Just heat, salt, a hot pan, and attention. The technique centers on drying the fish, salting it, and using a hot skillet to form that coveted crust. It’s a short cook, so timing and a confident flip are where most cooks win or lose.
I write this from the kind of kitchen that values ingredients and rhythm over recipes that read like novels. If you want crisp skin, juicy flakes, and a plateful of satisfaction with minimal cleanup, you’re in the right place. Read through, prep your skillet, and let’s make salmon sing.
Ingredient Checklist

Ingredients
- 1.5 to 2lbs salmon, cut into individual filets — choose even-thickness fillets so cooking time is consistent across pieces.
- Sea salt — seasons and helps draw surface moisture for a crisper sear.
Mastering Crispy Skillet Salmon Recipe: How-To
- Remove the salmon from its packaging and place the fillets on a cutting board. Pat both sides dry with paper towels to remove excess moisture.
- Sprinkle sea salt evenly over the exposed surfaces of each fillet.
- Preheat a large cast-iron or nonstick skillet over medium-high heat for 2–4 minutes, until the pan is hot (a small drop of water should sizzle on contact).
- Carefully place the salmon fillets flesh side down (skin side up, if the fillets have skin) on the hot skillet. Gently set each fillet down rather than dropping it to minimize splatter.
- Cook the fillets without moving them for about 6 minutes on the flesh side. Adjust this time shorter for thin fillets and longer for thick fillets.
- Use a spatula to carefully flip each fillet and cook the other side for about 4 minutes, or until the salmon reaches an internal temperature of 145°F measured in the thickest part (or until it reaches your preferred doneness).
- Transfer the cooked fillets to a plate and let them rest 2–3 minutes before serving to allow juices to redistribute.
- Store any leftover salmon in an airtight container in the refrigerator for up to 4 days.
Why This Recipe is a Keeper

Because it’s honest and reliable. The method strips the process back to three essentials: dry the fish, salt it, and cook in a hot skillet. That simplicity makes it repeatable. When you nail the surface dryness and the pan temperature, the salmon will consistently develop a golden, slightly crunchy exterior while the interior stays moist. Nobody wants a grey, soggy sear; this technique avoids that.
Time is another reason. From pan to plate this takes minutes, not hours. When dinner needs to happen on a worknight, this recipe delivers flavor and texture without drama. And finally, it’s forgiving: small adjustments in cooking time handle thicker or thinner fillets so you can adapt without re-learning the recipe.
Swap Guide

If you need to change something, do it thoughtfully. The recipe lists only salmon and sea salt, so swaps are about cookware and seasoning approach rather than adding new ingredients.
- If you prefer a neutral-fat sear, a nonstick skillet works better for delicate fillets; cast iron gives superior crust for thicker pieces.
- Don’t replace sea salt with a wet brine at home unless you plan extra time; the quick salt rub is designed to pull surface moisture for crisping.
- For different fish: lean fillets with similar thickness will respond similarly. Oily species that are thicker may need slightly longer on the flesh side.
Equipment at a Glance
Good technique is easier with the right tools. You don’t need a lot, but quality pays off.
- Large cast-iron skillet — best for heat retention and a deep, even sear.
- Or a good nonstick skillet — ideal for very delicate fillets or if you prefer cleaner release.
- Spatula with a thin edge — helps you slide under fillets without tearing them.
- Paper towels — for thorough drying of the fish.
- Instant-read thermometer — optional, but very useful to confirm the 145°F target if you want precision.
Watch Outs & How to Fix
Common problems and quick fixes
- Skin or flesh sticking to the pan: the pan wasn’t hot enough or the fillet wasn’t dry. Fix by letting the pan heat longer and patting the fillets drier next time. For the current fillet, give it another 30–60 seconds; if it releases cleanly, proceed to flip.
- Too much splatter: the fillet was set down too hard or the surface was wet. Lower the heat a touch, dry thoroughly, and place gently.
- Undercooked center: the fillet was thicker than average. Finish in a 350°F oven for a few minutes after searing, or allow an extra minute or two on the second side.
- Overcooked, dry salmon: check pan heat (too high cooks too fast externally) and reduce second-side time. Remove from heat and let rest; resting continues gentle carryover cooking while redistributing juices.
Warm & Cool Weather Spins
Seasonal touches help this dish feel right any time of year without changing the method. In warmer months, serve the salmon with bright, crisp sides and lighter accompaniments. In cooler months, aim for richer plates and warming grains. The pan-sear stays the same; only the accompaniments change to match the season.
Keep the core approach consistent: dry, salt, hot pan, and short, confident cook times. That’s where the magic lives — not in complicated seasonal sauces.
Author’s Commentary
As someone who writes about food for a living, I favor recipes that respect ingredient integrity. Salmon is a lovely, expressive fish: it doesn’t need a lot to sing. I often keep it simple so textures and the fish’s natural flavor are the focus. This Crispy Skillet Salmon Recipe is one of those go-to methods I use when I want an impressive plate with minimal fuss. It’s the kind of dinner I’ll bring to a friend’s house because it travels well and looks gorgeous on every plate.
One practical note: don’t be intimidated by the flip. A gentle edge under the fillet and a confident lift will keep the fish intact. Also, trust a short rest after cooking — it makes a noticeable difference in juiciness.
Prep Ahead & Store
Prepping this recipe ahead is straightforward. Pat the fillets dry and salt them up to an hour before cooking, uncovered in the fridge — this helps draw moisture out and promotes an even crisper sear. Bring the fillets back to near room temperature before cooking for the most even results.
Leftovers store well: store any leftover salmon in an airtight container in the refrigerator for up to 4 days. Reheat gently in a low oven or enjoy chilled on a salad. Rapid reheating at high heat will risk overcooking, so use low, gentle warmth when returning cooked salmon to serving temperature.
Your Top Questions
Q: Can I use frozen salmon?
A: Yes—if it’s fully thawed and patted dry. Thaw overnight in the refrigerator, then follow the drying step carefully; any surface moisture will prevent a crisp sear.
Q: Should I remove the skin?
A: It’s a preference. Skin-on fillets crisp beautifully when seared skin-side down, though the method here starts flesh-side down. If you prefer skin removed, proceed the same way—just be extra gentle when flipping.
Q: How do I know when it’s done?
A: The recipe gives a safe internal target of 145°F measured in the thickest part. If you prefer slightly less done, aim lower, but be mindful of food safety and texture. The flesh should flake easily when pressed with a fork.
Q: My fillets are different thicknesses—how do I adjust?
A: Thinner fillets need less time on the first side, and thicker ones need more. Use visual cues: a golden sear on the surface and a slightly translucent center before flipping. When in doubt, err on slightly less time and check with a thermometer.
Ready to Cook?
Gather your fillets, give them a good pat dry, preheat the skillet, and sprinkle on sea salt. This Crispy Skillet Salmon Recipe rewards attention for a handful of minutes with a dinner that looks and tastes like it took twice as long. Enjoy the process. Cook confidently. Then sit down and savor the results.

Crispy Skillet Salmon Recipe
Ingredients
Ingredients
- 1.5 to 2 lbssalmoncut into individual filets
- Sea salt
Instructions
Instructions
- Remove the salmon from its packaging and place the fillets on a cutting board. Pat both sides dry with paper towels to remove excess moisture.
- Sprinkle sea salt evenly over the exposed surfaces of each fillet.
- Preheat a large cast-iron or nonstick skillet over medium-high heat for 2–4 minutes, until the pan is hot (a small drop of water should sizzle on contact).
- Carefully place the salmon fillets flesh side down (skin side up, if the fillets have skin) on the hot skillet. Gently set each fillet down rather than dropping it to minimize splatter.
- Cook the fillets without moving them for about 6 minutes on the flesh side. Adjust this time shorter for thin fillets and longer for thick fillets.
- Use a spatula to carefully flip each fillet and cook the other side for about 4 minutes, or until the salmon reaches an internal temperature of 145°F measured in the thickest part (or until it reaches your preferred doneness).
- Transfer the cooked fillets to a plate and let them rest 2–3 minutes before serving to allow juices to redistribute.
- Store any leftover salmon in an airtight container in the refrigerator for up to 4 days.
Equipment
- large cast-iron or nonstick skillet
- Spatula
- Cutting Board
- Paper Towels
- Meat Thermometer
- Plate
- Airtight Container