

Flaky, buttery pastry cradling a creamy sweet cheese filling and a scatter of fresh berries — that’s the soul of this recipe. It’s approachable and forgiving, which makes it perfect for a relaxed weekend breakfast or an elegant compromise when you want to impress with minimal fuss. You’ll get reliable structure from store-bought puff pastry and a straightforward filling that comes together in minutes.
I like this version because it leans on technique, not drama. The steps are clear, the timing is set, and you can make a dozen beautiful pastries from two sheets of thawed puff pastry. Use good quality cream cheese and ripe berries, and you’ll end up with pastries that look like you spent far more time on them than you actually did.
Below I walk through everything you need: the exact ingredients, the step-by-step method I follow every time, equipment notes, troubleshooting fixes, and sensible storage tips. There are also quick swaps if you want to change the flavor profile, and a few small testing notes so you know what to expect.
Ingredients
- 1 lb puff pastry (2 sheets), thawed — the structural base; thaw fully but keep cool so it’s easier to roll and twist.
- 8 oz cream cheese, room temperature — makes the filling creamy and stable; full-fat gives best texture.
- 1/4 cup granulated sugar — sweetens the cream cheese without overpowering the berries.
- 1 egg yolk, room temperature — enriches and binds the filling for a smooth finish.
- 1/2 tsp vanilla extract — adds warmth and depth to the filling.
- 1 tsp lemon zest from 1 lemon — brightens the cream cheese; use fresh zest for aroma.
- 1 1/2 cups berries, (blueberries, strawberries, raspberries) — the fresh topping; hull and cut larger berries to fit in the center.
- 1 egg — for the egg wash to create a glossy, golden edge.
- 1 Tbsp water — mixed with the egg to make the egg wash thin enough to brush without pooling into the filling.
- 1/2 cup powdered sugar — base for the glaze; sift if it’s clumpy for a smooth drizzle.
- 1/2 tsp lemon zest — adds extra lemon lift to the glaze.
- 1 Tbsp fresh lemon juice — thins the powdered sugar into a pourable glaze and gives a fresh tang.
What Goes Into Cheese Danish
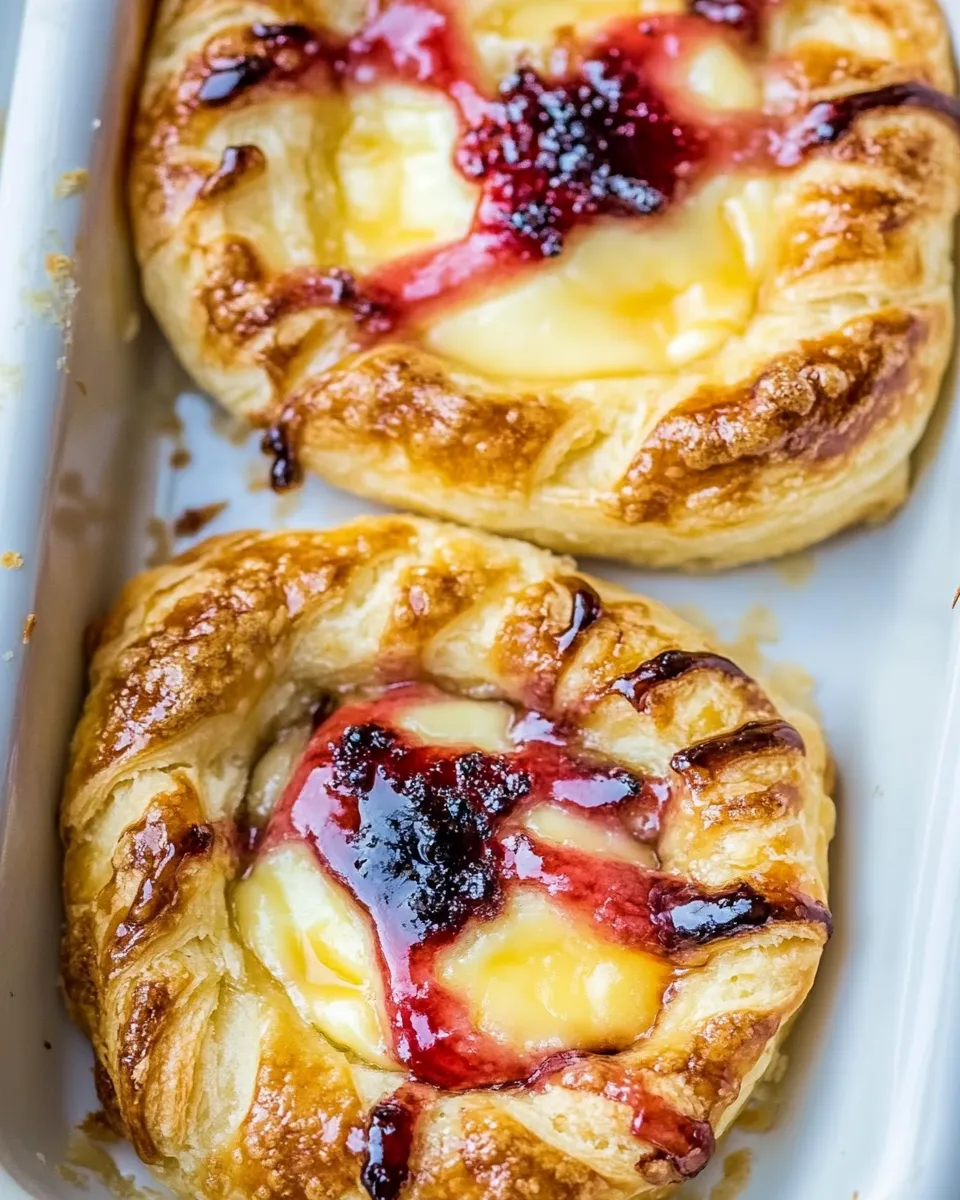
At its core this Cheese Danish is three parts: pastry, creamy cheese filling, and fresh berries. The puff pastry brings lift and crisp layers. The cream cheese mixture is sweetened and brightened with lemon and vanilla to balance the richness. The berries add color, freshness, and a contrast in texture.
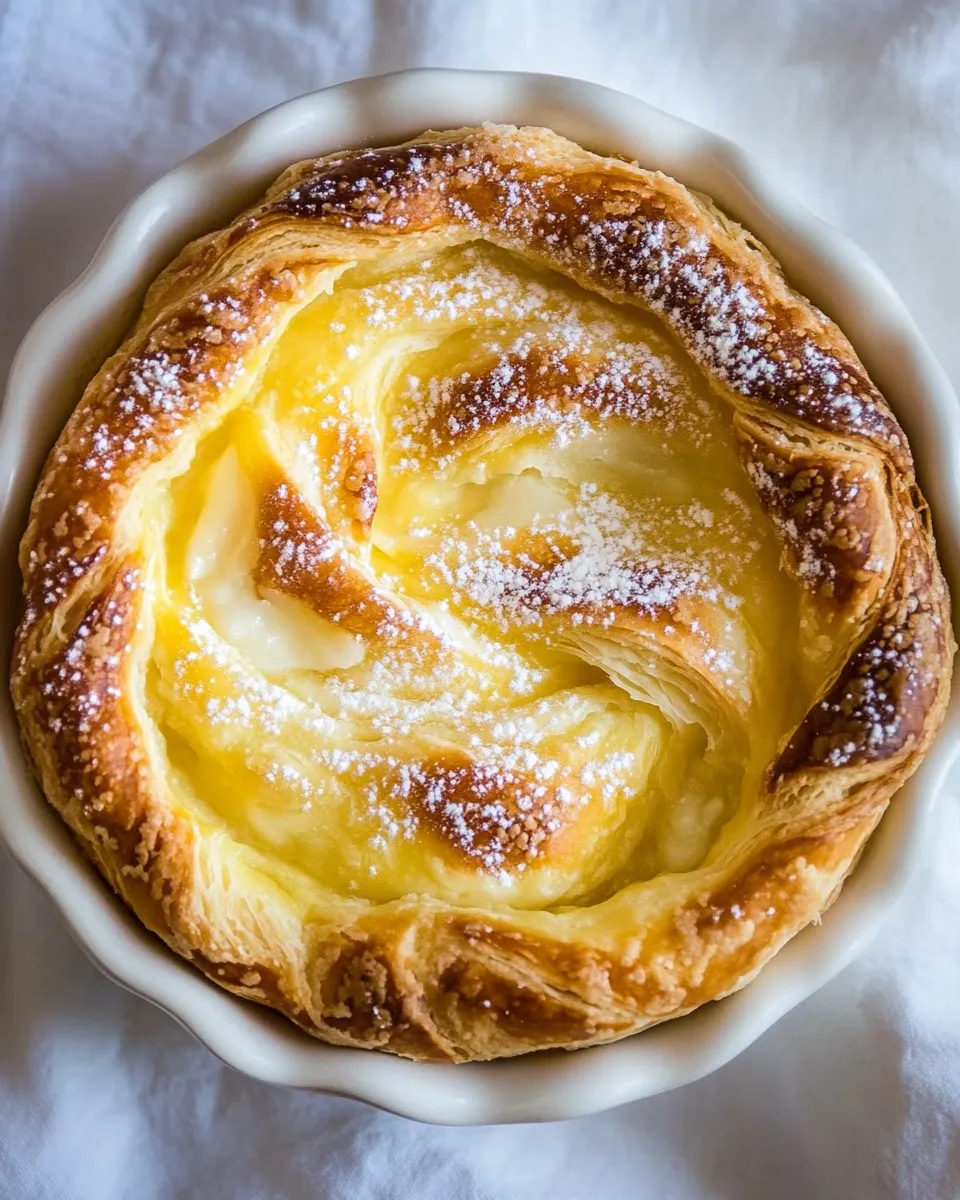
There are small finishing elements too: an egg wash to get that caramelized, glossy edge, and a lemon glaze for a pretty, tangy finish. Each component has a simple job and they work together to create a pastry that’s both elegant and approachable.
Cheese Danish Made Stepwise
- Thaw the 1 lb puff pastry (2 sheets) according to package instructions. Position an oven rack in the center and preheat the oven to 400°F. Line a large baking sheet with parchment paper or a Silpat.
- In a large bowl, combine 8 oz cream cheese (room temperature), 1/4 cup granulated sugar, 1 egg yolk (room temperature), 1/2 tsp vanilla extract, and 1 tsp lemon zest. Beat on medium–high speed until the mixture is creamy and smooth. Set the filling aside.
- Rinse the 1 1/2 cups berries and drain well. Hull and halve or quarter larger berries (strawberries) so the berry pieces are roughly uniform and will fit into the pastry centers.
- Unfold one sheet of thawed puff pastry onto a lightly floured or clean work surface. Roll gently to about a 10″ x 10″ square. Using a pizza cutter or sharp knife, cut the sheet into 12 even strips. Repeat with the second sheet so you have 24 strips total.
- Working with two strips at a time, place the ends of the two strips together and pinch to seal. Twist the joined strips tightly from one end to the other to form a twisted strand.
- Coil the twisted strand into a round “wreath” shape by pressing one end onto the work surface and wrapping the strand around it, working from the center outward. Pinch the final end to the pastry to secure it to the base.
- Flatten the center of the coiled pastry slightly with your fingertips and prick the center a few times with a fork to discourage excessive puffing.
- Place about 1 tablespoon of the cream cheese filling into the center of the pastry ring, then press several berry pieces into the filling so they are partially embedded. (Repeat steps 5–8 for each pair of strips to make 12 pastries.)
- Transfer the filled pastries to the prepared baking sheet, spacing them at least 1/2″ apart.
- In a small bowl, whisk together 1 egg and 1 Tbsp water to make an egg wash. Lightly brush the exposed pastry edges (avoid brushing the filling) with the egg wash.
- Bake on the center rack at 400°F for 18–20 minutes, or until the pastry is golden brown. Remove from the oven and let the pastries cool completely on a wire rack so the cream cheese filling sets.
- While the pastries cool, make the lemon glaze: in a small bowl whisk together 1/2 cup powdered sugar, 1/2 tsp lemon zest, and 1 Tbsp fresh lemon juice until smooth.
- When the pastries are completely cooled to room temperature, drizzle the lemon glaze over them. Serve.
Why It’s Crowd-Pleasing
There’s a lot to love that’s immediately obvious: the layers of puff pastry are visually impressive and satisfying to bite into; the cream cheese filling feels indulgent but not heavy; and the berries bring freshness and a pop of color. Together they create a balance of textures—crisp, creamy, and juicy—that people naturally enjoy.
Another reason these are popular is timing and accessibility. You don’t need to make laminated dough from scratch. Using store-bought puff pastry means you can turn out beautiful pastries with minimal equipment and in a short amount of hands-on time. That makes these a great option for brunches, potlucks, or last-minute guests.
Quick Replacement Ideas
- Berries — swap with sliced apples or pears tossed in a little lemon and sugar for a fall variation.
- Cream cheese — you can fold in a tablespoon of mascarpone for a silkier filling if you have it, though pure cream cheese works perfectly.
- Lemon glaze — replace with a vanilla glaze made from powdered sugar and a splash of milk for a sweeter finish.
- Puff pastry — if you’d rather, use croissant dough sheets for a slightly different flaky texture, though baking time may vary.
Equipment Breakdown
You don’t need anything exotic. A few reliable tools make this straightforward:
- Baking sheet — a rimmed sheet lined with parchment or Silpat keeps the pastries from sticking and helps with even browning.
- Stand mixer or hand mixer — for the cream cheese filling; you can whisk by hand but it takes more elbow grease to reach a silky texture.
- Pizza cutter or sharp knife — for slicing the puff pastry into even strips quickly.
- Wire rack — essential to cool the pastries so the filling sets and the bottoms don’t steam and soften.
Watch Outs & How to Fix
Even simple recipes can hiccup. Here are common pitfalls and professional-feeling fixes to keep you calm.
Under-thawed or too-warm pastry: If it’s still stiff, it’ll crack when you roll; if it’s too warm, it’ll be sticky and lose layers. Fix: chill the sheet briefly (10–15 minutes) if it feels sticky. If it’s too cold, let it sit at room temp a few minutes until pliable.
Filling too runny: If the cream cheese mixture reads loose, it may soften the pastry and fail to set. Fix: make sure the cream cheese is at room temperature but not melted, and beat until smooth but not watery. Chill the filled pastries briefly before baking if you’re worried about runniness.
Pastry puffs up in the center: You want the ring to hold a cavity for the filling. Fix: prick the center with a fork a few times before filling, which discourages excessive puffing.
Berries sink or leak juice: Very juicy berries can make the filling watery. Fix: pat berries dry after rinsing, and don’t overfill. For very juicy berries, toss with a teaspoon of granulated sugar and let sit briefly, then drain.
Edges browning too fast: If the pastry edges brown before the center is cooked, lower your oven rack a notch and reduce oven temperature by 25°F, roasting a bit longer until done.
Health-Conscious Tweaks
You can nudge this recipe toward lighter or less-sweet without losing what makes it satisfying.
Swap half the granulated sugar in the filling for a natural sweetener like a teaspoon of honey or maple (note: texture will change slightly). Use low-fat cream cheese if you want to cut calories, though the filling will be less rich. For the glaze, reduce powdered sugar to 1/3 cup and increase lemon juice by a half teaspoon to keep drizzle consistency but remove some sweetness.
Another small change: use more berries and slightly less filling in the centers for a fruit-forward pastry that feels lighter. The puff pastry is still an indulgence, but portion control—smaller rings—helps too.
What I Learned Testing
I made this recipe several times across a week to pin down texture and timing. Two things stuck out: first, room-temperature cream cheese is crucial. If it’s too cold you’ll end up over-working it and getting lumps; if it’s too warm it won’t hold shape. Aim for soft but not runny.
Second, the twist-and-coil method gives a great look without a lot of precision. You don’t need to be artistically perfect; the twist creates texture and the coil hides small imperfections. That means you can make beautiful pastries quickly, even on your first try.
How to Store & Reheat
Store cooled pastries in an airtight container at room temperature for up to 24 hours. After that, refrigerate and consume within 48 hours. Keep the glaze dry if you plan to reheat; glaze can be added fresh after warming.
To reheat: preheat oven to 350°F. Place pastries on a baking sheet and warm for 5–7 minutes until the pastry regains crispness. Microwaving will warm the filling but softens the pastry, so avoid it if you want a crisp edge. Re-drizzle glaze or add a quick dusting of powdered sugar just before serving.
Common Questions
- Can I make these ahead? — Yes. You can shape and fill the coiled pastries, then refrigerate them on the baking sheet for up to 24 hours before baking. Brush with egg wash right before they go into the oven for best color.
- Can I freeze them? — Freeze unbaked shaped pastries on a tray until solid, then transfer to a freezer bag for up to one month. Bake from frozen, adding a few extra minutes to the bake time.
- What if my puff pastry doesn’t rise? — Likely it was too cold or overhandled. Make sure it thaws properly and avoid pressing layers together. Let pastry rest briefly before baking if it feels stressed from shaping.
- Can I use jam instead of fresh berries? — Yes. Use about 1 teaspoon jam in the center and omit the fresh berries if you prefer a smoother finish.
Serve & Enjoy
Serve these warm or at room temperature. They pair wonderfully with a bright coffee or a pot of tea. For a brunch spread, place them alongside simple yogurt, granola, and fruit so guests can choose how sweet they want to go. A little extra glaze or a handful of fresh berries on the side makes them feel special without fuss.
These pastries are ideal for sharing. Make a double batch when you have company. They travel well and look lovely on a platter. Enjoy the process — the results are reliably impressive and the method is forgiving, even for a busy morning.

Easy Cheese Danish Recipe
Ingredients
Ingredients
- 1 lbpuff pastry 2 sheets, thawed
- 8 ozcream cheese room temperature
- 1/4 cupgranulated sugar
- 1 egg yolk room temperature
- 1/2 tspvanilla extract
- 1 tsplemon zest from 1 lemon
- 1 1/2 cupsberries (blueberries, strawberries, raspberries)
- 1 egg
- 1 Tbspwater
- 1/2 cuppowdered sugar
- 1/2 tsplemon zest
- 1 Tbspfresh lemon juice
Instructions
Instructions
- Thaw the 1 lb puff pastry (2 sheets) according to package instructions. Position an oven rack in the center and preheat the oven to 400°F. Line a large baking sheet with parchment paper or a Silpat.
- In a large bowl, combine 8 oz cream cheese (room temperature), 1/4 cup granulated sugar, 1 egg yolk (room temperature), 1/2 tsp vanilla extract, and 1 tsp lemon zest. Beat on medium–high speed until the mixture is creamy and smooth. Set the filling aside.
- Rinse the 1 1/2 cups berries and drain well. Hull and halve or quarter larger berries (strawberries) so the berry pieces are roughly uniform and will fit into the pastry centers.
- Unfold one sheet of thawed puff pastry onto a lightly floured or clean work surface. Roll gently to about a 10" x 10" square. Using a pizza cutter or sharp knife, cut the sheet into 12 even strips. Repeat with the second sheet so you have 24 strips total.
- Working with two strips at a time, place the ends of the two strips together and pinch to seal. Twist the joined strips tightly from one end to the other to form a twisted strand.
- Coil the twisted strand into a round "wreath" shape by pressing one end onto the work surface and wrapping the strand around it, working from the center outward. Pinch the final end to the pastry to secure it to the base.
- Flatten the center of the coiled pastry slightly with your fingertips and prick the center a few times with a fork to discourage excessive puffing.
- Place about 1 tablespoon of the cream cheese filling into the center of the pastry ring, then press several berry pieces into the filling so they are partially embedded. (Repeat steps 5–8 for each pair of strips to make 12 pastries.)
- Transfer the filled pastries to the prepared baking sheet, spacing them at least 1/2" apart.
- In a small bowl, whisk together 1 egg and 1 Tbsp water to make an egg wash. Lightly brush the exposed pastry edges (avoid brushing the filling) with the egg wash.
- Bake on the center rack at 400°F for 18–20 minutes, or until the pastry is golden brown. Remove from the oven and let the pastries cool completely on a wire rack so the cream cheese filling sets.
- While the pastries cool, make the lemon glaze: in a small bowl whisk together 1/2 cup powdered sugar, 1/2 tsp lemon zest, and 1 Tbsp fresh lemon juice until smooth.
- When the pastries are completely cooled to room temperature, drizzle the lemon glaze over them. Serve.
Equipment
- Oven
- Baking Sheet
- parchment paper or Silpat
- Large Bowl
- electric mixer or beaters
- Pizza cutter or sharp knife
- Fork
- Small Bowl
- Whisk
- Wire Rack


