
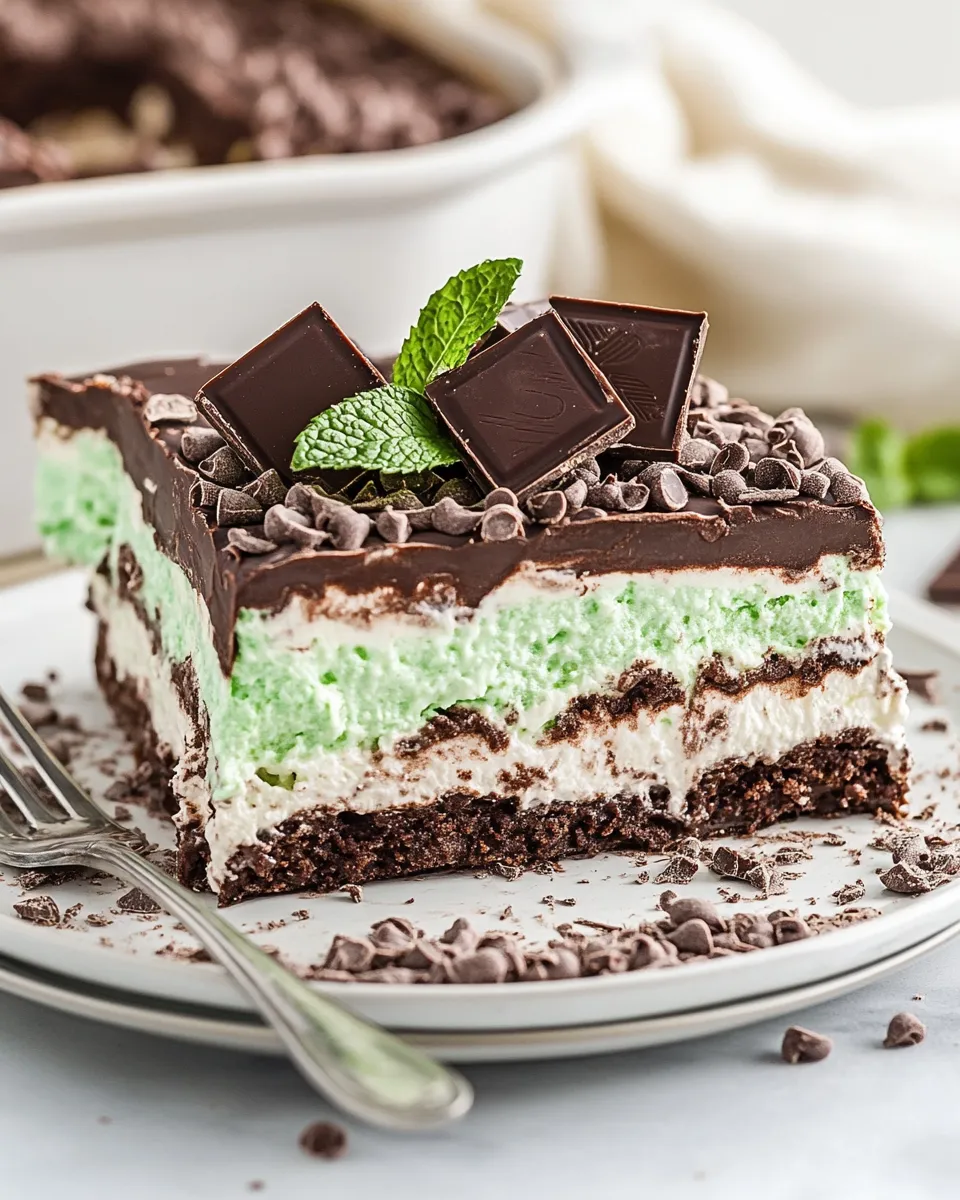
I fell for this dessert the first time I tasted it: layers of Oreo crust, minty cream, silky chocolate pudding, and cloud-like whipped topping. It feels indulgent without being fussy, and it comes together in assembly-line fashion—no baking required. That makes it great for warm evenings, potlucks, or when you want something that looks impressive with minimal hands-on time.
This recipe is straightforward and forgiving. The structure is predictable: crust, mint layer, pudding, topping. Each layer has a job to play in texture and flavor, and small tweaks (that respect the core ingredients) let you tailor the dessert to your crowd. I’ll walk through the exact steps, what to buy, gear to have on hand, and practical fixes for common mistakes.
Read through the steps once before you start. Lay out the ingredients and tools, and work in order. You’ll find that a chilled dish and a couple of short waits make the final slices much cleaner. Let’s get into it.
What to Buy
Shop for a few specific items to keep the process smooth. Aim for Oreo cookies (regular or mint), Cool Whip, and instant chocolate pudding—these are the pillars. If you want a brighter green mint layer, pick up green food coloring and a small bottle of peppermint extract. Freshness matters most for the cream cheese and whipped topping; make sure they’re chilled, and the cream cheese is allowed to come to room temperature before beating.
Ingredients
- 36 Oreo cookies (regular or mint) — base for the crust; mint Oreos add extra flavor, regular Oreos keep the mint subtle.
- 6 tablespoons (78 grams) melted butter — binds the cookie crumbs into a firm crust.
- 8 ounces (225 grams) cream cheese — softened to room temperature; provides the creamy mint layer.
- 2 tablespoons heavy whipping cream — loosens the cream cheese for a spreadable texture.
- ½ teaspoon peppermint extract — concentrated mint flavor; a little goes a long way.
- 2 drop Green food coloring — or enough to get the desired shade of green; optional for visual effect.
- 1 cup powdered sugar — sweetens and stabilizes the cream cheese layer.
- 8 ounces (450 grams) whipped topping (Cool Whip) — thawed; folded into the cream cheese to lighten the layer.
- 2 (3.9-ounce) packages instant chocolate pudding — not cook-and-serve; forms the chocolate layer when mixed with cold milk.
- 3 cups (720 ml) milk — cold; necessary for instant pudding to set properly.
- ¼ cup Andes mint chocolate chips — or chopped Andes mints, for garnish and extra mint-chocolate bites.
- 8 ounces (450 grams) whipped topping (Cool Whip) — thawed; remaining container used as the top layer for a smooth finish.
Mint Chocolate Lasagna in Steps
- Line up your ingredients and an ungreased 9×13 inch (23×33 cm) baking dish. Confirm you have 36 Oreo cookies (regular or mint) and 6 tablespoons (78 grams) melted butter for the crust.
- Place the 36 Oreo cookies in a food processor and crush to fine crumbs. (If you don’t have a food processor, put cookies in a heavy-duty resealable bag and crush with a rolling pin.)
- Transfer the Oreo crumbs to a bowl, pour in the 6 tablespoons (78 grams) melted butter, and stir until the crumbs are evenly moistened.
- Press the Oreo crumb mixture firmly and evenly into the bottom of the 9×13 inch dish to form the crust. Refrigerate the crust for 5 minutes to firm.
- In a large bowl, use a hand mixer to beat the 8 ounces (225 grams) cream cheese (softened to room temperature) on medium speed until smooth and creamy, scraping the bowl as needed.
- Add 2 tablespoons heavy whipping cream, 1 cup powdered sugar, ½ teaspoon peppermint extract, and 2 drops green food coloring to the cream cheese. Beat on low-to-medium speed until well combined and smooth.
- Fold in one 8-ounce (450 gram) container of the whipped topping (Cool Whip), using a spatula, until evenly incorporated. Spread this cream cheese mixture evenly over the chilled Oreo crust. Return the dish to the refrigerator for 10 minutes.
- In a medium bowl, whisk together the 2 (3.9-ounce) packages instant chocolate pudding (not cook and serve) and 3 cups (720 ml) cold milk. Beat with a hand mixer on low speed for about 1–2 minutes, or until the pudding begins to thicken.
- Spread the thickened chocolate pudding evenly over the chilled cream cheese layer. Refrigerate for 10 minutes to allow the pudding layer to set.
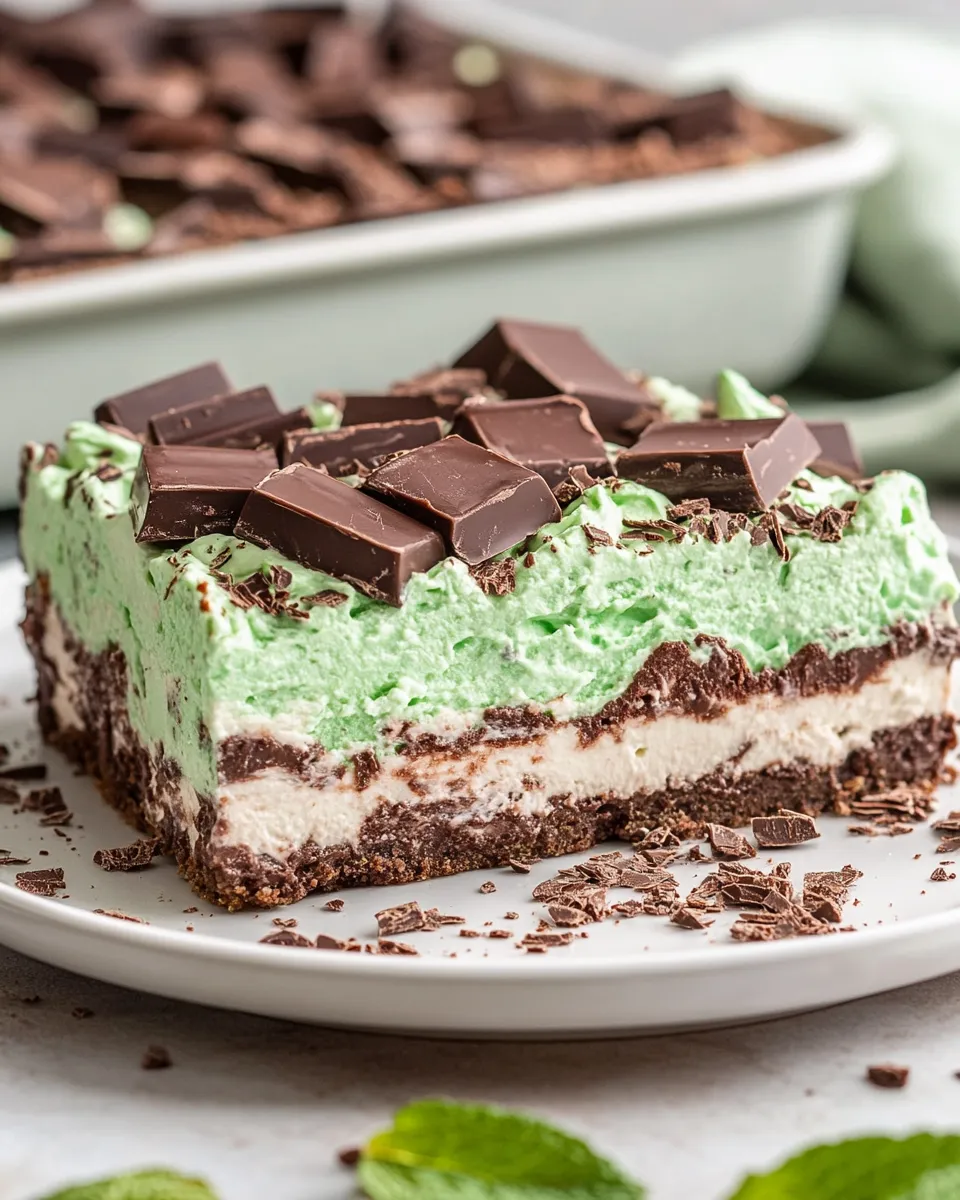
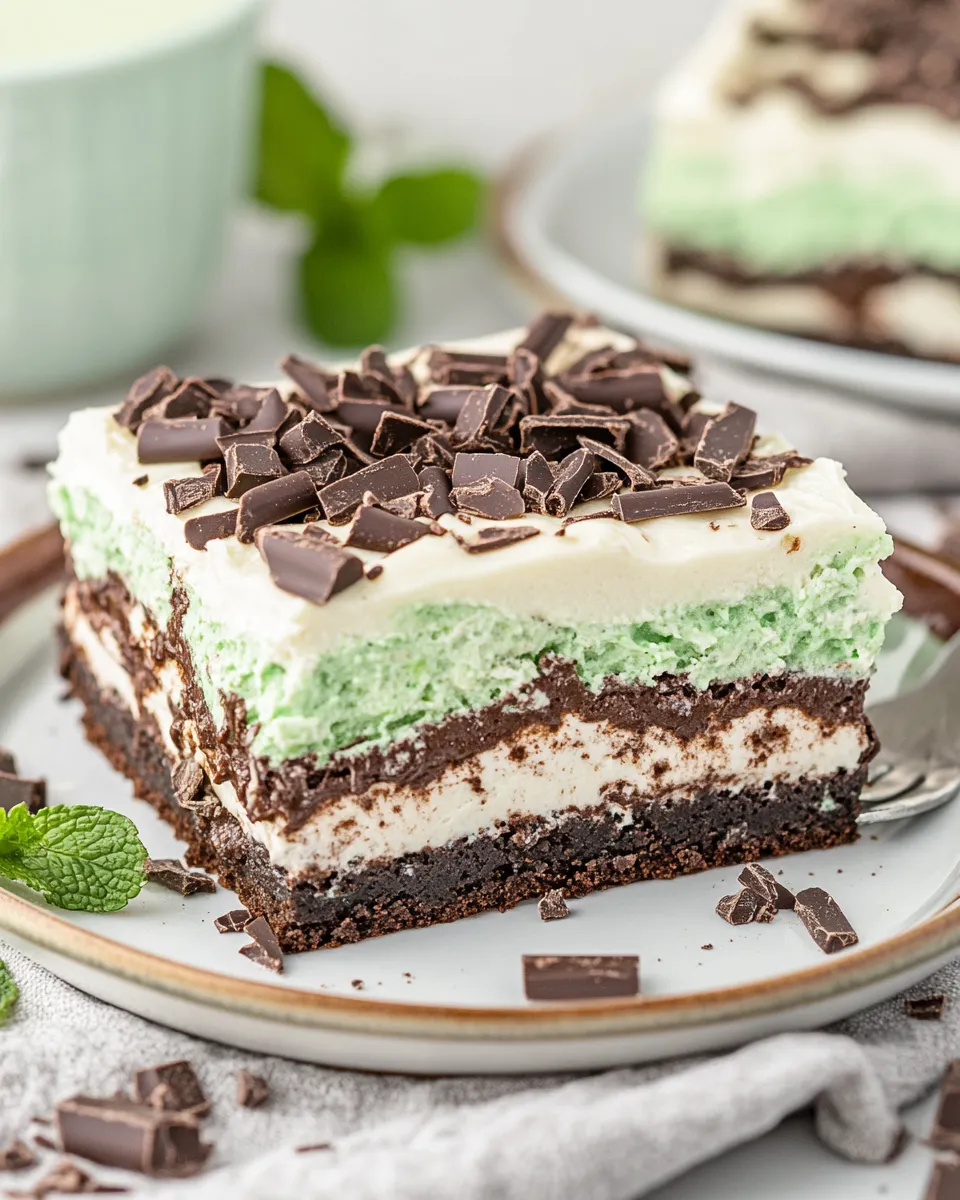
- Spread the remaining 8 ounces (450 grams) whipped topping (Cool Whip) gently and evenly over the pudding layer. Sprinkle ¼ cup Andes mint chocolate chips (or chopped Andes mints) over the top as garnish.
- Refrigerate the assembled dessert for at least 1 hour (longer is fine) to let all layers fully set. Slice into squares and serve chilled.
What Makes This Recipe Special
The magic here is contrast: crunchy, chocolatey crust, light mint cream, smooth pudding, and airy whipped topping. Each layer is simple on its own, but together they mimic a bakery-style layered dessert with minimal effort. Using instant pudding keeps the chocolate layer velvety and quick to assemble, and folding whipped topping into the cream cheese makes the mint layer fluffy without collapsing.
Another strength is reliability. There’s no baking or temperamental components—no worries about curdling or overcooking. The recipe scales visually; doubling ingredients for a larger crowd is straightforward if you have a bigger pan. It’s also forgiving with timing: a longer chill only improves sliceability.
Texture-Safe Substitutions
If someone needs a texture-safe version (softer or less crunchy), choose substitutions that maintain layer integrity:
- For a softer crust: Swap half the Oreo crumbs with finely ground graham crackers; the crumb remains cohesive but less dense.
- For dairy sensitivity: Use dairy-free cream cheese and a dairy-free whipped topping alternative labeled for spreading; note the set may be slightly softer.
- For less air in the mint layer: Reduce the whipped topping folded into the cream cheese by a couple of tablespoons; the result will be denser and easier for those who prefer a firmer bite.
What You’ll Need (Gear)
- 9×13 inch (23×33 cm) baking dish — ungreased; the recipe assumes this size.
- Food processor — speeds up crushing Oreos. If you don’t have one, a resealable bag and rolling pin work fine.
- Hand mixer — helpful for smoothing cream cheese and mixing pudding quickly.
- Mixing bowls — at least two: one for crust crumb mixing and one for pudding.
- Spatula and spoon — for folding and spreading layers evenly.
- Measuring cups and spoons — to confirm quantities (the recipe uses specific amounts).
Common Errors (and Fixes)
These are the issues I see most often and how to avoid them.
- Crumbs too loose or sandy: Not enough butter or not packed firmly. Add the full 6 tablespoons of melted butter and press the crust firmly into the pan; chill for at least 5 minutes to help it set.
- Gritty cream cheese layer: Cream cheese too cold will clump. Bring the 8 ounces to room temperature before beating for a smooth result.
- Runny pudding layer: Using warm milk or under-mixing can lead to a loose filling. Use cold milk and beat for 1–2 minutes until it starts to thicken, then chill for 10 minutes as directed.
- Messy slices: Cutting too soon or using a dull knife. Refrigerate at least an hour, then slice with a hot, wiped-clean knife for neater squares.
- Overpowering peppermint: Peppermint extract is potent. Stick to ½ teaspoon as written; you can always add a touch more next time if you want stronger mint.
Seasonal Adaptations
This dessert adapts well across seasons. In summer, keep it chilled and garnish with fresh mint leaves for a bright finish. Around winter holidays, use red-and-green sprinkles or swap Andes chips for chopped peppermint bark to push the festive note. For St. Patrick’s Day, the green layer and chocolate pairing make this a natural fit—consider adding a thin dusting of cocoa for contrast.
If you’re serving outdoors in warm weather, keep the dessert in a cooler or serve it in smaller, pre-sliced portions to prevent melting. For colder months, the chilled nature still works well and provides a refreshing counterpoint to richer hot dishes.
Notes from the Test Kitchen
We tested the recipe as written several times to confirm timing and texture. Key takeaways:
- Room-temperature cream cheese is non-negotiable for a lump-free mint layer. Take it out 30–60 minutes before starting.
- The crust benefits from a firm press. I use the bottom of a measuring cup to compact the crumbs evenly.
- Pudding thickens noticeably in the refrigerator; the two 10-minute rests between layers make final assembly much cleaner.
- Slicing tastes better after a longer chill. One hour is a minimum; two to four hours yields cleaner, firmer slices.
How to Store & Reheat
Store: Keep the lasagna tightly covered in the refrigerator. It holds well for 3–4 days; after that the crust can begin to soften and the textures will blend more. For best texture, consume within 48 hours.
Freeze: You can freeze portions wrapped tightly in plastic and foil for up to 1 month. Thaw overnight in the refrigerator. Note that freezing and thawing changes the whipped topping texture slightly; it may be a bit grainier once defrosted.
Reheat: This dessert is served chilled and is not intended to be reheated. If you prefer a slightly less cold bite, let slices sit at room temperature for 10–15 minutes before serving.
Mint Chocolate Lasagna FAQs
- Can I use store-bought whipped cream instead of Cool Whip? You can, but Cool Whip holds its shape longer. If using whipped cream, stabilize it with a bit of powdered sugar and avoid over-whipping.
- Do the Oreos have to be mint? No—regular Oreos work fine. Mint Oreos will strengthen the mint profile.
- Can I make this ahead? Yes. Assemble up to a day in advance and keep chilled. This improves sliceability and flavor melding.
- What if I don’t have peppermint extract? Omit it and the dessert becomes a straightforward chocolate-cream lasagna. A small amount of finely chopped mint candy can help mimic the flavor, but peppermint extract gives a cleaner mint note.
- Can I halve the recipe? Yes, but use a smaller pan (like an 8×8 inch) and adjust chilling time as needed.
- Is this recipe nut-free? The base ingredients are nut-free, but check labels on Oreo cookies and Andes chips if you need to avoid cross-contamination.
The Last Word
This Mint Chocolate Lasagna is one of those desserts that looks like a production but is actually straightforward. Lay out the ingredients, follow the simple steps in order, and give it time to chill. The result is a sliceable, crowd-pleasing treat with a balance of mint and chocolate that’s hard to beat. Serve it chilled, cut it cleanly, and enjoy the compliments.

Mint Chocolate Lasagna
Ingredients
Ingredients
- ?36 Oreo cookiesregular or mint
- ?6 tablespoons 78 gramsmelted butter
- ?8 ounces 225 gramscream cheesesoftened to room temperature
- ?2 tablespoonsheavy whipping cream
- ?1/2 teaspoonpeppermint extract
- ?2 dropGreen food coloringor enough to get the desired shade of green
- ?1 cuppowdered sugar
- ?8 ounces 450 gramswhipped topping (Cool Whip)thawed
- ?23.9-ounce packagesinstant chocolate puddingnot cook and serve
- ?3 cups 720 mlmilkcold
- ?1/4 cupAndes mint chocolate chipsor chopped Andes mints for garnish
- ?8 ounces 450 gramswhipped topping (Cool Whip)thawed
Instructions
Instructions
- Line up your ingredients and an ungreased 9×13 inch (23×33 cm) baking dish. Confirm you have 36 Oreo cookies (regular or mint) and 6 tablespoons (78 grams) melted butter for the crust.
- Place the 36 Oreo cookies in a food processor and crush to fine crumbs. (If you don’t have a food processor, put cookies in a heavy-duty resealable bag and crush with a rolling pin.)
- Transfer the Oreo crumbs to a bowl, pour in the 6 tablespoons (78 grams) melted butter, and stir until the crumbs are evenly moistened.
- Press the Oreo crumb mixture firmly and evenly into the bottom of the 9×13 inch dish to form the crust. Refrigerate the crust for 5 minutes to firm.
- In a large bowl, use a hand mixer to beat the 8 ounces (225 grams) cream cheese (softened to room temperature) on medium speed until smooth and creamy, scraping the bowl as needed.
- Add 2 tablespoons heavy whipping cream, 1 cup powdered sugar, ½ teaspoon peppermint extract, and 2 drops green food coloring to the cream cheese. Beat on low-to-medium speed until well combined and smooth.
- Fold in one 8-ounce (450 gram) container of the whipped topping (Cool Whip), using a spatula, until evenly incorporated. Spread this cream cheese mixture evenly over the chilled Oreo crust. Return the dish to the refrigerator for 10 minutes.
- In a medium bowl, whisk together the 2 (3.9-ounce) packages instant chocolate pudding (not cook and serve) and 3 cups (720 ml) cold milk. Beat with a hand mixer on low speed for about 1–2 minutes, or until the pudding begins to thicken.
- Spread the thickened chocolate pudding evenly over the chilled cream cheese layer. Refrigerate for 10 minutes to allow the pudding layer to set.
- Spread the remaining 8 ounces (450 grams) whipped topping (Cool Whip) gently and evenly over the pudding layer. Sprinkle ¼ cup Andes mint chocolate chips (or chopped Andes mints) over the top as garnish.
- Refrigerate the assembled dessert for at least 1 hour (longer is fine) to let all layers fully set. Slice into squares and serve chilled.
Equipment
- Food Processor
- 9×13" casserole dish
- Mixing Bowl
- Offset Spatula
- Hand Mixer
Notes
Regular Oreos work best.While double stuff Oreos are amazing dunked in milk, they have a bit too much frosting in them when it comes to making a crispy cookie crust.
Use peppermint extract.I prefer peppermint extract over the other variety, called “pure mint” extract. Peppermint has a lighter flavor, whereas the other is more herbal.
Be sure to use instant pudding mix.When buying pudding mix, look for the box that says “instant”. The type of pudding mix that needs to be cooked won’t work properly here.
You need a total of 16 ounces of whipped topping. Half goes into the mint layer, and the other half is for the topping. It’s usually less expensive to buy the larger container than it is to buy 2 8-ounce containers.
To use fresh whipped creaminstead of whipped topping: Whip two cups of heavy cream to get 16oz. Of whipped cream and divide in half for the different layers.
Chill each layer!The key to making a layered dessert with clean lines is that each layer is cold and set firm before you add the next one. A little bit of patience makes all the difference here.
To Store:Keep chocolate lasagna covered in the fridge for up to 5 days. You can also freeze the dessert for up to 2 months. Just allow it to thaw overnight in the fridge before serving.


