
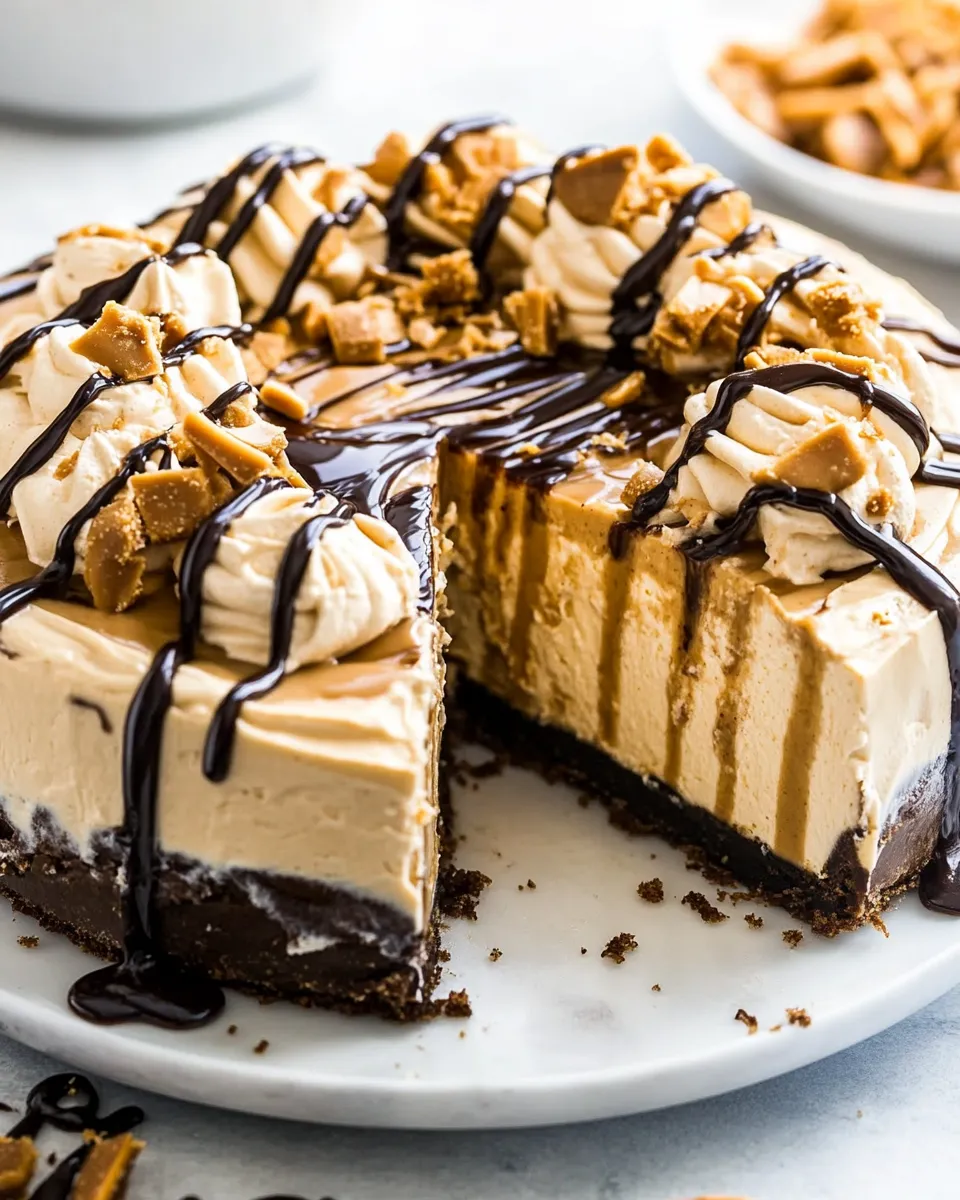
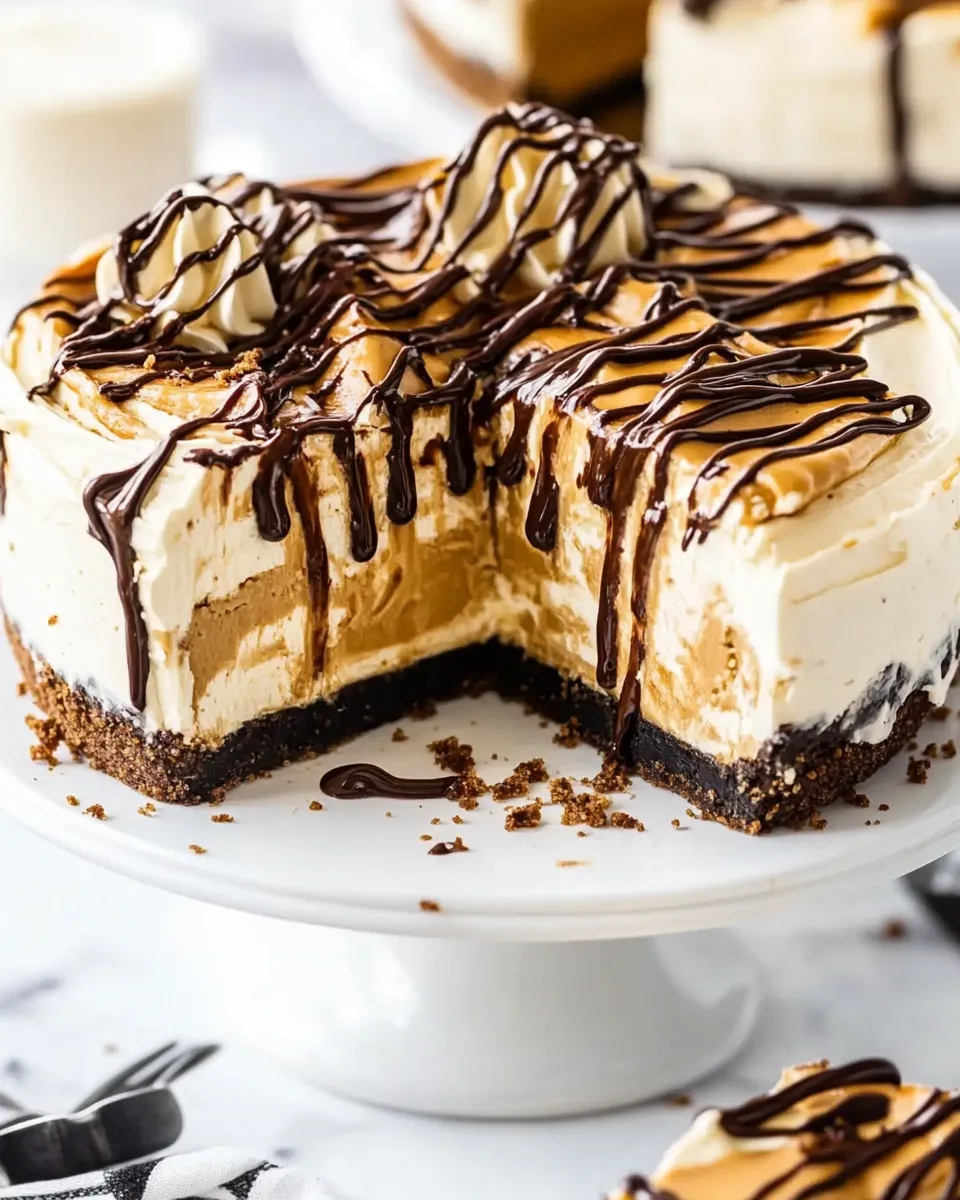
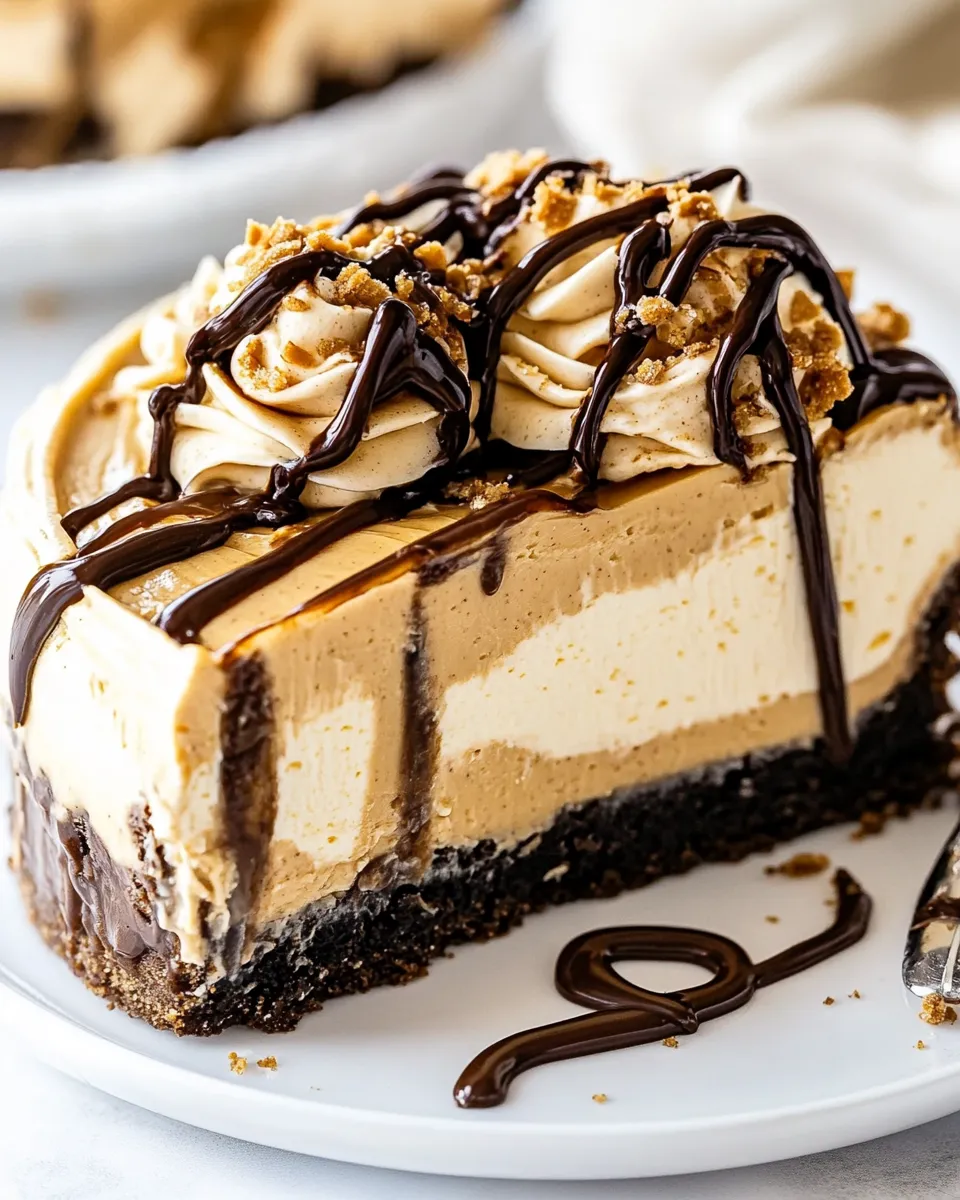
This No Bake Peanut Butter Cheesecake is one of those reliably excellent desserts I reach for when I want maximum flavor with minimal fuss. It’s rich, peanut-buttery, and set in a crisp chocolate sandwich-cookie crust. No oven time, no complicated water baths — just straightforward steps and a very forgiving finish.
I like this recipe because it plays to texture as much as taste: a crunchy chocolate base, a creamy, airy peanut-butter filling, and glossy toppings if you want them. It comes together fast and improves after a few hours in the fridge, so it’s perfect for parties, potlucks, or a weekend treat when you want something impressive without a lot of hands-on time.
Below you’ll find the exact ingredients and the step-by-step instructions to make it exactly as written, plus practical swaps, gear suggestions, troubleshooting, and storage tips. Read through once, gather your tools, and you’ll be slicing into that first perfect piece faster than you think.
Ingredient Rundown
Ingredients
- 30 chocolate sandwich cookies (leave the cream inside) — forms the chocolate cookie crust; keeping the cream adds extra chocolate richness.
- 5 tablespoons (70 g) unsalted butter, melted — binds the crumb and firms the crust once chilled.
- 38-ounce blocks (24 ounces total) (678 g) cream cheese, room temperature — provides the smooth, tangy base for the filling; bring to room temperature for lump-free mixing.
- 1 cup (268 g) creamy peanut butter — gives the cheesecake its peanut-butter flavor and body; creamy works best for a smooth texture.
- ¾ cup (85 g) powdered sugar — sweetens and helps stabilize the filling without adding graininess.
- 1 teaspoon vanilla extract — enhances flavor and rounds out the peanut butter.
- 1 ¼ cups (296 ml) heavy whipping cream see note — whipped into the filling to add volume and structure (see chef’s notes on how to get stiff peaks).
- Hot fudge and melted peanut butter for garnish — optional finishers that add shine, extra peanut flavor, and visual appeal.
- Whipped Cream for garnish — optional light topping for serving.
No Bake Peanut Butter Cheesecake: How It’s Done
- Place the 30 chocolate sandwich cookies (leave the cream inside) in a food processor and pulse until they form a fine crumb. If you don’t have a food processor, put the cookies in a sealed plastic bag and crush with a rolling pin until fine.
- Pour the 5 tablespoons (70 g) melted unsalted butter over the cookie crumbs. Stir with a fork until all crumbs are evenly moistened.
- Transfer the crumb mixture to a 9-inch springform pan. Press the crumbs firmly into the bottom and about halfway up the sides to form an even crust. Refrigerate the crust while you make the filling (about 15–30 minutes).
- In a large bowl, beat the room-temperature cream cheese (amount as listed in the ingredients) and 1 cup (268 g) creamy peanut butter with a hand mixer or stand mixer until smooth and fully combined.
- Add 3/4 cup (85 g) powdered sugar to the cream cheese–peanut butter mixture and continue mixing until the mixture is creamy and smooth.
- Add 1 teaspoon vanilla extract and mix briefly to combine.
- With the mixer running on low, slowly add 1 1/4 cups (296 ml) heavy whipping cream. Increase the speed and continue beating until the mixture holds stiff peaks and is thick enough to stand when the mixer is lifted.
- Spoon or spread the cheesecake filling into the prepared cookie crust, smoothing the top with a spatula.
- Chill the assembled cheesecake in the refrigerator for at least 1 hour to set (longer is fine if you prefer a firmer texture).
- Before serving, unlock and remove the springform ring. Garnish the cheesecake with hot fudge and melted peanut butter and/or whipped cream as desired. Slice and serve.
Reasons to Love No Bake Peanut Butter Cheesecake
There are practical and delicious reasons this cheesecake earns a regular spot in my baking rotation. First, it’s fast to assemble. You do the crust, whip a silky filling, and let the fridge do the rest. No oven means it’s less sensitive to temperature and easier to time around other dishes.
Second, the flavor is universal. Peanut butter lovers get a deep nutty profile, chocolate-cream-cookie crumbs give a nostalgic contrast, and the optional hot fudge or extra melted peanut butter lets you dial up richness at serving time. Texture-wise, the contrast between the crunchy crust and silky filling makes each bite interesting.
Finally, it’s forgiving. The recipe tolerates small timing variations (a longer chill time makes a firmer slice) and small technique slips (softening cream cheese slightly longer removes lumps). For those reasons, this is a dessert that looks and tastes like effort even when it’s straightforward to do.
Ingredient Swaps & Substitutions

- Chocolate sandwich cookies — use any chocolate sandwich cookie you like. Gluten-free chocolate sandwich cookies work if you need a gluten-free base.
- Unsalted butter — you can use salted butter if that’s what you have; reduce added salt in other components (this recipe doesn’t list added salt, so keep that in mind).
- Cream cheese — full-fat cream cheese delivers the best texture and flavor. If you must use a lighter version, expect a slightly less creamy mouthfeel.
- Creamy peanut butter — natural-style peanut butter can be used, but stir it well first to reincorporate the oils for a smoother filling.
- Powdered sugar — confectioners’ sugar is the same thing; it dissolves easily and keeps the filling silky.
- Heavy whipping cream — if you want a looser, mousse-like filling, whip slightly less. For the firmest set, ensure you reach stiff peaks as instructed.
- Garnishes — swap hot fudge for chocolate ganache, or drizzle caramel if you prefer those flavor profiles.
Gear Checklist
- 9-inch springform pan — makes unmolding the cheesecake simple and clean.
- Food processor or a sturdy plastic bag and rolling pin — for finely crushing the cookies.
- Hand mixer or stand mixer — needed to get a smooth cream cheese–peanut butter base and to whip the cream to stiff peaks.
- Mixing bowls — at least one large bowl for the filling and one for whipping cream if you separate tasks.
- Spatula and measuring tools — spatula for smoothing and accurate measures to keep balance.
- Refrigerator space — the cheesecake needs at least an hour to set, longer for a firmer slice.
What Not to Do
There are a few common mistakes that make this recipe harder than it needs to be. Don’t try to beat cold cream cheese straight out of the fridge — it won’t incorporate smoothly and you’ll get lumps. Bring it to room temperature before mixing.
Don’t skip chilling the crust before adding the filling. Pressing the crumbs into the pan and chilling them helps the crust hold together when you slice. Also, don’t under-whip the cream. You want stiff peaks so the filling has body and holds its shape. Conversely, don’t over-whip to the point of turning the cream grainy; stop as soon as stiff peaks form.
Finally, don’t rush the set time. The filling firms in the fridge, and a short chill will give a looser, mousse-like texture, while a longer chill gives cleaner slices. Plan at least an hour, but ideally a few hours or overnight for best results.
Dietary Swaps & Alternatives
If you have dietary constraints, there are sensible swaps to keep the essence of this cheesecake while accommodating needs.
- Nut allergies — substitute peanut butter with sunflower seed butter or soy-based spreads. Texture and flavor will differ, but the method stays the same.
- Dairy-free / vegan — use plant-based cream cheese and a nondairy heavy cream alternative that whips (some coconut cream brands whip well). Use vegan sandwich cookies for the crust and melted vegan butter or coconut oil for binding.
- Lower sugar — reduce powdered sugar slightly, or use a powdered sugar substitute that measures like confectioners’ sugar. Be aware this will affect sweetness and structure.
- Gluten-free — swap the sandwich cookies for a certified gluten-free chocolate sandwich cookie for an easy gluten-free version.
Chef’s Notes
Room Temperature Is Key
Let the cream cheese sit out until it’s soft enough that your mixer can push through it without large lumps, but not so warm that it becomes runny. This is the single best way to avoid a grainy filling.
Whipping the Cream
Start whipping the cream on low to build structure, then increase speed. Watch it closely. Stiff peaks mean the cream holds its shape and the filling won’t collapse when folded together. If you overwhip and the cream looks curdled, you can often rescue it by gently beating in a small amount of unwhipped cream to smooth it back.
Crust Tips
Press crumbs firmly and evenly into the pan for slices that hold together. If you want a taller crust edge, press higher along the sides. Chilling the crust before adding the filling reduces sliding and gives a cleaner finish when you remove the springform ring.
Best Ways to Store
Store the assembled cheesecake, covered, in the refrigerator. It keeps best for up to 4–5 days. If you need longer storage, individual slices freeze well: wrap slices tightly in plastic and place them in an airtight container. Thaw in the refrigerator overnight before serving.
If you plan to freeze the whole cheesecake, remove the springform ring (or leave it on if you prefer), wrap the cake well in plastic wrap followed by foil, and freeze. Thaw in the refrigerator for 12–24 hours before serving to ensure even texture. Note that toppings like whipped cream or hot fudge may separate or change texture after freezing, so consider adding those just before serving.
FAQ
Can I make this ahead of time?
Yes. The cheesecake improves with time in the fridge. Make it the day before for easy entertaining. Just wait to add whipped cream, hot fudge, or delicate garnishes until serving time.
How firm will the cheesecake be after chilling only 1 hour?
At one hour you’ll have a set but slightly softer, mousse-like cheesecake. For clean slices and a firmer texture, chill for several hours or overnight.
Can I use crunchy peanut butter?
You can, but it will change the texture. Crunchy peanut butter adds nuts and texture to the filling, which some people enjoy. If you want an ultra-smooth filling, stick to creamy peanut butter.
Do I have to use a springform pan?
A springform pan makes life easier at unmolding. You can use a loose-bottom tart pan, but a standard cake pan will make removal harder. If you use a fixed pan, serve the cheesecake in wedges straight from the pan.
My filling looks runny — what went wrong?
Most often, the cream wasn’t whipped to stiff peaks or the cream cheese was too warm. Chill the mixture briefly and then whip a little more if needed. Ensure you’ve reached the proper peak stage before assembling.
See You at the Table
This No Bake Peanut Butter Cheesecake is a reliable crowd-pleaser: straightforward, adaptable, and rich without being fussy. Follow the steps as written, mind the key technique points (room-temperature cream cheese and stiff whipped cream), and you’ll have a dessert that looks like you spent hours on it, even when you didn’t.
If you try it, I’d love to know how you garnish yours — extra hot fudge, a salted-peanut drizzle, or a dollop of whipped cream are my favorites. Slice confidently, serve chilled, and enjoy every peanut-buttery bite.
No Bake Peanut Butter Cheesecake
Ingredients
Ingredients
- 30 chocolate sandwich cookies leave the cream inside
- 5 tablespoons 70 g unsalted butter, melted
- 38- ounce blocks 24 ounces total(678 g) cream cheese, room temperature
- 1 cup 268 g creamy peanut butter
- 3/4 cup 85 g powdered sugar
- 1 teaspoonvanilla extract
- 1 1/4 cups 296 ml heavy whipping creamsee note
- Hot fudge and melted peanut butterfor garnish
- Whipped Creamfor garnish
Instructions
Instructions
- Place the 30 chocolate sandwich cookies (leave the cream inside) in a food processor and pulse until they form a fine crumb. If you don't have a food processor, put the cookies in a sealed plastic bag and crush with a rolling pin until fine.
- Pour the 5 tablespoons (70 g) melted unsalted butter over the cookie crumbs. Stir with a fork until all crumbs are evenly moistened.
- Transfer the crumb mixture to a 9-inch springform pan. Press the crumbs firmly into the bottom and about halfway up the sides to form an even crust. Refrigerate the crust while you make the filling (about 15–30 minutes).
- In a large bowl, beat the room-temperature cream cheese (amount as listed in the ingredients) and 1 cup (268 g) creamy peanut butter with a hand mixer or stand mixer until smooth and fully combined.
- Add 3/4 cup (85 g) powdered sugar to the cream cheese–peanut butter mixture and continue mixing until the mixture is creamy and smooth.
- Add 1 teaspoon vanilla extract and mix briefly to combine.
- With the mixer running on low, slowly add 1 1/4 cups (296 ml) heavy whipping cream. Increase the speed and continue beating until the mixture holds stiff peaks and is thick enough to stand when the mixer is lifted.
- Spoon or spread the cheesecake filling into the prepared cookie crust, smoothing the top with a spatula.
- Chill the assembled cheesecake in the refrigerator for at least 1 hour to set (longer is fine if you prefer a firmer texture).
- Before serving, unlock and remove the springform ring. Garnish the cheesecake with hot fudge and melted peanut butter and/or whipped cream as desired. Slice and serve.
Equipment
- Food Processor
- sealed plastic bag
- Rolling Pin
- Fork
- 9-inch springform pan
- Hand Mixer
- Stand mixer
- Spatula
- Refrigerator
Notes
To avoid lumps, make sure your cream cheese is room temperature.
You can make this up to 24 hours ahead of time, store leftovers in refrigerator. I don’t recommend freezing.


