
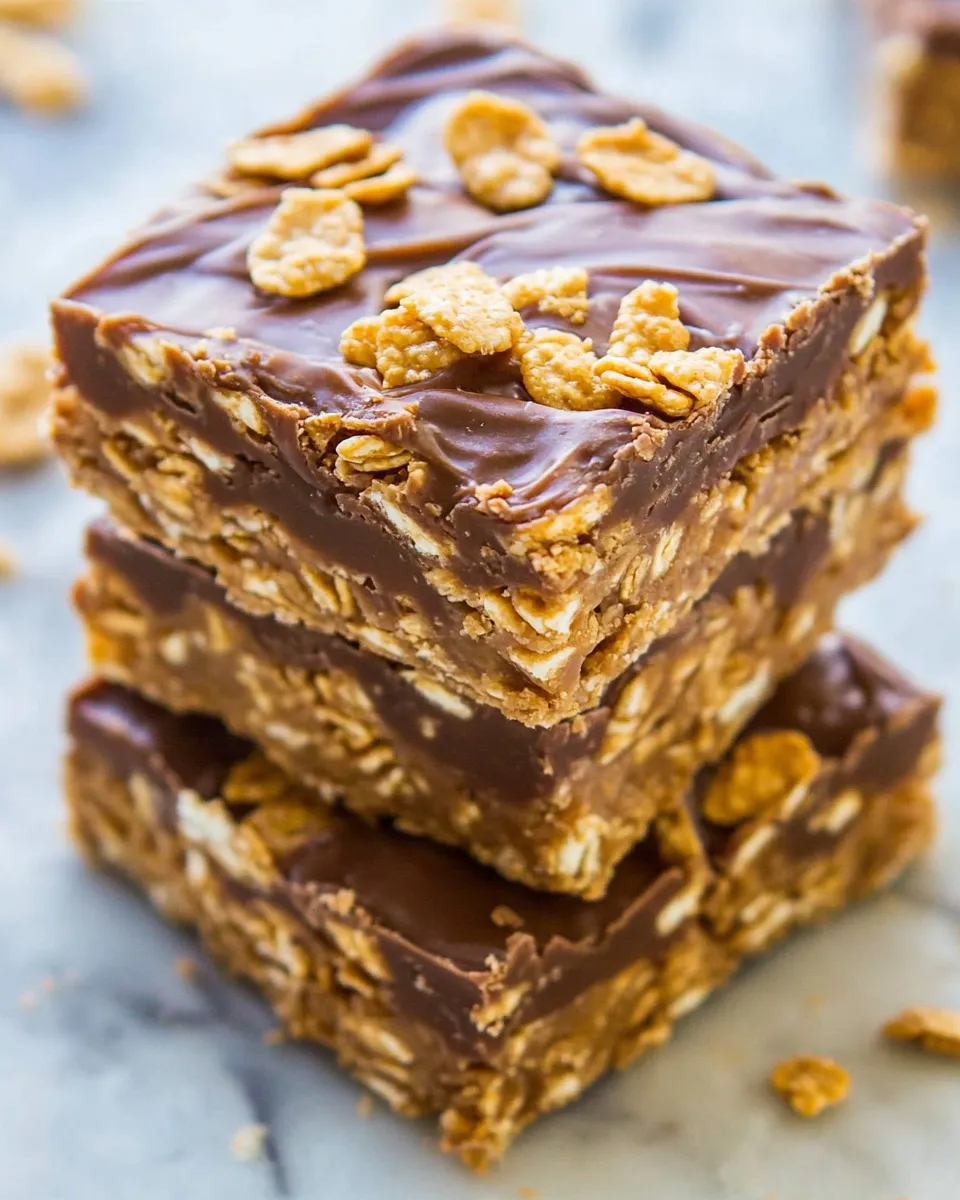
I make these bars whenever I need something fast, crunchy, and ridiculously comforting without turning on the oven. They’re one of those recipes that travel well to potlucks, disappear from lunchboxes, and reward a late-night sweet tooth without a lot of fuss. The triple peanut butter comes through in three distinct layers: a peanut-butter–glued cornflake base, a chocolate-peanut topping, and a swirled peanut-butter finish. It’s simple, decisive, and dependable.
There’s no special equipment required, no tempering, and no complicated ratios to remember. The key moments are heating just enough to bind the cereal and melting the chocolate smoothly. If you follow the steps in order and press the cereal firmly, you’ll end up with clean bars that hold together and slice neatly.
I’ll walk you through everything you need to know: the exact ingredients, the step-by-step build, why each component matters, swaps for common diet needs, what to avoid, and how to store them so they stay at their best. Let’s get into it and make something delicious without turning on the oven.
The Essentials
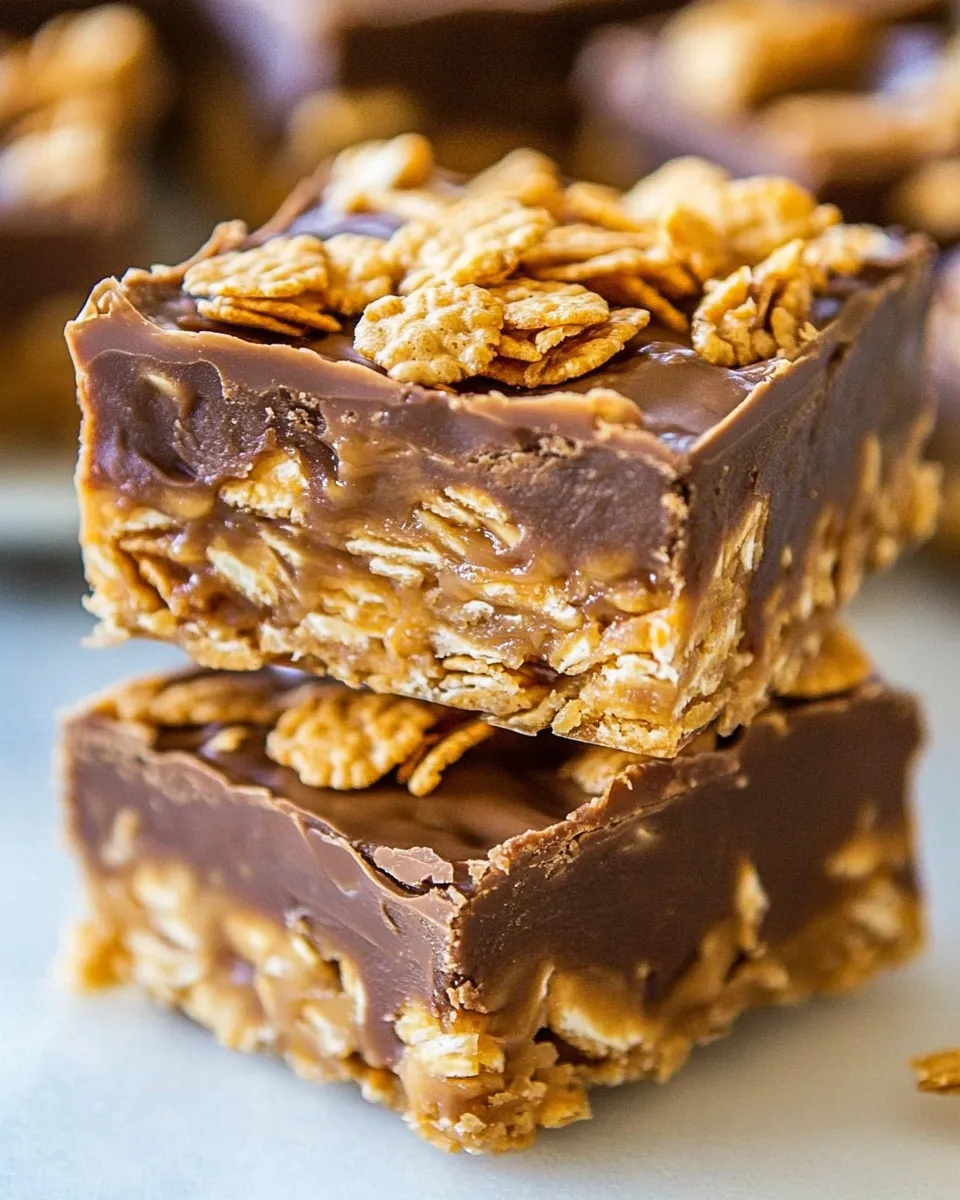
These are no-bake bars built around crunchy corn flakes and creamy peanut butter. They’re sweetened and bound with corn syrup and sugar, topped with a chocolate-peanut layer, and finished with a peanut-butter swirl that’s marbled into the chocolate. The recipe is straightforward and forgiving, which makes it ideal for a quick bake-less weekend project.
Plan for at least 2–3 hours of chill time so the chocolate sets completely; overnight is fine if you’re prepping ahead. Use commercially processed creamy peanut butter (not natural or homemade) so the cereal sticks together properly and the texture remains stable.
Ingredients
- 1 heaping cup creamy peanut butter — don’t use natural or homemade, it’s too runny to glue the cereal together.
- ½ cup light corn syrup — light colored, not lite; it provides stickiness and shine.
- ½ cup granulated sugar — adds sweetness and helps set the binder.
- ¼ cup light brown sugar, packed — brings a touch of molasses flavor and depth.
- 1 tablespoon vanilla extract — brightens the mix and rounds the sweetness.
- 3 ½ cups corn flakes cereal — the crunchy structure; use plain corn flakes rather than flavored varieties.
- ½ heaping cup semi-sweet chocolate chips, melted — the main chocolate layer; semi-sweet balances the peanut butter.
- ¼ heaping cup creamy peanut butter, melted with the chocolate — folded into the melted chocolate for a peanutty chocolate layer.
- ¼ cup creamy peanut butter, for swirling on top — warmed slightly so it can be drizzled and marbled into the chocolate.
Build No-Bake Triple Peanut Butter Cornflake Bars Step by Step
- Line an 8-inch square pan with aluminum foil, leaving an overhang on two sides; spray the foil with cooking spray and set the pan aside.
- In a large microwave-safe bowl, combine 1 heaping cup creamy peanut butter, ½ cup light corn syrup, ½ cup granulated sugar, and ¼ cup light brown sugar (packed).
- Microwave the mixture on high for 1 minute. Remove and stir; the mixture may still be granular. Return to the microwave and heat on high for 1 more minute.
- Stir in 1 tablespoon vanilla extract until combined.
- Add 3½ cups corn flakes to the peanut butter mixture and stir until the cereal is evenly coated.
- Turn the coated cereal mixture into the prepared pan. Press and pack it down somewhat firmly and evenly with a spatula, then smooth the top. Set the pan aside.
- In a large microwave-safe bowl (you may use the same bowl if scraped clean), combine ½ heaping cup semi-sweet chocolate chips and ¼ heaping cup creamy peanut butter (the peanut butter to be melted with the chocolate).
- Microwave the chocolate mixture on high for 1 minute. Stir; if the chips are not fully melted, return to the microwave in 10–15 second bursts, stirring between bursts, until the mixture is smooth.
- Pour the melted chocolate-peanut butter mixture over the cereal layer and smooth the top lightly with a spatula or knife.
- In a small microwave-safe bowl, heat ¼ cup creamy peanut butter (for swirling) about 30 seconds, then stir until smooth.
- Drizzle the melted peanut butter over the chocolate in five wide, evenly spaced, parallel lines that span the width of the pan.
- Rotate the pan 90 degrees. Using a toothpick or the tip of a knife, draw five evenly spaced lines perpendicular to the drizzled lines (starting at one side and dragging to the other) to create a marbled pattern.
- Cover the pan with a sheet of foil and refrigerate until the chocolate layer is completely set, at least 2–3 hours or overnight.
- Use the foil overhang to lift the set slab from the pan, place on a cutting board, and slice into bars. Serve.
Why This Recipe Works

Every layer has a clear job. The corn syrup and sugars heat with the peanut butter to form a tacky binder that glues the flakes together without becoming rock-hard. Creamy, commercially stabilized peanut butter provides the right balance of fat and emulsifiers so the bars hold shape. The melted chocolate-peanut layer seals the top, adding a concentrated flavor and a smooth textural contrast to the cornflake crunch. Finally, the peanut-butter swirl not only boosts peanut flavor but creates an attractive marbled top that makes each bar feel a little special.
The microwave steps are short and controlled to prevent scorching and keep the mix workable. Pressing the cereal firmly into the pan eliminates air pockets, which helps the bars slice cleanly and last longer without crumbling.
Easy Ingredient Swaps

Want to tweak the recipe? Here are safe, practical swaps that preserve texture and performance.
- Binder: If you must avoid corn syrup, use a commercially available light glucose syrup or a very thick commercial honey as a partial swap, but expect a slight flavor change and softer set. Work carefully to get the right tackiness.
- Peanut butter: For nut-free needs, use a commercially processed, stabilized seed butter (for example a sunflower seed butter labeled for baking). Make sure it’s creamy and not the runny, stirred type.
- Chocolate: Swap semi-sweet for milk or dark chocolate chips depending on sweetness preference. If using dairy-free chocolate chips, melt them slowly and expect a slightly different mouthfeel.
- Sweeteners: Don’t replace the granulated plus brown sugar with a liquid-only sweetener; solids help with structure. If reducing sugar, expect a softer, less set bar.
Essential Tools for Success
You don’t need much. A good 8-inch square pan lined with foil makes removal effortless. Use a microwave-safe bowl big enough to stir without spilling. A sturdy spatula for pressing the cereal evenly is invaluable—silicone or metal with a flat edge works best. A toothpick or the tip of a knife creates the marbled pattern without overworking the top.
What Not to Do
Do not use natural or homemade peanut butter for the binder stage; it’s too oily and loose to hold the corn flakes together. Don’t overheat the chocolate — melt it gently in short bursts and stir between intervals to avoid graininess. When pressing the cereal into the pan, don’t compact it so tightly that the bars become dense; press firmly enough to remove large air pockets but keep some lightness.
Dietary Customizations
If you need allergy-friendly or dairy-free bars, focus on commercially processed alternatives labeled for baking. Swap the creamy peanut butter for a stable seed butter and choose dairy-free chocolate chips. Keep in mind that any substitution of the peanut-butter binder should match the viscosity of the original creamy peanut butter to maintain bar structure.
For lower-sugar versions, reduce the granulated sugar slightly, but know the bars will be softer and less set. If you need a completely sugar-free version, the structural role sugars play makes a straight swap challenging without further testing.
Behind-the-Scenes Notes
I test bars on a sheet of parchment and allow one slab to sit at room temperature for several hours to compare texture with refrigeration. Refrigerator-set bars are firmer and slice cleanly; room-temperature bars are chewier and better when you want a softer bite. The recipe as written is optimized for refrigeration.
The “heaping” cup measurements are deliberate: the slightly generous amount of peanut butter in the binder and the chocolate mix improves cohesion and flavor. If measuring exactly, a heaping cup means a bit more than a level cup; this recipe tolerates a touch of variance, but avoid large deviations.
Storing Tips & Timelines
Cover the bar slab or place cut bars in an airtight container and refrigerate. Stored cold, they keep well for about 7–10 days. If left at room temperature in a cool, dry place, they’re best within 48 hours since the chocolate layer will soften and the binder can become stickier. For longer storage, wrap individual bars and freeze for up to one month; thaw in the refrigerator before serving.
No-Bake Triple Peanut Butter Cornflake Bars FAQs
Q: Can I bake these to dry them out? A: No—this is a no-bake recipe by design. Baking would alter textures and could melt the chocolate layer unnaturally.
Q: Why does my cereal layer fall apart? A: Likely causes are using natural peanut butter (too runny), not pressing the cereal firmly enough into the pan, or not heating the binder long enough for the sugars to dissolve and bond with the peanut butter.
Q: Can I use other cereals? A: You can experiment, but corn flakes provide a neutral crunch that holds up well. Flakier or lighter cereals may compress too much, and sturdier cereals may require different binder amounts.
Q: How do I get clean slices? A: Chill thoroughly until the chocolate is fully set (2–3 hours minimum). Use a sharp knife warmed briefly under hot water and wiped dry between cuts for cleaner edges.
Hungry for More?
If you enjoyed these bars, try experimenting with different chocolate-to-peanut ratios for a more chocolate-forward or more peanut-forward bar. Keep the technique the same: bind, press, top, chill. Small adjustments in the top layer change the final texture and flavor in satisfying ways. These bars are forgiving, and once you make them a couple times you’ll find your favorite balance.
Make a batch, cut a few for neutral-tasting palates and stash some for yourself. They’re simple, reliable, and exactly the kind of thing I keep in rotation when I want a quick, nostalgic treat without fuss.
No-Bake Triple Peanut Butter Cornflake Bars
Ingredients
Ingredients
- 1 heaping cup creamy peanut butter don’t use natural or homemade, it’s too runny to glue the cereal together
- 1/2 cuplight corn syrup light colored, not lite
- 1/2 cupgranulated sugar
- 1/4 cuplight brown sugar packed
- 1 tablespoonvanilla extract
- 3 1/2 cupscorn flakes cereal
- 1/2 heaping cup semi-sweet chocolate chips melted
- 1/4 heaping cup creamy peanut butter melted with the chocolate
- 1/4 cupcreamy peanut butter for swirling on top
Instructions
Instructions
- Line an 8-inch square pan with aluminum foil, leaving an overhang on two sides; spray the foil with cooking spray and set the pan aside.
- In a large microwave-safe bowl, combine 1 heaping cup creamy peanut butter, ½ cup light corn syrup, ½ cup granulated sugar, and ¼ cup light brown sugar (packed).
- Microwave the mixture on high for 1 minute. Remove and stir; the mixture may still be granular. Return to the microwave and heat on high for 1 more minute.
- Stir in 1 tablespoon vanilla extract until combined.
- Add 3½ cups corn flakes to the peanut butter mixture and stir until the cereal is evenly coated.
- Turn the coated cereal mixture into the prepared pan. Press and pack it down somewhat firmly and evenly with a spatula, then smooth the top. Set the pan aside.
- In a large microwave-safe bowl (you may use the same bowl if scraped clean), combine ½ heaping cup semi-sweet chocolate chips and ¼ heaping cup creamy peanut butter (the peanut butter to be melted with the chocolate).
- Microwave the chocolate mixture on high for 1 minute. Stir; if the chips are not fully melted, return to the microwave in 10–15 second bursts, stirring between bursts, until the mixture is smooth.
- Pour the melted chocolate-peanut butter mixture over the cereal layer and smooth the top lightly with a spatula or knife.
- In a small microwave-safe bowl, heat ¼ cup creamy peanut butter (for swirling) about 30 seconds, then stir until smooth.
- Drizzle the melted peanut butter over the chocolate in five wide, evenly spaced, parallel lines that span the width of the pan.
- Rotate the pan 90 degrees. Using a toothpick or the tip of a knife, draw five evenly spaced lines perpendicular to the drizzled lines (starting at one side and dragging to the other) to create a marbled pattern.
- Cover the pan with a sheet of foil and refrigerate until the chocolate layer is completely set, at least 2–3 hours or overnight.
- Use the foil overhang to lift the set slab from the pan, place on a cutting board, and slice into bars. Serve.
Equipment
- 1 (8 inch) Square Pan
- 2 Large, Microwave-Safe Bowls
Notes
Storage:
Bars will keep airtight at room temperature for up to 1 week, in the refrigerator for up to 2 weeks, or in the freezer for up to 6 months.


