
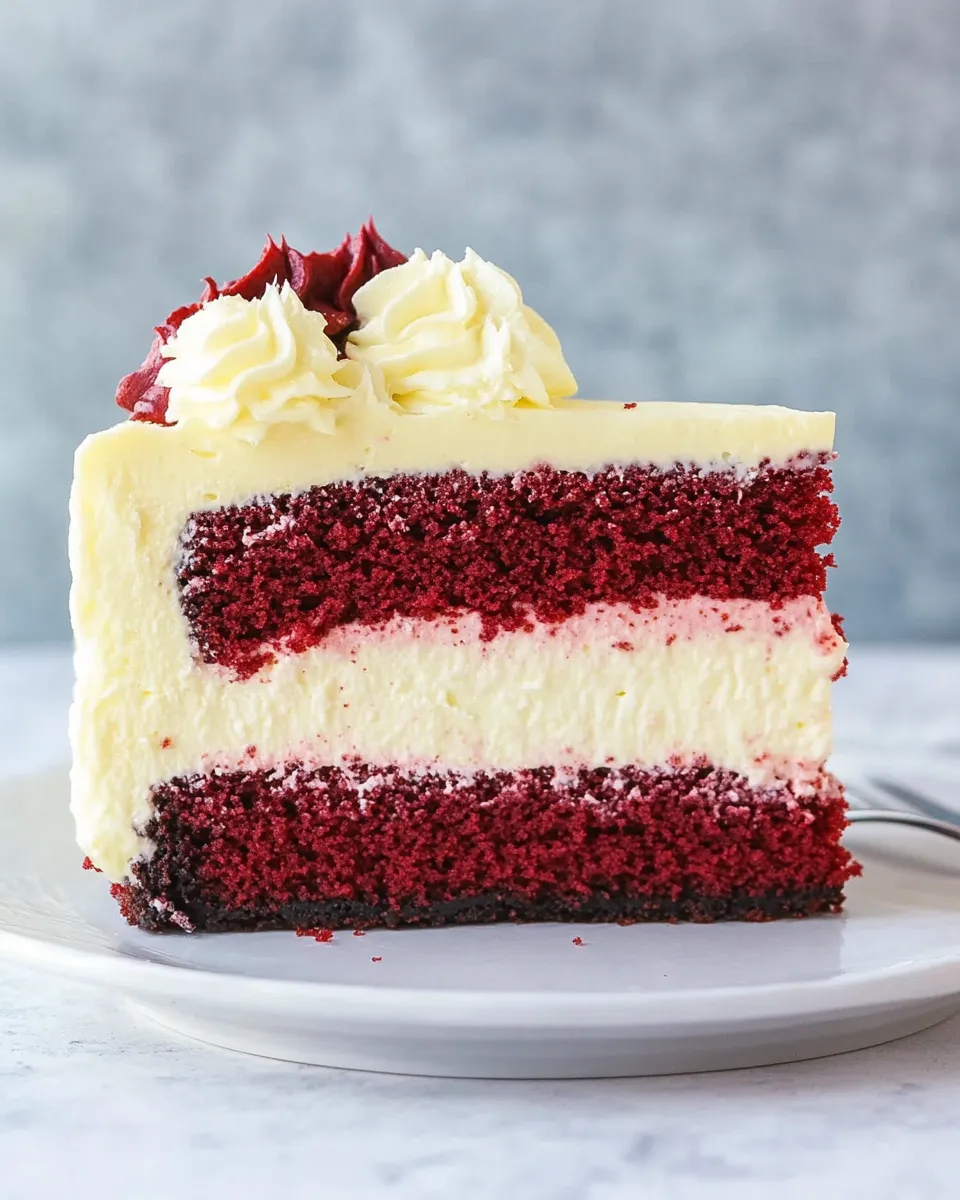
This cake is one of my favorite mashups: tender red velvet layers hugging dense, tangy cheesecakes, all wrapped in a smooth cream cheese frosting. It looks impressive, but it’s manageable if you follow the order and keep the components separate until assembly. I’ve made it on busy weekends and for special occasions — the technique stays the same.
I’ll walk you through what to buy, the exact steps for both the cakes and the cheesecakes, and the tricks that keep the layers neat and the texture on point. Expect practical notes — timing, room-temperature calls, and where to pause so nothing gets rushed.
Read straight through for the complete plan, or jump to the section you need: ingredients, step-by-step baking, gear checklist, and storage. Let’s make this cake reliably show-stopping.
Your Shopping Guide
Plan to shop for two distinct sets of ingredients: the red velvet cake batter and the cheesecake batter. Get everything in one trip so you don’t have to pause mid-bake. Buy the freshest cream cheese you can find (full-fat for best texture) and check the date on the sour cream.
Small but important items: parchment rounds, an accurate instant-read thermometer if you have one, and a bench scraper or offset spatula for frosting. If you don’t have red gel food coloring, buy the regular liquid — the recipe lists both options; gel gives a deeper color with less product.
One last note: baking spray makes un-molding easier, and extra parchment rounds are worth the few cents. If you plan to press crumbs on the sides, reserve a small portion of one cake layer to crumble. Otherwise, you can skip that step.
Build Red Velvet Cake Cheesecake Step by Step
Ingredients
- Baking Spray for the pans — nonstick release; helps cheesecakes and cakes unmold cleanly.
- 2 1/2 cups all-purpose flour — the cake’s structure; measure by spooning into the cup and leveling.
- 1 1/2 cups sugar — sweetens the cake; keep level for consistent texture.
- 1 teaspoon baking soda — leavening for the cake; fresh ensures lift.
- 1 teaspoon baking powder — pairs with the soda for balanced rise.
- 1/2 teaspoon salt — rounds flavors in the cake batter.
- 1/3 cup cocoa powder — adds the classic faint cocoa note of red velvet.
- 2 large eggs at room temperature — bind and enrich; room temp eggs incorporate better.
- 1 1/2 cups vegetable oil — keeps the cake moist and tender (don’t substitute with butter here).
- 1 cup buttermilk room temperature — acidity for tenderness and flavor.
- 1 teaspoon white distilled vinegar — a small acid boost to react with leavening.
- 1 teaspoon vanilla extract — flavor base used in both cake and cheesecake.
- 1 teaspoon red gel food coloring or 2 tablespoons regular food coloring — choose gel for stronger color without extra liquid.
- 24 ounces cream cheese softened to room temperature — main cheesecake ingredient; use full-fat for best texture.
- 1 cup granulated sugar — for the cheesecake; don’t reduce unless you’re comfortable changing texture.
- 2 large eggs room temperature — for the cheesecake; add one at a time for smooth batter.
- 1/2 tablespoon vanilla extract — subtle flavor lift in the cheesecake.
- 1 cup sour cream room temperature — adds tang and silkiness to the cheesecakes.
- 2 tablespoons all-purpose flour — stabilizes the cheesecake a bit without making it cakey.
- 1/2 teaspoons salt — balances sweetness in the cheesecake.
- Cream Cheese Frosting Recipe — search it on the blog; you’ll need enough for crumb coat and finishing layer.
Build Red Velvet Cake Cheesecake Step by Step
- Preheat the oven to 350°F (177°C). Spray two 8-inch cake pans with baking spray, line the bottoms with parchment rounds cut to fit, then spray the parchment. Set pans aside.
- In a medium bowl whisk together the dry cake ingredients: 2 1/2 cups all-purpose flour, 1 1/2 cups sugar, 1 teaspoon baking soda, 1 teaspoon baking powder, 1/2 teaspoon salt, and 1/3 cup cocoa powder. Set aside.
- In a large bowl combine the wet cake ingredients: 2 large eggs (room temperature), 1 1/2 cups vegetable oil, 1 cup buttermilk (room temperature), 1 teaspoon white distilled vinegar, 1 teaspoon vanilla extract, and 1 teaspoon red gel food coloring (or 2 tablespoons regular food coloring). Using a hand mixer or stand mixer, beat on medium speed until evenly combined.
- Reduce mixer speed to low and gradually add the dry ingredients to the wet ingredients. Stop occasionally to scrape the sides and bottom of the bowl. Mix only until the batter is thoroughly combined; do not overmix.
- Divide the cake batter evenly between the two prepared pans and smooth the tops. Bake, rotating the pans halfway through, until a toothpick inserted in the center comes out clean, about 30 minutes.
- Remove the pans from the oven. Run a knife around the edges to loosen the cakes and let them cool in the pans for 20–30 minutes. Invert each cake onto a plate, then re-invert onto a cooling rack with the round (domed) side up. Cool completely before assembling.
- While the cakes cool, prepare the oven and pans for the cheesecakes: preheat the oven to 325°F (163°C). Spray two 8-inch cake pans with baking spray and line the bottoms with parchment rounds. Set aside.
- In a large bowl beat 24 ounces cream cheese (softened to room temperature) on medium for about 1 minute until smooth.
- Add 1 cup granulated sugar and 2 tablespoons all-purpose flour to the cream cheese. Mix until combined and there are no lumps, scraping down the sides of the bowl as needed.
- With the mixer on low, add the 2 large eggs (room temperature) one at a time, mixing until each egg is just incorporated. Scrape the bowl as needed and avoid overbeating.
- Add 1/2 tablespoon vanilla extract, 1 cup sour cream (room temperature), and 1/2 teaspoon salt. Beat on low until just combined, stopping to scrape the sides and bottom of the bowl.
- Divide the cheesecake batter evenly between the two prepared pans and level the tops with a spatula.
- Bake the cheesecakes 40–45 minutes, until the centers are just slightly wobbly while the edges are set and puffed.
- Turn the oven off and crack the oven door open. Allow the cheesecakes to cool completely inside the oven with the door ajar.
- Once fully cooled, refrigerate the cheesecakes (in their pans) for at least 5–6 hours or overnight. When ready to use, run a butter knife around the edge to release each cheesecake from its pan and keep refrigerated until assembly.
- Prepare the Cream Cheese Frosting following the recipe instructions on the blog.
- Before assembling, level the two red velvet cake layers and the two cheesecake layers with a cake leveler or a sharp serrated knife so they are flat and even.
- Place a cake board or cake stand on your work surface. Spread a small amount of frosting onto the board to anchor the cake.
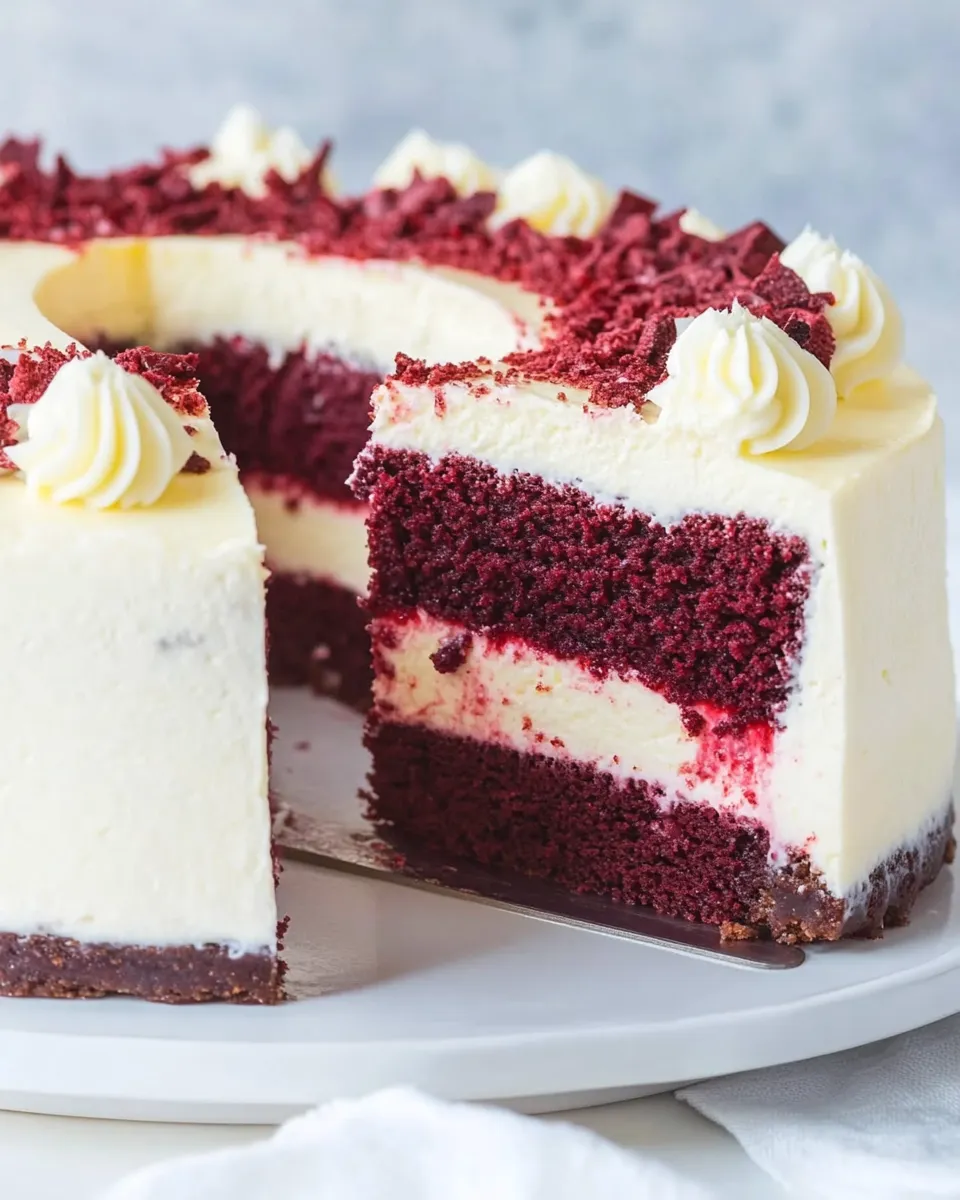
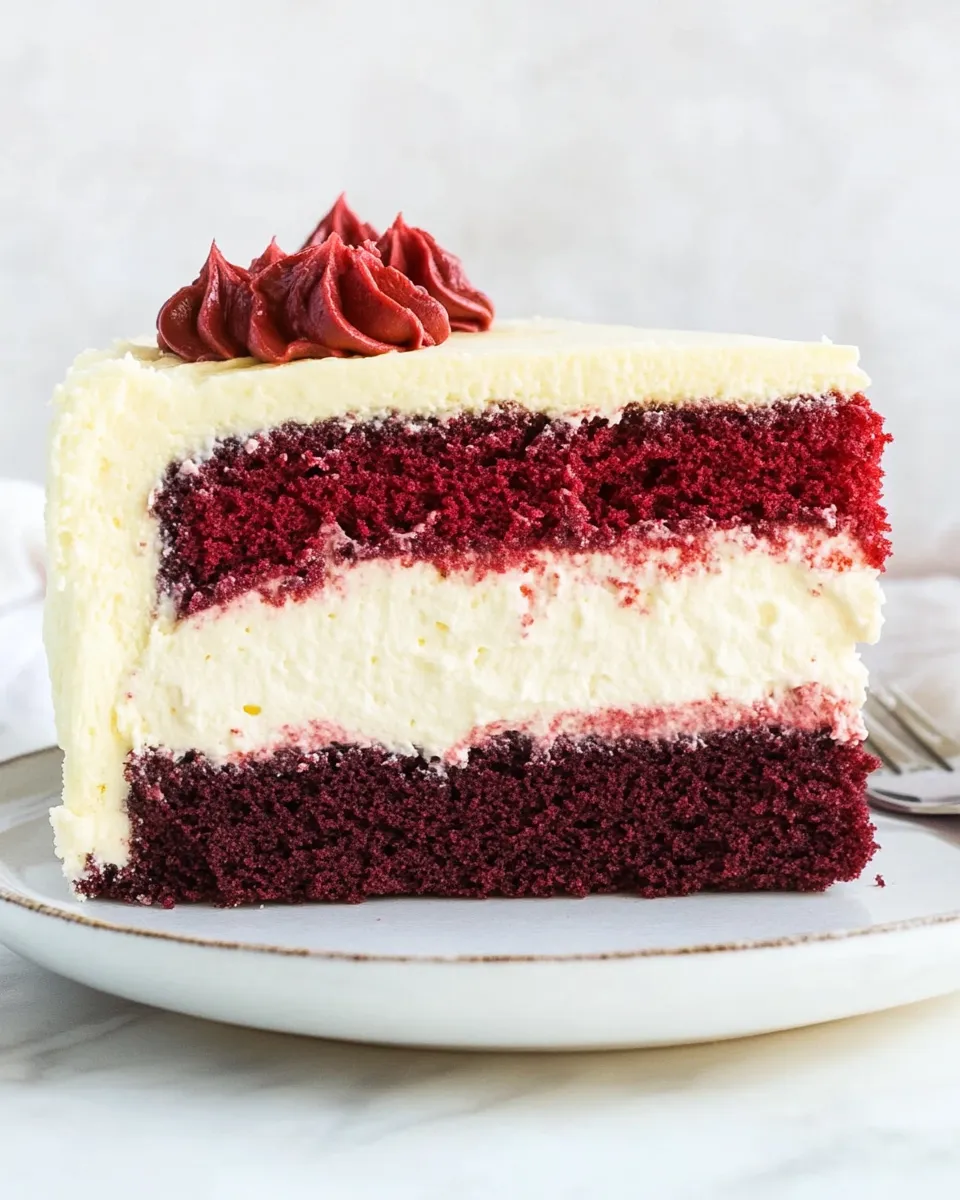
- Assemble the cake from bottom to top as follows: place one red velvet cake layer (flat side down) on the board, spread an even layer of frosting over it, place one cheesecake layer on top, spread another even layer of frosting, place the second red velvet cake layer, spread an even layer of frosting, and finish by placing the second cheesecake layer on top.
- Use the remaining frosting to apply a thin crumb coat over the entire cake. Chill the cake briefly (15–30 minutes) to set the crumb coat, then apply a final smooth layer of frosting to the top and sides.
- Press cake crumbs onto the sides/edges if desired. Refrigerate the assembled cake for at least 4 hours (longer is better) to allow the frosting to set before slicing.
- Serve chilled. Optionally serve with whipped cream on the side.
What Sets This Recipe Apart
This cake pairs two textures that usually live in different worlds: light, tender red velvet cake and dense, creamy cheesecake. The result is a layered contrast you don’t see every day. The method keeps each component true to its ideal bake: cake at a higher temp, cheesecake lower and slow, then a cool rest in the fridge.
Another detail: the recipe bakes two separate cheesecakes and two cake layers in 8-inch pans to make stacking practical and slicable. The uniform sizes make the assembly stable and the final slice clean — no leaning towers here.
Low-Carb/Keto Alternatives
Completely swapping this recipe to low-carb changes it significantly because both the cake and cheesecake rely on flour and sugar for structure and texture. If you must adapt:
- For the cheesecakes: replace granulated sugar with a granular erythritol sweetener that measures 1:1 and use almond flour (small amount) only where called for as a binder. Expect slightly different browning and a lighter surface crack profile.
- For the cake layers: true red velvet cake without sugar and without all-purpose flour will have a very different crumb. You could consider almond flour and a concentrated sweetener, but volume and lift won’t match. If you need a low-carb version, consider using a store-bought low-carb cake base or making thin almond-flour-based cake layers and proceed with the cheesecake layers as written.
Notes: temperature and time change with sugar-free sweeteners. Monitor color and doneness closely.
What You’ll Need (Gear)
- Two 8-inch cake pans — for both cake and cheesecake layers; consistent size is critical.
- Parchment rounds — for smooth bottoms and easy release.
- Baking spray — prevents sticking on pan sides and parchment.
- Stand mixer or hand mixer — you’ll use it for both cake and cheesecake batters.
- Offset spatula or bench scraper — for smooth frosting and even crumb coats.
- Cake leveler or serrated knife — to create flat layers for neat stacking.
- Cooling racks — cool cake layers fully before assembly.
- Refrigerator space — plan for at least one shelf to hold the assembled cake for several hours.
Easy-to-Miss Gotchas
Room temperature ingredients matter. Cold cream cheese or eggs make lumps and slow emulsification. So soften cream cheese and bring eggs and sour cream to room temp before you start the cheesecake batter.
Don’t overmix the cheesecake after adding eggs. You want smooth batter but avoid adding air, which can cause cracks or uneven texture. Mix just enough to combine.
Level those layers. Uneven cake or cheesecake layers create a wobbly stack and make frosting harder. Trim the domes so each layer sits flat.
Dietary Swaps & Alternatives
For dairy-free swaps: use a dairy-free cream cheese and coconut-based sour cream alternative, but expect subtle shifts in tang and texture. The cake’s vegetable oil is already dairy-free.
For an egg-free approach: commercial egg replacers exist, but both cakes and cheesecakes rely on eggs for structure and moisture, so results will differ. Consider making a dairy-based gluten-free cake and purchasing a small, firm vegan cheesecake if you need a fully vegan showpiece.
For less sugar: reduce sugar slightly in the cake or use a sugar substitute compatible with baking. Note that cutting sugar will change moisture and crumb.
Insider Tips
- Chill between steps: After the crumb coat, a 15–30 minute chill stabilizes the frosting and keeps crumbs from migrating into the final layer.
- Work cold for assembly: Keep cheesecakes chilled in their pans until just before you stack them to minimize sliding.
- Use a thin spatula to lift: When moving cheesecake layers, slide a thin metal spatula under the parchment to lift them cleanly.
- Reserve crumbs: If you want a crumb-coated look, set aside a small piece of one cake layer before decorating and crumble it finely for pressing into the sides.
- Slice with a hot, clean knife: Run the knife under hot water, wipe dry, then slice. Repeat between slices for clean edges.
Make-Ahead & Storage
You can bake the cakes and cheesecakes a day ahead. Wrap the cooled cake layers tightly in plastic wrap and refrigerate. Keep cheesecakes in their pans, covered, and chilled for up to 48 hours. Assemble the day of serving for the freshest look, or assemble up to 24 hours ahead and keep refrigerated.
Leftovers store covered in the refrigerator for 3–4 days. Freeze slices in airtight containers for longer storage; thaw in the fridge overnight before serving.
Reader Q&A
Q: Can I make this in one 9-inch pan instead of two 8-inch pans?
A: You can, but layer proportions and bake times will change. The recipe is scaled for two 8-inch pans to make stacking simple. Using different pans will require recalculating volume and adjusting bake time — not recommended unless you’re comfortable modifying recipes.
Q: My cheesecake tops cracked. What happened?
A: Cracks commonly occur from over-mixing, rapid temperature changes, or overbaking. Mix eggs in slowly and avoid whipping air into the batter. Turn off the oven and cool the cheesecakes with the door cracked as the recipe instructs — that gradual cooling helps prevent cracks.
Q: Can I swap the red food coloring for natural alternatives?
A: Natural colorants (like beet powder) can work but may alter flavor and stain utensils. Gel food coloring gives the most vivid color without extra liquid. If you use a natural option, test on a small scale first.
Q: How do I transport this cake?
A: Keep it chilled and travel on a flat surface in a box that prevents tipping. If you need to transport long distances, refrigerate until you arrive and avoid direct heat or sun.
Q: Can I skip the crumb coat?
A: You can, but crumb coat makes the final finish cleaner. If you skip it, expect more crumbs in the final frosting and a less polished look.
Time to Try It
Gather your ingredients and plan a two-day rhythm if you can: cakes and cheesecakes one day, assemble and finish the next. Follow the step sequence closely, keep temperatures and room-temperature calls in mind, and chill where the recipe asks. The payoff is worth it — a stunning, indulgent cake that slices beautifully and tastes even better than it looks.
When you try it, take notes on timing and any substitutions you test. I’d love to hear how your slices look and which tips made the difference for you.

Red Velvet Cake Cheesecake
Ingredients
Ingredients
- Baking Spray for the pans
- 2 1/2 cupsall-purpose flour
- 1 1/2 cupssugar
- 1 teaspoonbaking soda
- 1 teaspoonbaking powder
- 1/2 teaspoonsalt
- 1/3 cupcocoa powder
- 2 large eggsat room temperature
- 1 1/2 cupsvegetable oil
- 1 cupbuttermilkroom temperature
- 1 teaspoonwhite distilled vinegar
- 1 teaspoonvanilla extract
- 1 teaspoonred gel food coloringor 2 tablespoons regular food coloring
- 24 ouncescream cheesesoftened to room temperature
- 1 cupgranulated sugar
- 2 large eggsroom temperature
- 1/2 tablespoonvanilla extract
- 1 cupsour creamroom temperature
- 2 tablespoonsall-purpose flour
- 1/2 teaspoonssalt
- Cream Cheese Frosting Recipesearch it on the blog
Instructions
Instructions
- Preheat the oven to 350°F (177°C). Spray two 8-inch cake pans with baking spray, line the bottoms with parchment rounds cut to fit, then spray the parchment. Set pans aside.
- In a medium bowl whisk together the dry cake ingredients: 2 1/2 cups all-purpose flour, 1 1/2 cups sugar, 1 teaspoon baking soda, 1 teaspoon baking powder, 1/2 teaspoon salt, and 1/3 cup cocoa powder. Set aside.
- In a large bowl combine the wet cake ingredients: 2 large eggs (room temperature), 1 1/2 cups vegetable oil, 1 cup buttermilk (room temperature), 1 teaspoon white distilled vinegar, 1 teaspoon vanilla extract, and 1 teaspoon red gel food coloring (or 2 tablespoons regular food coloring). Using a hand mixer or stand mixer, beat on medium speed until evenly combined.
- Reduce mixer speed to low and gradually add the dry ingredients to the wet ingredients. Stop occasionally to scrape the sides and bottom of the bowl. Mix only until the batter is thoroughly combined; do not overmix.
- Divide the cake batter evenly between the two prepared pans and smooth the tops. Bake, rotating the pans halfway through, until a toothpick inserted in the center comes out clean, about 30 minutes.
- Remove the pans from the oven. Run a knife around the edges to loosen the cakes and let them cool in the pans for 20–30 minutes. Invert each cake onto a plate, then re-invert onto a cooling rack with the round (domed) side up. Cool completely before assembling.
- While the cakes cool, prepare the oven and pans for the cheesecakes: preheat the oven to 325°F (163°C). Spray two 8-inch cake pans with baking spray and line the bottoms with parchment rounds. Set aside.
- In a large bowl beat 24 ounces cream cheese (softened to room temperature) on medium for about 1 minute until smooth.
- Add 1 cup granulated sugar and 2 tablespoons all-purpose flour to the cream cheese. Mix until combined and there are no lumps, scraping down the sides of the bowl as needed.
- With the mixer on low, add the 2 large eggs (room temperature) one at a time, mixing until each egg is just incorporated. Scrape the bowl as needed and avoid overbeating.
- Add 1/2 tablespoon vanilla extract, 1 cup sour cream (room temperature), and 1/2 teaspoon salt. Beat on low until just combined, stopping to scrape the sides and bottom of the bowl.
- Divide the cheesecake batter evenly between the two prepared pans and level the tops with a spatula.
- Bake the cheesecakes 40–45 minutes, until the centers are just slightly wobbly while the edges are set and puffed.
- Turn the oven off and crack the oven door open. Allow the cheesecakes to cool completely inside the oven with the door ajar.
- Once fully cooled, refrigerate the cheesecakes (in their pans) for at least 5–6 hours or overnight. When ready to use, run a butter knife around the edge to release each cheesecake from its pan and keep refrigerated until assembly.
- Prepare the Cream Cheese Frosting following the recipe instructions on the blog.
- Before assembling, level the two red velvet cake layers and the two cheesecake layers with a cake leveler or a sharp serrated knife so they are flat and even.
- Place a cake board or cake stand on your work surface. Spread a small amount of frosting onto the board to anchor the cake.
- Assemble the cake from bottom to top as follows: place one red velvet cake layer (flat side down) on the board, spread an even layer of frosting over it, place one cheesecake layer on top, spread another even layer of frosting, place the second red velvet cake layer, spread an even layer of frosting, and finish by placing the second cheesecake layer on top.
- Use the remaining frosting to apply a thin crumb coat over the entire cake. Chill the cake briefly (15–30 minutes) to set the crumb coat, then apply a final smooth layer of frosting to the top and sides.
- Press cake crumbs onto the sides/edges if desired. Refrigerate the assembled cake for at least 4 hours (longer is better) to allow the frosting to set before slicing.
- Serve chilled. Optionally serve with whipped cream on the side.
Equipment
- Oven
- 8-inch cake pans
- parchment rounds
- Baking spray
- Hand mixer or stand mixer
- Spatula
- knife or cake leveler
- cake board or cake stand
- Refrigerator
Notes
Refrigerate the assembled cake for at least 4 hours before slicing; longer chilling yields cleaner slices.


