
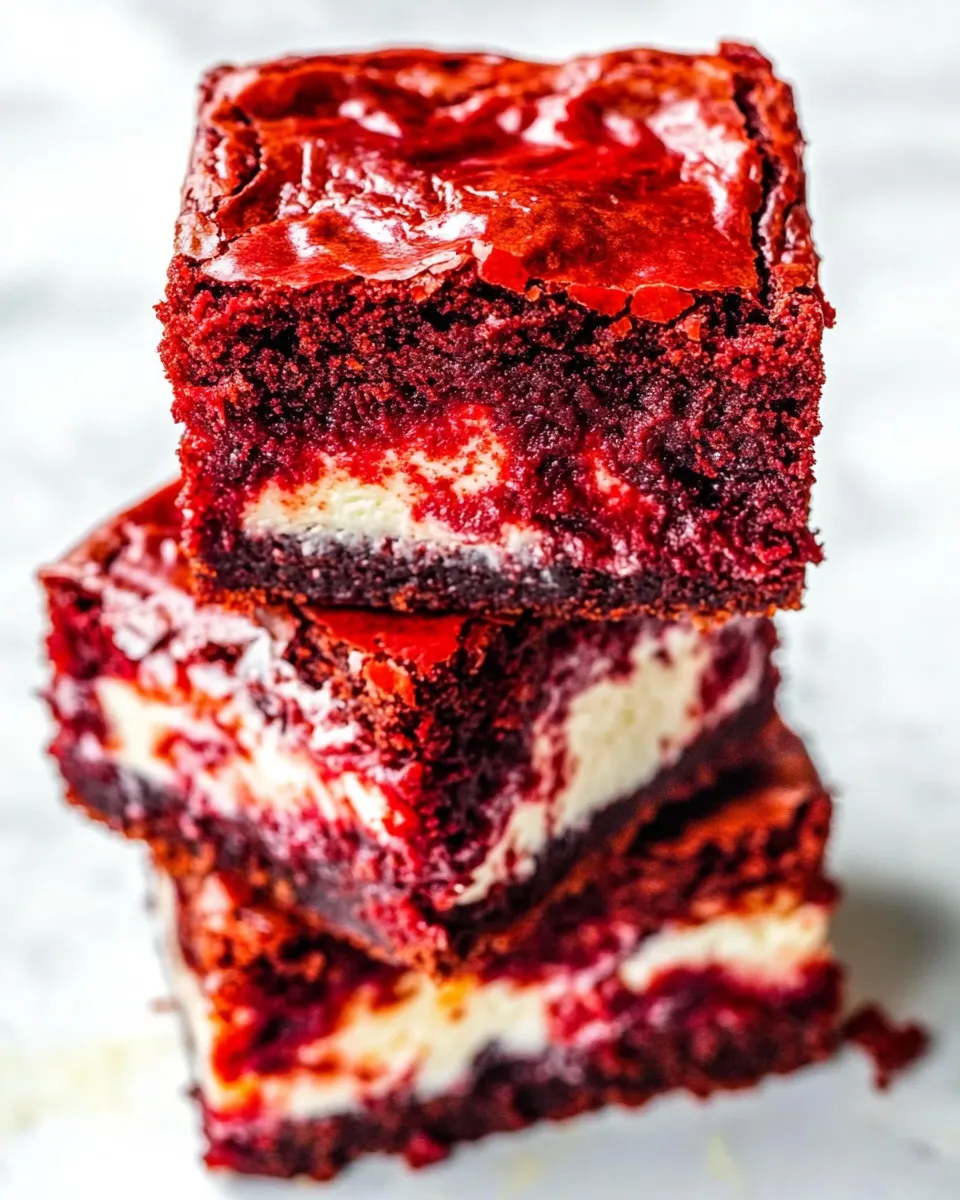
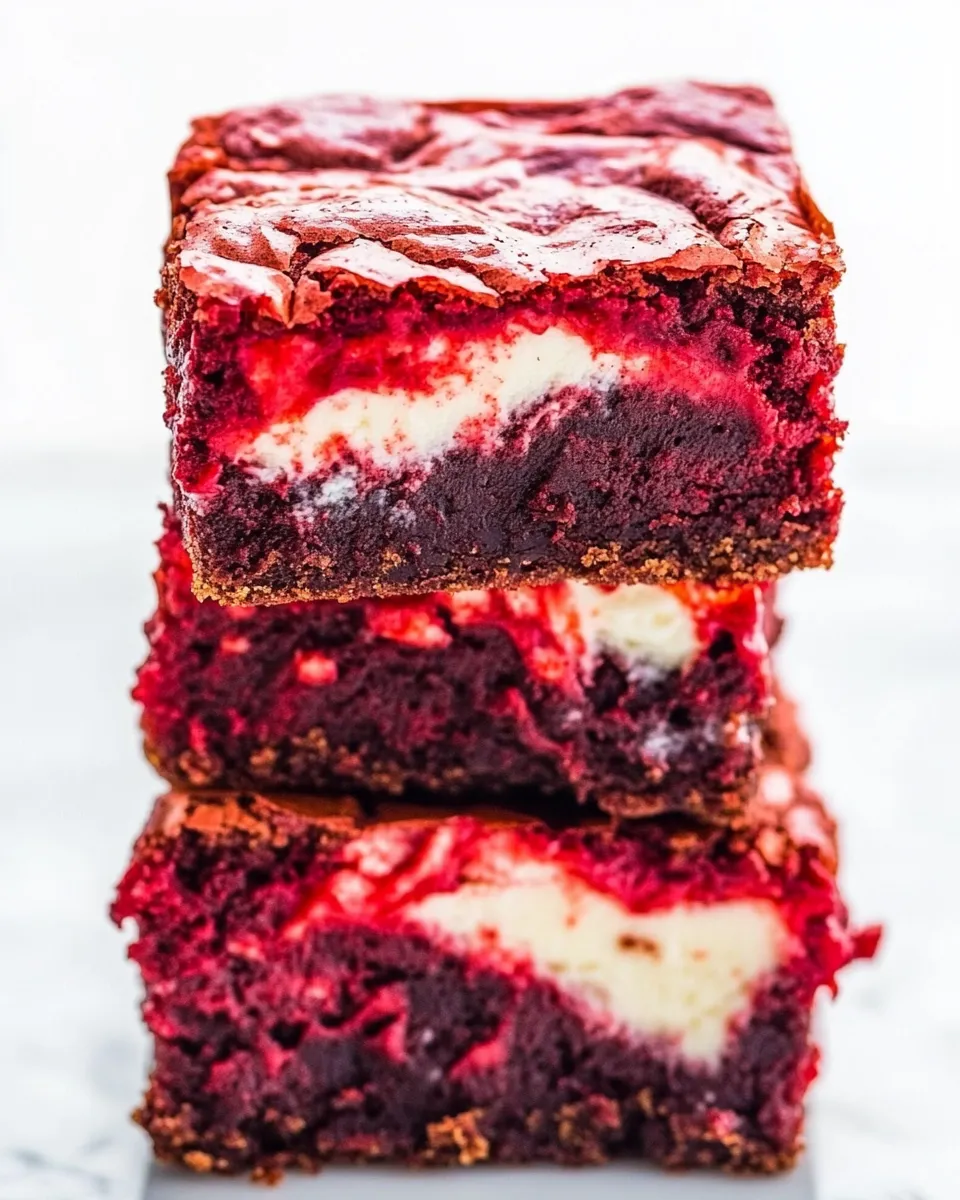
These brownies are the kind I make when I want something dramatic but not complicated — a dense, chocolate-forward brownie base dressed up with a tangy cream cheese swirl and that unmistakable red velvet color. The recipe is straightforward and forgiving. It rewards patience at the cooling stage and a gentle hand when swirling.
What I love most is how the layers play together: fudgy brownie, a lift from cocoa and butter, then a bright, silky cream cheese ribbon. They cut into neat squares that look like you spent hours on them, but the method is straightforward enough for a weeknight treat or a dessert to bring to a gathering.
Below you’ll find the exact ingredients and the method I follow, plus real-world tips to avoid the pitfalls I learned the hard way. Read the recipe through once, then roll up your sleeves — these are worth the effort.
Ingredient Checklist
- ¾ cup unsalted butter, diced into large cubes — melts smoothly with the chocolate and gives the brownies richness and shine.
- 4 ounces 72% bittersweet chocolate, coarsely chopped; or a similar percentage dark chocolate (I used Trader Joe’s 72% Pound Plus Bar) — provides deep chocolate flavor and structure; choose good-quality chocolate for the best results.
- 2 cups granulated sugar — sweetens and contributes to the slightly crackly top that brownies are known for.
- 4 large eggs — build structure and give the batter its dense, fudgy texture.
- 1 ounce red food coloring, or as needed for desired shade (see Note 1 below) — the signature red for the red velvet look; add gradually if you prefer a subtler hue.
- 2 teaspoons vanilla extract — rounds and brightens the chocolate and cream cheese flavors.
- ⅓ cup unsweetened cocoa powder, sifted if it’s lumpy — adds chocolate depth without extra fat; sifting prevents clumps in the batter.
- 1 ½ cups all-purpose flour — gives the brownies structure; measure with a scoop-and-level for consistency.
- ½ teaspoon kosher salt — balances sweetness and enhances chocolate flavor.
- 2 large egg whites — lighten and lift the cream cheese layer when whipped into the filling.
- 8 ounce package cream cheese, very well softened — the star of the cheesecake swirl; room temperature cream cheese blends smoothest.
- ¼ cup granulated sugar — sweetens the cream cheese layer without making it cloying.
- 2 tablespoons all-purpose flour — stabilizes the cream cheese filling so it holds its shape after baking.
- 1 teaspoon vanilla extract — complements the tang of the cream cheese and ties the filling to the brownie base.
Method: Red Velvet Cheesecake Brownies
- Preheat oven to 350°F (177°C). Line a 9×13-inch pan with heavy-duty aluminum foil if desired for easier cleanup, then spray the foil (or the pan) with cooking spray. Set the prepared pan aside.
- In a very large microwave-safe bowl, combine ¾ cup unsalted butter (diced) and 4 ounces 72% bittersweet chocolate (coarsely chopped). Microwave on high for 90 seconds, then stir until smooth. If not fully melted, heat in additional 15-second bursts, stirring after each, until butter and chocolate are completely smooth.
- Add 2 cups granulated sugar to the melted chocolate mixture and whisk to combine. The mixture will seem thick and granular.
- Add 4 large eggs to the bowl and whisk until incorporated and smooth.
- Add 1 ounce red food coloring (or add a portion and increase as needed) and 2 teaspoons vanilla extract. Whisk gently at first to incorporate, then whisk until the batter is evenly colored to your desired shade.
- Add ⅓ cup unsweetened cocoa powder (sift first if it’s lumpy) and stir until fully incorporated.
- Add 1 ½ cups all-purpose flour and ½ teaspoon kosher salt. Stir until just combined and no streaks of flour remain. Do not overmix.
- Pour/turn the brownie batter into the prepared 9×13 pan and spread into an even layer. Set the pan aside.
- In a clean bowl, add 2 large egg whites, an 8-ounce package cream cheese (very well softened), and ¼ cup granulated sugar. Beat on high with a handheld electric mixer for about 5 minutes, or until the cream cheese is totally smooth and the mixture has fluffed up significantly in volume.
- Add 2 tablespoons all-purpose flour and 1 teaspoon vanilla extract to the cream cheese mixture. Beat just until incorporated and smooth.
- Drop the cream cheese mixture over the brownie batter in heaping tablespoonfuls, spacing the dollops evenly across the surface.
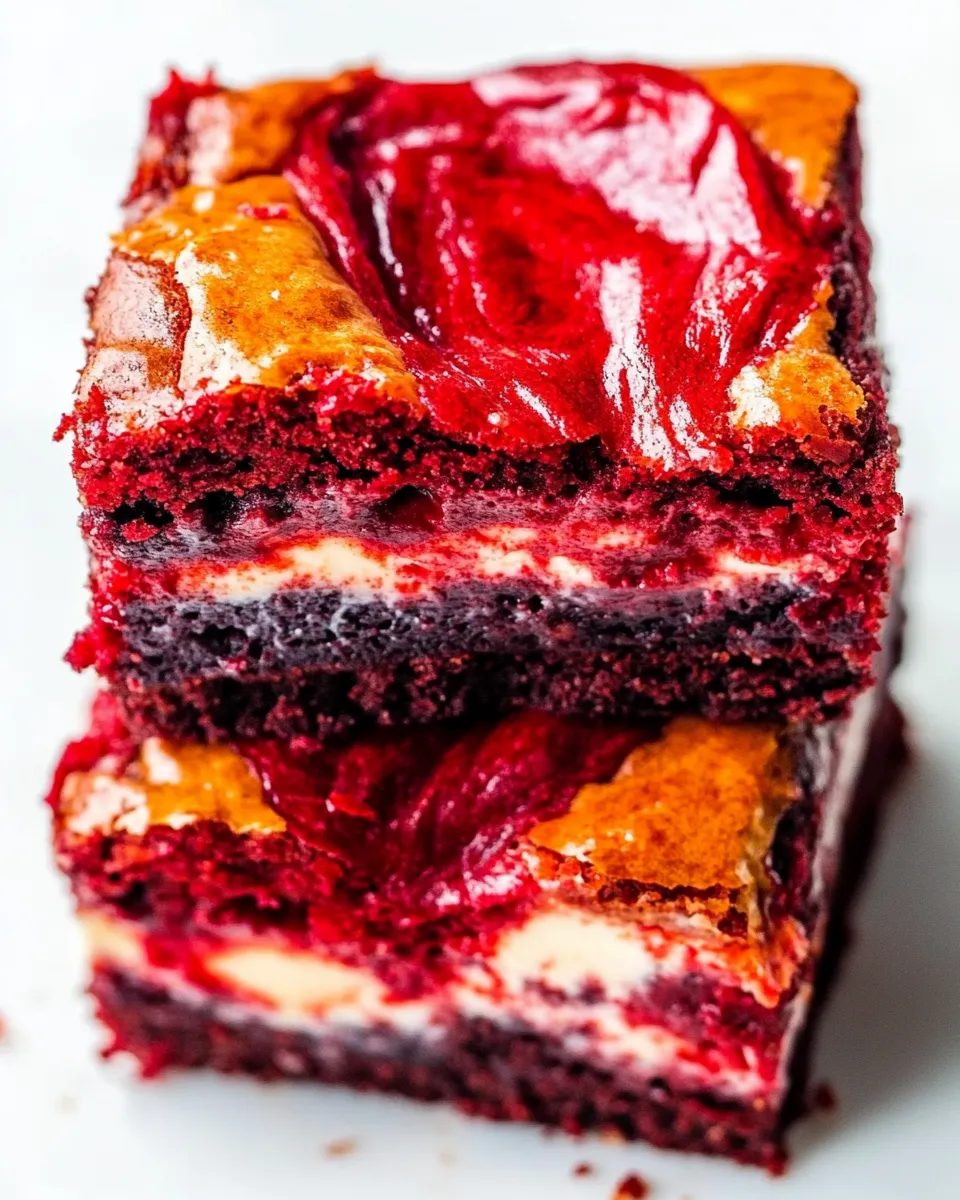
- Use a knife to gently swirl the cream cheese dollops into the brownie batter to create a marbled effect. Don’t over-swirl.
- Bake in the preheated 350°F oven for about 40 to 45 minutes (the recipe author baked 42 minutes). Start checking at 30 minutes. Rotate the pan once midway through baking to promote even cooking and browning. The brownies are done when a toothpick inserted into the center comes out clean or with a few moist crumbs.
- Remove the pan from the oven and transfer to a wire rack. Cool completely in the pan (this helps the brownies set) before lifting out using the foil, peeling off the foil, and cutting into squares.
Why Red Velvet Cheesecake Brownies is Worth Your Time
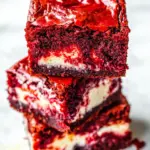
These brownies are a dessert with big visuals and approachable technique. You’re looking at fudgy, chocolate-forward brownies, but the cream cheese swirl makes every bite feel a little lighter and more sophisticated. It’s a dramatic upgrade to plain brownies without adding real complexity.
They travel well, slice cleanly when fully cooled, and hold up in a dessert spread next to cookies and cakey treats. If you want a showstopping bake that doesn’t require tempering or multi-step sauces, this is it. The cream cheese gives a tang that cuts the sweetness and makes the chocolate taste richer.
Finally, they’re flexible. You can make them for holidays, pack them for school lunches (in moderation, of course), or serve them warm with a scoop of vanilla ice cream. They look like something from a bakery, but the technique is honest and reproducible.
Low-Carb/Keto Alternatives
- Swap the all-purpose flour with a 1:1 almond/coconut flour blend that’s designed for baking; expect a change in texture and reduced browning.
- Replace granulated sugar in the brownie and cream cheese layers with a granular erythritol or monk fruit baking blend labeled for 1:1 substitution. Note that sweetness intensity and mouthfeel will differ from regular sugar.
- Keep the cream cheese layer — full-fat cream cheese is naturally low in carbs and works well as the tangy element in a keto-friendly version.
- Use unsweetened cocoa powder as listed; it’s already low-carb and preserves the chocolate flavor.
Must-Have Equipment
- 9×13-inch baking pan — the recipe is scaled for this size; don’t improvise with a much smaller pan unless you adjust the bake time.
- Heavy-duty aluminum foil — optional, but it makes lifting the brownies out simple and cleanup quick.
- Microwave-safe mixing bowl — for melting butter and chocolate; a heatproof bowl over a simmering pot works too.
- Handheld electric mixer — makes the cream cheese filling smooth and aerated; a stand mixer can be used instead.
- Offset spatula or rubber spatula — for spreading batter and smoothing the surface.
- Sharp knife — for clean slicing once the bars have set.
Frequent Missteps to Avoid
- Overmelting the chocolate — stop stirring as soon as it’s smooth. Chocolate can seize if overheated; short bursts in the microwave are safer.
- Using cold cream cheese — it won’t blend smooth. Let it sit at room temperature until very soft before whipping.
- Overmixing the flour into the brownie batter — mix just until no streaks remain. Overworking creates dense, cakey brownies instead of fudgy ones.
- Swirling too vigorously — aggressive swirling can blend the layers into one color. Light, deliberate figure-eights create pretty marbling.
- Skipping the full cool-down — removing or slicing too soon yields crumbly, gooey pieces. Let the pan cool completely and use the foil lift for neat squares.
Seasonal Serving Ideas
- Fall/Winter: Warm a square slightly and top with a scoop of vanilla or caramel ice cream and a drizzle of hot fudge or salted caramel.
- Valentine’s/Year-Round: Dust lightly with powdered sugar or top with a few fresh raspberries for a pop of color and acidity.
- Spring: Serve chilled with a spoonful of lemon curd on the side to cut through the richness.
- Summer: Plate a chilled square with macerated strawberries and a mint sprig for a refreshing contrast.
Method to the Madness
Brownie Batter
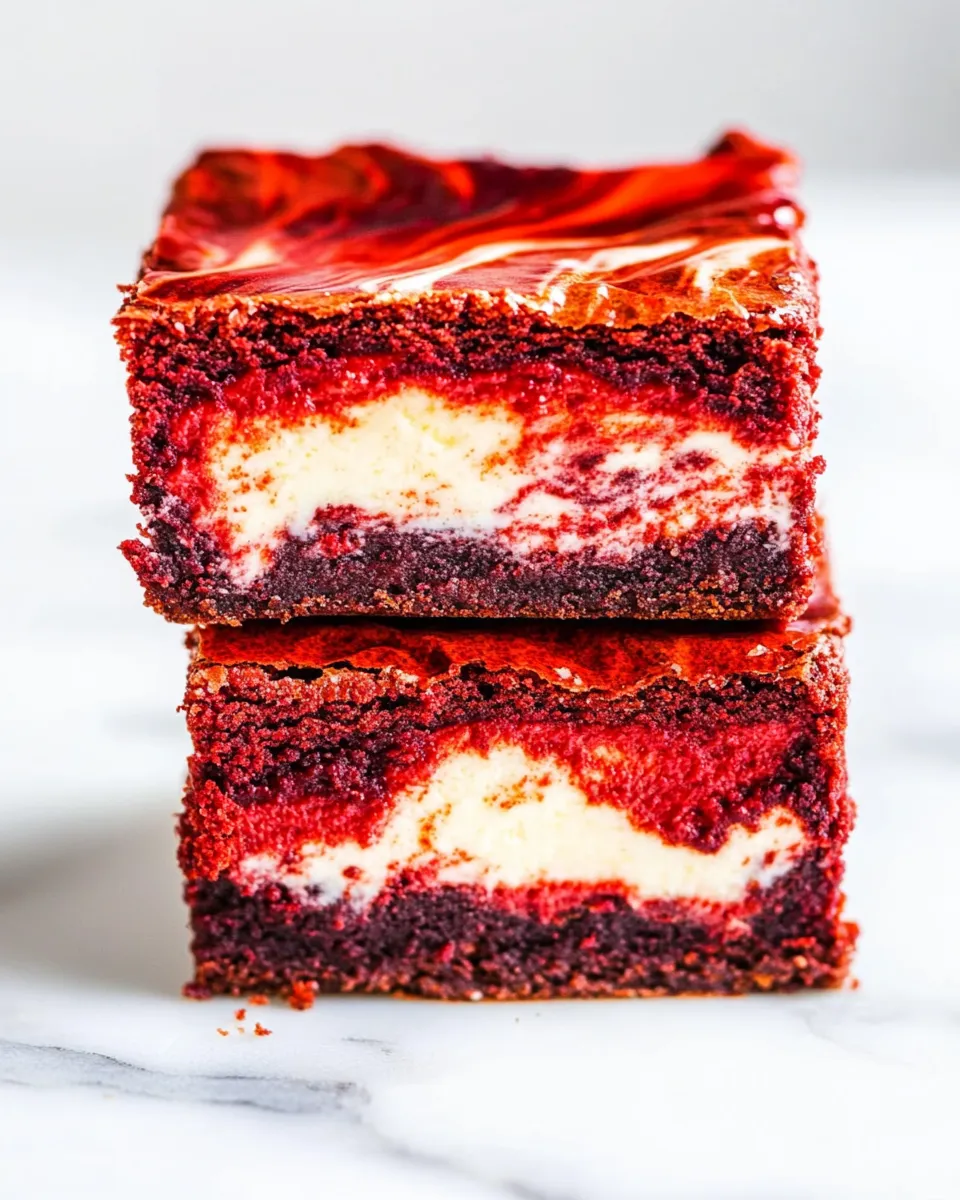
Melting the butter and chocolate together creates a glossy, emulsion-like base. The sugar is incorporated while the chocolate is warm, which helps with that slightly crackly top. Adding the eggs and whisking until smooth builds structure without aerating excessively — that’s why the brownies stay dense and fudgy rather than airy.
Cheesecake Swirl
Whipping the cream cheese with egg whites and sugar until very smooth and fluffy gives the swirl lift and a lighter texture. The small amount of flour stabilizes the filling so it holds its swirled shape and doesn’t collapse into the brownie layer during baking. Gentle swirling achieves the marbled look without melting the contrast between layers.
Bake and Rest
Rotating the pan halfway through ensures even browning across your oven. The pull test — toothpick with a few moist crumbs — is the right endpoint. Cooling in the pan is essential: the brownies continue to set, and that makes slicing tidy. Rushing this stage is the most common reason for messy squares.
Keep-It-Fresh Plan
Store cooled brownies in an airtight container at room temperature for a day, then refrigerate if you plan to keep them longer. They keep well chilled for several days; the cream cheese filling stays best when refrigerated. For longer storage, wrap squares tightly and freeze for up to a couple of months. Thaw in the refrigerator overnight and bring to room temperature before serving, or gently warm a frozen piece in the microwave for a few seconds.
Quick Questions
- Can I use natural cocoa versus Dutch-processed? — Yes, but flavor and acidity will shift slightly. The recipe works with natural unsweetened cocoa as written.
- What if my swirl disappears during baking? — You likely over-swirl or used a thin cheesecake mixture. Next time, swirl less and ensure the cream cheese mixture is thick and chilled briefly before dropping onto the batter.
- Why are my brownies cakey? — Overmixing flour or using too much flour can cause a cakier texture. Measure flour carefully.
- Can I halve the recipe? — Yes, but bake time and pan size will change. Watch the center closely and start checking earlier.
Serve & Enjoy
Cut the brownies into even squares and serve them as they are or with a simple accompaniment — whipped cream, ice cream, berries, or a drizzle of chocolate. These are one of those desserts that read fancy but are sturdy and practical to make in advance. Make them for a crowd or keep a tray at home to slice into for coffee breaks and late-night cravings.
When you bake them, give the cooling step the respect it deserves and keep your swirling gentle. Those two small choices make a big difference in presentation and texture. Happy baking — these are worth every minute.
Red Velvet Cheesecake Brownies
Ingredients
Ingredients
- 3/4 cupunsalted butter diced into large cubes
- 4 ounces72% bittersweet chocolate coarsely chopped; or a similar percentage dark chocolate (I used Trader Joe’s 72% Pound Plus Bar)
- 2 cupsgranulated sugar
- 4 large eggs
- 1 ouncered food coloring or as needed for desired shade (see Note 1 below)
- 2 teaspoonsvanilla extract
- 1/3 cupunsweetened cocoa powder sifted if it’s lumpy
- 1 1/2 cupsall-purpose flour
- 1/2 teaspoonkosher salt
- 2 large egg whites
- 8 ouncepackage cream cheese very well softened
- 1/4 cupgranulated sugar
- 2 tablespoonsall-purpose flour
- 1 teaspoonvanilla extract
Instructions
Instructions
- Preheat oven to 350°F (177°C). Line a 9×13-inch pan with heavy-duty aluminum foil if desired for easier cleanup, then spray the foil (or the pan) with cooking spray. Set the prepared pan aside.
- In a very large microwave-safe bowl, combine ¾ cup unsalted butter (diced) and 4 ounces 72% bittersweet chocolate (coarsely chopped). Microwave on high for 90 seconds, then stir until smooth. If not fully melted, heat in additional 15-second bursts, stirring after each, until butter and chocolate are completely smooth.
- Add 2 cups granulated sugar to the melted chocolate mixture and whisk to combine. The mixture will seem thick and granular.
- Add 4 large eggs to the bowl and whisk until incorporated and smooth.
- Add 1 ounce red food coloring (or add a portion and increase as needed) and 2 teaspoons vanilla extract. Whisk gently at first to incorporate, then whisk until the batter is evenly colored to your desired shade.
- Add ⅓ cup unsweetened cocoa powder (sift first if it’s lumpy) and stir until fully incorporated.
- Add 1 ½ cups all-purpose flour and ½ teaspoon kosher salt. Stir until just combined and no streaks of flour remain. Do not overmix.
- Pour/turn the brownie batter into the prepared 9×13 pan and spread into an even layer. Set the pan aside.
- In a clean bowl, add 2 large egg whites, an 8-ounce package cream cheese (very well softened), and ¼ cup granulated sugar. Beat on high with a handheld electric mixer for about 5 minutes, or until the cream cheese is totally smooth and the mixture has fluffed up significantly in volume.
- Add 2 tablespoons all-purpose flour and 1 teaspoon vanilla extract to the cream cheese mixture. Beat just until incorporated and smooth.
- Drop the cream cheese mixture over the brownie batter in heaping tablespoonfuls, spacing the dollops evenly across the surface.
- Use a knife to gently swirl the cream cheese dollops into the brownie batter to create a marbled effect. Don’t over-swirl.
- Bake in the preheated 350°F oven for about 40 to 45 minutes (the recipe author baked 42 minutes). Start checking at 30 minutes. Rotate the pan once midway through baking to promote even cooking and browning. The brownies are done when a toothpick inserted into the center comes out clean or with a few moist crumbs.
- Remove the pan from the oven and transfer to a wire rack. Cool completely in the pan (this helps the brownies set) before lifting out using the foil, peeling off the foil, and cutting into squares.
Equipment
- 9x13-inch pan
Notes
Food coloring:
I used a
1-ounce bottle McCormick Red Food Coloring
. Anything less than this quantity would not have given me a sufficiently red enough shade. All brands of food coloring and personal preferences vary so use as much as needed. But don’t be surprised if you need a lot more than originally anticipated, i.e. a whole 1-ounce bottle in my case.
Swirling Tips:
I find actually bringing a bit of the brownie batter up and into the cream cheese mixture, and then swirling, gives a nice visual effect so you can see the red in the white. Everyone will have a different technique and swirl however you see fit. A big tip here is to not over swirl because then you won’t have an "artsy" looking design with a swirl pattern; you will just have a uniform pink-ish design and it doesn’t look as pretty. When you get to a place you think it looks good, have the courage to just stop swirling and not do "one more little swirl".
Storage:
I store the brownies airtight at room temp for up to 5 days. If you’re more comfortable storing them in the fridge, do so; noting they will be more prone to drying out. Brownies can be frozen for up to 4 months.
Adapted from
MyRecipes
.


