
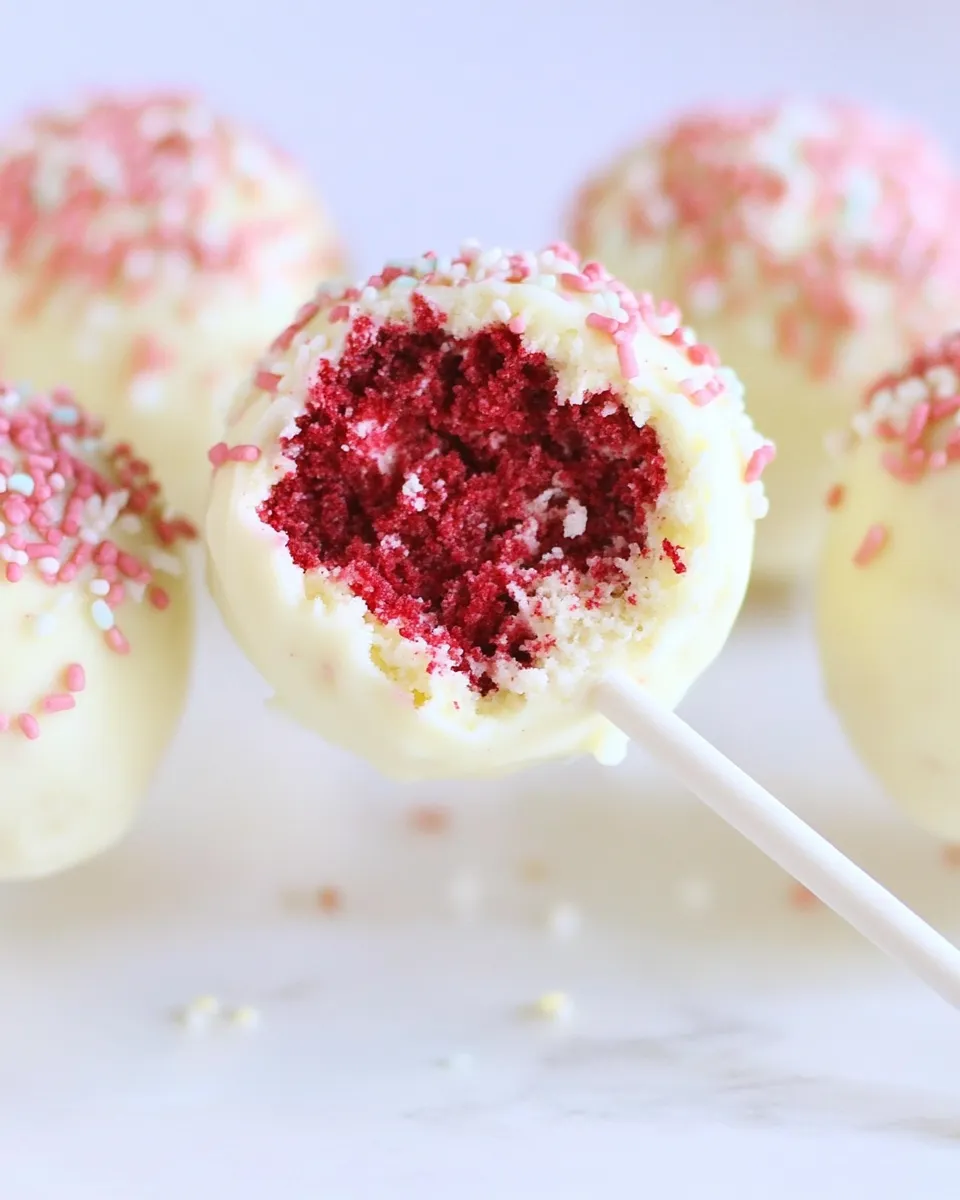
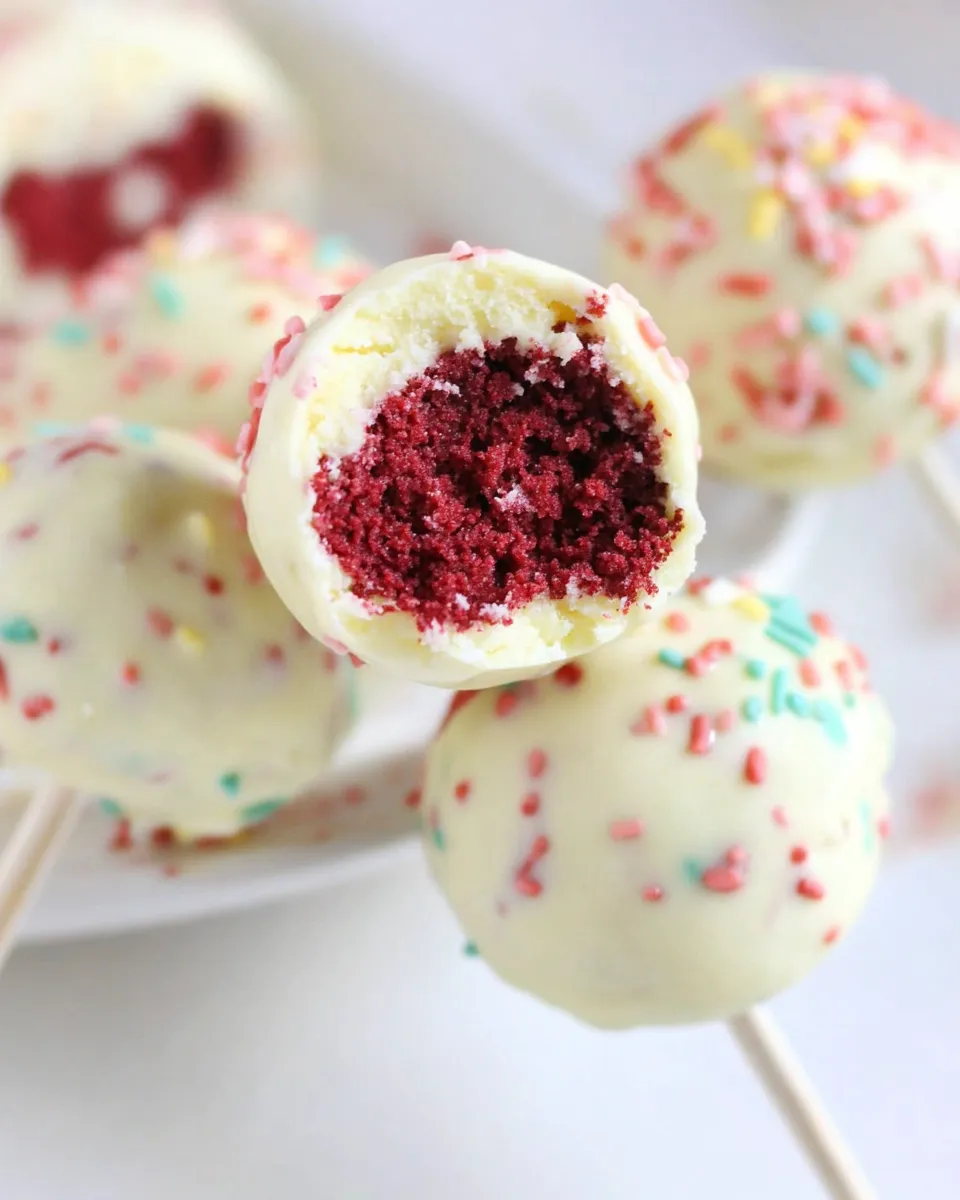
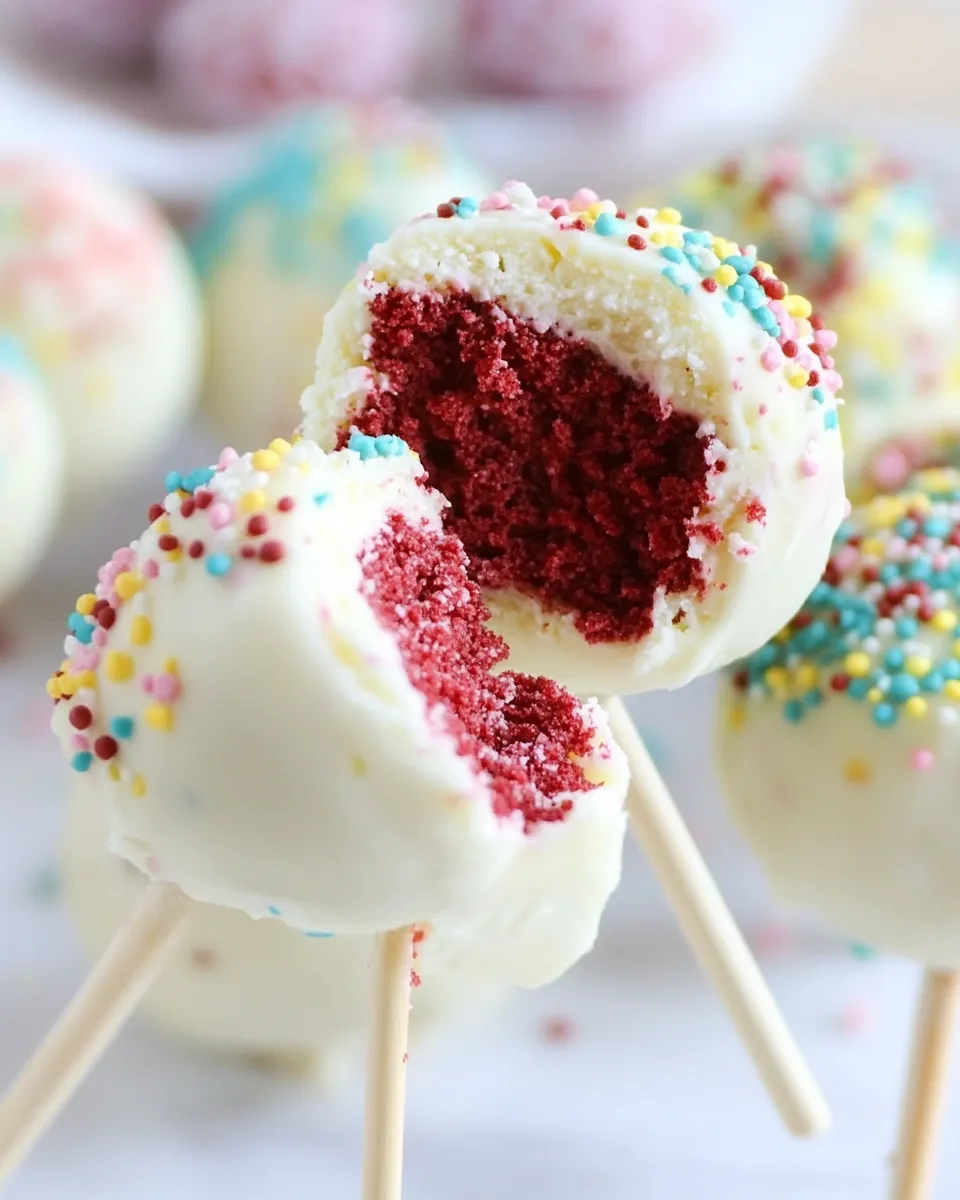
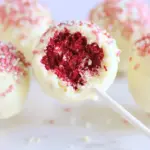
These Red Velvet Cheesecake Pops are the kind of handheld dessert that makes parties easier and dessert tables prettier. They combine the tender crumb of boxed red velvet cake with a creamy cheesecake shell, finished in a candy coating that gives you a neat, portable bite. No fancy pastry school skills required — just a little time, patience, and the right setup.
I test this recipe on busy baking days when I need something that looks special but actually saves time. The process splits into clear stages: bake, crumble and bind, add the cheesecake layer, chill, coat, and chill again. Each stage has a simple goal and a quick tip to keep the pops tidy and consistent.
Below I give the precise ingredients and the exact step-by-step method I follow. Read through once before you start so you can get your equipment set up and the timing staggered. These pop well for birthday tables, bridal showers, classroom treats, or whenever you want dessert that guests can eat while mingling.
What You’ll Gather
Gather everything before you begin: the cake mix, a 7″ plain cheesecake, frosting, candy melts, and the small tools that make assembly faster. Having a foil-lined cookie sheet, measuring spoons, and a microwave-safe bowl ready will save you from scrambling mid-recipe.
Ingredients
- 1 box red velvet cake mix — the base for your cake; follow the box directions for the batter and baking.
- 1/2 cup store-bought buttercream or cream cheese frosting (I used Betty Crocker Whipped Buttercream) — binds the crumbled cake into a moldable mixture.
- 7″ plain cheesecake — pre-made plain cheesecake to form the creamy outer layer.
- 1-2 cups graham crackers, crumbled into small crumbs — for rolling the cheesecake-covered balls to add texture and flavor.
- 1 bag of 10-12 oz. candy melts, your favorite color (I used Wilton Color Burst Pastels, can find at Michael’s crafts) — the exterior coating; choose a color that suits your event.
- 1/4 to 1/2 cup of vegetable oil — thins the candy melts to a smooth, dippable consistency.
- 24-30 candy/cookie sticks (found at craft store) — anchors the pops and makes dipping easier.
- Microwave safe bowl, at least 3-inches deep — for melting candy melts safely and stirring without splatters.
- 1/2 tablespoon measuring spoon — used to portion both cake crumbs and cheesecake accurately for uniform pops.
- Cookie sheet, covered in foil — a nonstick surface for chilling and staging the pops.
- Rectangular foam block or another cookie sheet covered in foil and topped with parchment paper — to hold pops upright while the coating sets.
Stepwise Method: Red Velvet Cheesecake Pops
- Prepare and bake the red velvet cake according to the directions on the cake mix box or your recipe. If you only want to use half the cake for pops, divide the batter into two pans before baking so one pan can be reserved for another use. Cool the cake completely.
- Crumble the cooled cake into fine crumbs using two forks or a food processor. Transfer crumbs to a bowl and stir in the 1/2 cup store-bought buttercream or cream cheese frosting until the mixture is smooth and holds together when pressed.
- Using the 1/2 tablespoon measuring spoon, scoop and level 1/2 tablespoon of the cake mixture for each pop. Roll each scoop into a ball between your palms. Make 24–30 cake balls and place them on a cookie sheet lined with foil. Refrigerate the cake balls for 20–30 minutes.
- Remove the chilled cake balls. Prepare the 7″ plain cheesecake on a clean surface. Using the 1/2 tablespoon measuring spoon, scoop about 1/2 tablespoon of cheesecake for each pop.
- Flatten the 1/2 tablespoon cheesecake portion slightly in your hand (or on a small plate). Place one cake ball on top of the flattened cheesecake and mold the cheesecake around the cake ball to begin sealing it.
- Measure an additional 1/2 to 3/4 tablespoon of cheesecake and mold it around the rest of the cake ball so the cake ball is fully covered in cheesecake. If needed, gently roll the coated ball in your palms to smooth. Repeat for each cake ball. (Tip: this step can get messy—wash and dry your hands after every two pops if needed.)
- Place the cheesecake-covered balls on the foil-lined cookie sheet and refrigerate for 20–30 minutes to firm up.
- Remove the cheesecake balls and roll each one in the crumbled graham crackers until fully coated. Return the graham-coated balls to the foil-lined cookie sheet and refrigerate while you prepare the coating.
- Place the candy melts in a microwave-safe bowl (at least 3 inches deep). Melt according to the candy melts package directions, using short microwave intervals and stirring between pulses.
- After the candy melts are melted and smooth, add 1/4 cup of vegetable oil and whisk until combined. If the coating is too thick for a thin, even dip, whisk in additional vegetable oil a little at a time (up to the 1/2 cup amount) until you reach a smooth, thin coating consistency.
- Dip the tip (about 1/2 inch) of a candy/cookie stick into the melted candy coating, then immediately insert the stick into the bottom of a cheesecake-covered ball. Insert far enough to anchor the ball but not so far that the stick passes through the other side. Place each stick-inserted pop back on the foil-lined cookie sheet. Repeat for all pops.
- Refrigerate the pops with sticks for 30–60 minutes (or overnight) to set the stick in the filling.
- If needed, remelt or reheat the candy melts so the coating is smooth and pourable. Working one pop at a time, fully dip each cheesecake pop into the melted candy coating, lifting and quickly rotating or tapping the stick to remove excess coating. Place the coated pop either upright into the rectangular foam block or lay it on the second cookie sheet covered with foil and topped with parchment paper.
- Refrigerate the coated pops for 15–20 minutes, or until the candy coating is set.
- Keep the cheesecake pops refrigerated until ready to serve.
Why It’s Crowd-Pleasing
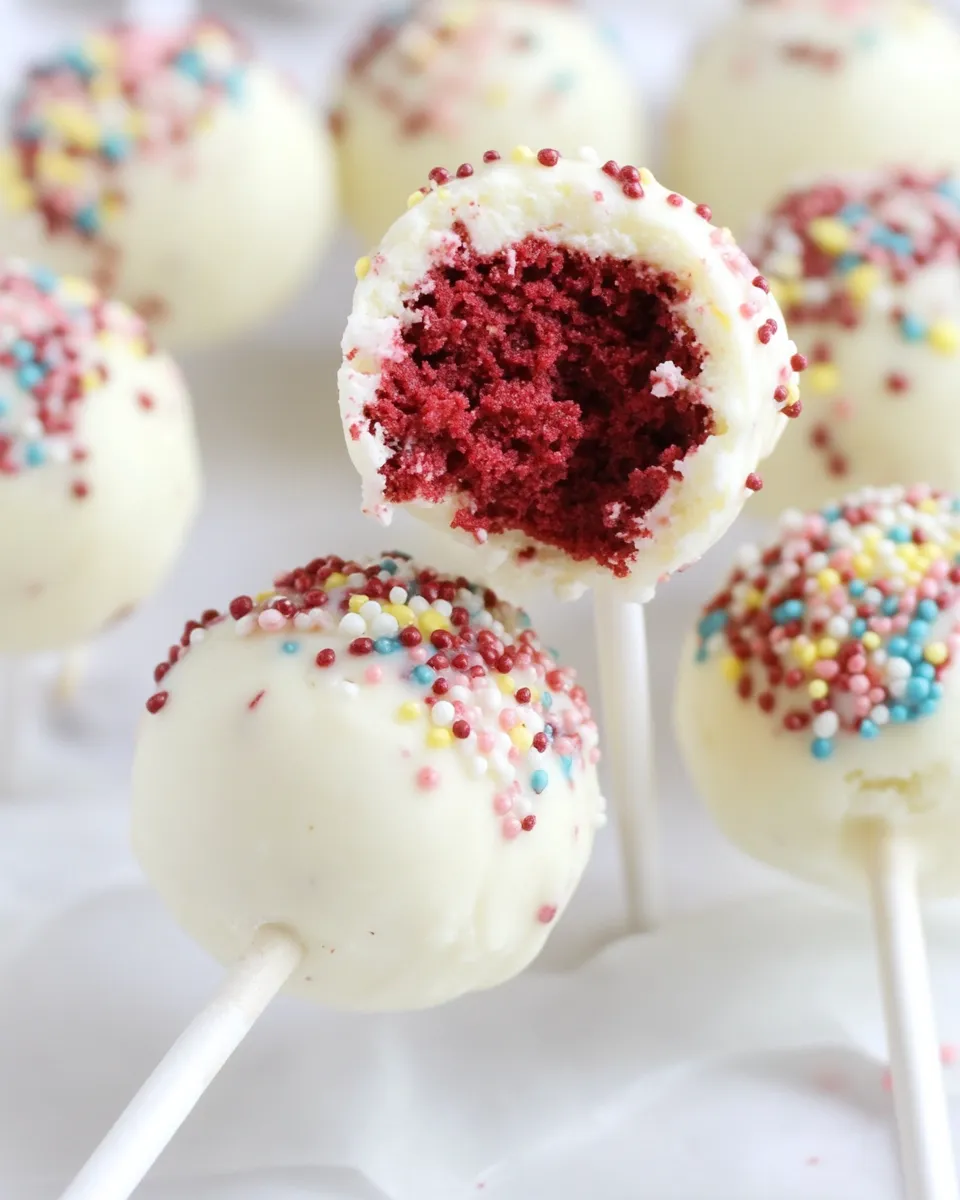
Red Velvet Cheesecake Pops hit several pleasure points at once: familiar cake flavor, creamy cheesecake texture, and the satisfying snap of a candy shell. Each pop is a single portion, so guests can grab one and keep mingling. They also look polished — color-coordinated candy melts make these pop-worthy photo ops.
The combination of soft cake and denser cheesecake creates contrast in mouthfeel that people notice even if they can’t name it. The graham cracker coating adds a toasty hint and hides any small imperfections in the cheesecake layer, so your pops look uniformly smooth after coating.
Allergy-Friendly Substitutes
- Dairy-free option: Use dairy-free buttercream or a vegan cream cheese frosting in place of the store-bought buttercream and select a dairy-free cheesecake alternative if you can find one. Choose dairy-free candy melts.
- Gluten-free option: Use a gluten-free red velvet cake mix and gluten-free graham cracker crumbs. Confirm that candy melts are certified gluten-free.
- Nut warnings: This recipe does not call for nuts, but always check ingredient labels if serving people with severe allergies.
- Lower sugar/cleaner coating: Swap colorful candy melts for dipping chocolate that lists only cocoa butter and chocolate solids, and thin with a neutral oil sparingly; note texture and set time will vary.
Appliances & Accessories
A few small tools make a big difference here. You need a microwave-safe bowl (deep enough to whisk without splashing), a 1/2 tablespoon measuring spoon for consistent sizing, and either a foam block or a covered second sheet for styling while the pops set. Sturdy cookie sheets and foil keep cleanup quick.
Recommended extras
- Food processor or two forks: For fine crumbs.
- Small offset spatula: Helpful when smoothing cheesecake around a cake ball.
- Wax or parchment sheets: If you need to transfer pops or want an extra nonstick layer over foil.
Learn from These Mistakes
- Not chilling between steps: Skipping the refrigeration stages makes the balls soft and harder to insert sticks into. Chill as directed.
- Inserting stick without a candy anchor: Always dip the stick tip into coating before inserting. This creates a glue-like anchor when it sets.
- Over-thinning candy melts: Adding too much oil will make the coating soft and slow to set. Add oil in small increments (as instructed).
- Rushing the coating: Work one pop at a time and keep the rest chilled. Warm pops absorb the coating and can drip or collapse.
- Uneven portions: Use the 1/2 tablespoon spoon for both cake and cheesecake so pops are uniform and finish at the same time.
Seasonal Spins
- Valentine’s: Use red or pink candy melts, and sprinkle tiny heart confetti while the coating is wet.
- Halloween: Choose orange or black candy melts and press a small candy corn into the coating edge for effect.
- Winter holidays: Use peppermint candy melts and add crushed candy cane for a crunchy finish.
- Spring/Easter: Pastel candy melts and edible flower dusting make these pop-friendly for lighter brunches.
If You’re Curious
Why add a cheesecake layer? The cheesecake gives structure and a creamy contrast to the crumbly cake center. It also stabilizes the cake ball so it doesn’t crumble when you insert the stick or dip. The graham cracker layer acts as a buffer between soft cheesecake and hot candy coating so the pops set cleaner.
Thinning candy melts with oil lowers the viscosity so the coating flows evenly and doesn’t clump. Use the smallest amount needed; texture and set time change with more oil.
Storage Pro Tips
Keep Red Velvet Cheesecake Pops refrigerated until serving. They can be held in a single layer in an airtight container for up to 3 days. If you want to make these ahead longer, freeze them on the cookie sheet until solid, then transfer to a freezer-safe container with parchment between layers. Thaw in the refrigerator for a few hours before serving.
A quick tip: if condensation forms after moving pops from cold to warm environments, return them to the fridge for 10–15 minutes before serving to let the coating re-firm and avoid sogginess.
Quick Q&A
- Can I make these without a boxed cake mix? Yes. You can bake any red velvet recipe and follow the same process; just ensure the cake is fully cooled before crumbling.
- How many pop servings will I get? The recipe yields about 24–30 pops, depending on how strictly you measure with the 1/2 tablespoon scoop.
- Can I skip the graham cracker coating? You can, but graham crumbs help with texture and mask small seams in the cheesecake layer.
- What if my candy melts seize? Gently reheat in short intervals and stir thoroughly; if still thick, whisk in a tiny bit of vegetable oil to smooth.
- Can I use melted chocolate instead of candy melts? Yes. Use chocolate suitable for dipping and adjust oil sparingly; chocolate may set differently and bloom if temperatures fluctuate.
Before You Go
Make a test pop first. It tells you whether the coating is the right thickness, how deep to insert your stick, and what your set times look like in your kitchen. Once you dial the first one in, the rest follow smoothly. These Red Velvet Cheesecake Pops are forgiving and scale well — double the batch if you’re feeding a crowd.
If you try them, leave a note on what color coating you chose and any tweaks you made. I love hearing how readers adapt recipes for parties and seasons. Happy popping!
Red Velvet Cheesecake Pops
Ingredients
Ingredients
- 1 boxred velvet cake mix
- 1/2 cupstore-bought buttercream or cream cheese frosting I used Betty Crocker Whipped Buttercream
- 7 "plain cheesecake
- 1-2 cupsgraham crackers crumbled into small crumbs
- 1 bag of 10-12 oz. candy melts your favorite color (I used Wilton Color Burst Pastels, can find at Michael's crafts)
- 1/4 to 1/2 cupof vegetable oil
- 24-30 candy/cookie sticks found at craft store
- Microwave safe bowl at least 3-inches deep
- 1/2 tablespoonmeasuring spoon
- Cookie sheet covered in foil
- Rectangular foam block or another cookie sheet covered in foil and topped with parchment paper
Instructions
Instructions
- Prepare and bake the red velvet cake according to the directions on the cake mix box or your recipe. If you only want to use half the cake for pops, divide the batter into two pans before baking so one pan can be reserved for another use. Cool the cake completely.
- Crumble the cooled cake into fine crumbs using two forks or a food processor. Transfer crumbs to a bowl and stir in the 1/2 cup store-bought buttercream or cream cheese frosting until the mixture is smooth and holds together when pressed.
- Using the 1/2 tablespoon measuring spoon, scoop and level 1/2 tablespoon of the cake mixture for each pop. Roll each scoop into a ball between your palms. Make 24–30 cake balls and place them on a cookie sheet lined with foil. Refrigerate the cake balls for 20–30 minutes.
- Remove the chilled cake balls. Prepare the 7" plain cheesecake on a clean surface. Using the 1/2 tablespoon measuring spoon, scoop about 1/2 tablespoon of cheesecake for each pop.
- Flatten the 1/2 tablespoon cheesecake portion slightly in your hand (or on a small plate). Place one cake ball on top of the flattened cheesecake and mold the cheesecake around the cake ball to begin sealing it.
- Measure an additional 1/2 to 3/4 tablespoon of cheesecake and mold it around the rest of the cake ball so the cake ball is fully covered in cheesecake. If needed, gently roll the coated ball in your palms to smooth. Repeat for each cake ball. (Tip: this step can get messy—wash and dry your hands after every two pops if needed.)
- Place the cheesecake-covered balls on the foil-lined cookie sheet and refrigerate for 20–30 minutes to firm up.
- Remove the cheesecake balls and roll each one in the crumbled graham crackers until fully coated. Return the graham-coated balls to the foil-lined cookie sheet and refrigerate while you prepare the coating.
- Place the candy melts in a microwave-safe bowl (at least 3 inches deep). Melt according to the candy melts package directions, using short microwave intervals and stirring between pulses.
- After the candy melts are melted and smooth, add 1/4 cup of vegetable oil and whisk until combined. If the coating is too thick for a thin, even dip, whisk in additional vegetable oil a little at a time (up to the 1/2 cup amount) until you reach a smooth, thin coating consistency.
- Dip the tip (about 1/2 inch) of a candy/cookie stick into the melted candy coating, then immediately insert the stick into the bottom of a cheesecake-covered ball. Insert far enough to anchor the ball but not so far that the stick passes through the other side. Place each stick-inserted pop back on the foil-lined cookie sheet. Repeat for all pops.
- Refrigerate the pops with sticks for 30–60 minutes (or overnight) to set the stick in the filling.
- If needed, remelt or reheat the candy melts so the coating is smooth and pourable. Working one pop at a time, fully dip each cheesecake pop into the melted candy coating, lifting and quickly rotating or tapping the stick to remove excess coating. Place the coated pop either upright into the rectangular foam block or lay it on the second cookie sheet covered with foil and topped with parchment paper.
- Refrigerate the coated pops for 15–20 minutes, or until the candy coating is set.
- Keep the cheesecake pops refrigerated until ready to serve.
Equipment
- Mixing Bowl
- microwave-safe bowl (at least 3 in. deep)
- 1/2 tablespoon measuring spoon
- forks or food processor
- Whisk
- Cookie Sheet
- Foil
- Parchment Paper
- rectangular foam block or second cookie sheet


