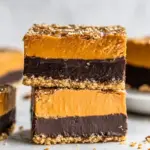
Almond Butter Bars (No-Bake)
These Almond Butter Bars are SO DELICIOUS! A no-bake treat packed with almond butter and chocolate, perfect for any time of day!
Servings: 12 servings
Ingredients
Base Ingredients:
- 3/4 cup almond flour
- 3 tablespoons cocoa or cacao powder
- pinch salt
- 3 tablespoons grade A maple syrup at room temperature
- 1 cup almond butter (unsalted)
- 1/4 cup grade A maple syrup at room temperature
- 1/4 cup refined coconut oil (melted and cooled)
- 1/2 teaspoon vanilla extract
- 1/4 teaspoon fine sea salt omit if nut butter is salted
- 3 ounces high-quality dairy-free dark chocolate (chopped)
- 1 teaspoon refined coconut oil (optional) makes the chocolate easier to pour
- Flaky salt for garnish a finishing touch
Instructions
Instructions
- Step 1: Prepare Your Pan - Line a 9x9-inch baking pan with parchment paper, allowing some overhang for easy removal later.
- Step 2: Mix Dry Ingredients - In a mixing bowl, combine the almond flour, cocoa or cacao powder, and a pinch of salt. Stir until blended.
- Step 3: Combine Wet Ingredients - In another bowl, mix together the almond butter, 3 tablespoons of maple syrup, melted coconut oil, and vanilla extract until smooth and creamy.
- Step 4: Combine Wet and Dry Mixtures - Pour the wet mixture into the dry ingredients. Use a spatula to mix until fully combined and a dough forms.
- Step 5: Press the Mixture into the Pan - Transfer the mixture into the prepared baking pan. Press it down firmly and evenly into the pan.
- Step 6: Melt the Chocolate - In a double boiler or microwave-safe bowl, melt the chopped dairy-free dark chocolate along with the optional teaspoon of refined coconut oil. Stir until smooth.
- Step 7: Pour Chocolate Over the Bars - Pour the melted chocolate over the pressed almond butter mixture, spreading it evenly with a spatula.
- Step 8: Chill - Sprinkle flaky salt on top and place the pan in the refrigerator for at least 2 hours, or until the bars are firm.
- Step 9: Slice and Serve - Once the bars are set, lift them out of the pan using the parchment overhang. Slice into squares or rectangles and enjoy!
Equipment
- Mixing Bowl
- Spatula
- 9x9-inch Baking Pan
- Parchment Paper
- Double boiler or microwave-safe bowl
Notes
- Store in an airtight container in the refrigerator for up to a week.
- Freeze for up to three months, separating layers with parchment paper.
- Feel free to add chocolate chips or dried fruits for extra flavor!