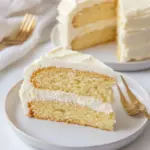
Dairy-Free Gluten-Free Vanilla Cake
If you’re on the lookout for a delightful treat that caters to both dietary restrictions and flavor lovers alike, this Dairy-Free Gluten-Free Vanilla Cake is the answer to your sweet cravings. With its moist texture and rich vanilla flavor, it’s perfect for birthdays, celebrations, or even just a cozy afternoon snack. This cake is easy…
Servings: 2 servings
Ingredients
Ingredients
- 2 1/3 cups 320 g gluten-free all-purpose flour
- 1 1/2 cups 330 g granulated sugar
- 1 tspsea salt
- 2 tspbaking powder
- 1/4 tspbaking soda
- 3/4 cup 175 mlavocado oil
- 1 cup 225 mlfull-fat canned coconut milk
- 3 large eggs
- 1 Tbsppure vanilla extract
- 2 sticks 1 cup, 230 gvegan butter*
- 4 to 6 cups 480-600 gpowdered sugar**
- 6 to 8 Tbsp 80-100 mlfull-fat canned coconut milk, as needed***
- 1 tsppure vanilla extract
- Pinchsea salt
Instructions
Instructions
- Preheat the oven to 350°F (175°C). Grease the sides of two 8-inch springform pans and line the bottoms with rounds of parchment paper.
- In a large bowl, whisk together the dry ingredients: 2 1/3 cups (320 g) gluten-free all-purpose flour, 1 1/2 cups (330 g) granulated sugar, 1 tsp sea salt, 2 tsp baking powder, and 1/4 tsp baking soda until evenly combined.
- In a separate bowl, whisk the wet ingredients: 3/4 cup (175 ml) avocado oil, 1 cup (225 ml) full-fat canned coconut milk, 3 large eggs, and 1 Tbsp pure vanilla extract. If the canned coconut milk has separated, warm it briefly (for example, in a jar in the microwave) until it stirs together smoothly.
- Pour the dry ingredients into the wet ingredients and mix until a smooth, homogenous cake batter forms. Avoid overmixing.
- Divide the batter evenly between the two prepared pans and smooth the tops. Bake on the center oven rack for 23–28 minutes, or until the cakes are set and a toothpick inserted into the center comes out clean or with a few moist crumbs. (If you are at high altitude you may need to bake toward the higher end of the range.)
- Remove the cakes from the oven and let them sit in the pans for about 10–15 minutes. Run a knife around the pan edges, release the springform rings, then transfer the cakes (with parchment) to a wire rack. Remove the parchment and let the cakes cool completely to room temperature on the rack before frosting.
- While the cakes cool (or after they are cool), make the frosting. Using a stand mixer fitted with the paddle attachment or a handheld mixer, beat 2 sticks (1 cup, 230 g) vegan butter until creamy.
- Add half of the powdered sugar (from the 4–6 cups/480–600 g), the full-fat canned coconut milk called for for the frosting (6–8 Tbsp / 80–100 ml, as needed), 1 tsp pure vanilla extract, and a pinch of sea salt. Beat on low speed until the sugar starts to incorporate, then beat on high speed for 2 minutes.
- Check the frosting for consistency and flavor. Add the remaining powdered sugar a little at a time until the frosting reaches your desired sweetness and thickness. If the frosting is too thick, add small amounts of the canned coconut milk until it is spreadable.
- To assemble, place one cooled cake layer rounded side down on a serving plate or cake stand so the top is flat. Spread a generous layer of frosting (about 1/2 inch thick) over this layer. If you like, add a fruit layer here (chopped strawberries or mashed raspberries).
- Place the second cake layer rounded side down on top. Trim the domes if you prefer the cake to sit flat. Frost the top and sides of the cake as desired. For a neater finish, you may apply a thin crumb coat first, chill briefly to set, then apply the final layer of frosting.
- Decorate the cake as you like, slice, and serve. Enjoy!
Equipment
- 8-inch springform pans
- Parchment Paper
- Large Bowl
- Stand mixer
- paddle attachment
- Handheld mixer
- Wire Rack
- Knife
Notes
Notes
*Use Earth Balance butter or Miyokos. If you aren’t dairy-free, use regular butter.
**Base the amount on the consistency and sweetness you’re going for.
***If you aren’t dairy-free, use heavy cream.
Cakes are considered fully cooked when they have reached an internal temperature of 190 to 200 degrees Fahrenheit. You can insert an instant read thermometer into the center of the cakes to verify the temperatures.
Nutrition Facts are for the exact recipe as written, including the buttercream.