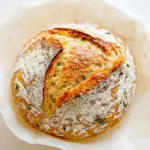
Herb Bread (No-Knead)
A simple no-knead herb loaf with rosemary and thyme, baked in a lidded pot for a crisp crust and tender crumb.
Servings: 12 servings
Ingredients
Ingredients
- 2 teaspoonsinstant yeast
- 2 teaspoonshoney
- 1-1/2 cupswarm watersee note 3
- 3 cupsflour
- 1-3/4 teaspoonssalt
- 2 teaspoonsminced garlic
- 1-1/2 tablespoonsfinely chopped fresh rosemaryor 1 teaspoon dried
- 1-1/2 tablespoonsfinely chopped fresh thymeor 1 teaspoon dried
- 1/4 teaspoonpepperoptional
- 1 tablespoon + 1 teaspoonolive oildivided
- Butteroptional for serving
- Flaky sea saltoptional for serving
Instructions
Instructions
- In a medium bowl, whisk together 2 teaspoons instant yeast, 2 teaspoons honey, and 1-1/2 cups warm water. Let sit 5 minutes until creamy or foamy. If it does not foam, the yeast may be inactive—discard and start again.
- In a large bowl, stir together 3 cups flour, 1-3/4 teaspoons salt, 2 teaspoons minced garlic, 1-1/2 tablespoons finely chopped fresh rosemary (or 1 teaspoon dried), 1-1/2 tablespoons finely chopped fresh thyme (or 1 teaspoon dried), and 1/4 teaspoon pepper (optional) until evenly combined.
- Add the yeast mixture to the flour mixture and stir with a rubber spatula until a shaggy dough forms and there are no dry flour streaks.
- Use the spatula to pull the dough to one side and drizzle 1 tablespoon olive oil over it. Turn the dough in the bowl to coat it in oil (the dough will be sticky). Cover the bowl tightly with plastic wrap.
- Let the bowl sit at room temperature (about 70°F / 21°C) for 10–18 hours to rise.
- When ready to bake, move an oven rack to the center position and preheat the oven to 450°F (230°C). Place a lidded cast-iron pot (oven-safe) in the oven to heat for 30 minutes.
- Sprinkle 1 tablespoon flour on a clean work surface. Use a spatula to scrape the dough from the bowl onto the floured surface. Sprinkle the remaining 1 tablespoon flour over the top. Gently fold the sides inward with a spatula or dough scraper about six times to form a rough ball.
- Transfer the dough ball onto a large piece of parchment paper, flipping it so the seam side is down. Gently shape it into a round. Optional: score the top with 3–5 slashes using a sharp knife or lame.
- Carefully remove the heated pot from the oven. Lift the parchment with the dough and place both into the hot pot. Drizzle the remaining 1 teaspoon olive oil over the top of the dough. Cover with the lid.
- Bake covered for 30 minutes. Remove the lid and continue baking 13–20 minutes more, until the top is a deep golden brown and the loaf sounds hollow when tapped in the center.
- Using the parchment, lift the bread from the pot and transfer it to a wire cooling rack. Let cool for 30 minutes before slicing. Serve with butter and flaky sea salt if desired.
Equipment
- Large cast-iron potsee note 1
- Parchment papersee note 2
Notes
Recipe Notes
Note 1:
Here is a great affordable
cast-iron pot
and here is my personal favorite
pot
! For alternatives to a cast-iron pot, see right above the recipe card.
Note 2
: Ensure you use parchment paper, not foil or wax paper, as wax paper will melt in the oven.
Note 3
: Test the water temperature by drizzling a few drops on your wrist. It should feel warm and comfortable, not hot.
Note 4:
No-Knead Bread In a Hurry: After 2–3 hours, you can bake the bread immediately. The flavor and texture won’t be as developed as after a long rest but will still be tasty.
Note 5:
Allowing the bread to cool is crucial to ensure it’s fully baked inside. Cutting too early can result in a mushy interior.
Storage
: This bread is best on days 1 and 2. On the first day, leave it out uncovered with the cut side down on a cutting board to keep the crust crisp. After that, store it in an airtight container or bag. The crust may lose its crispness, but the bread will still be great toasted.