

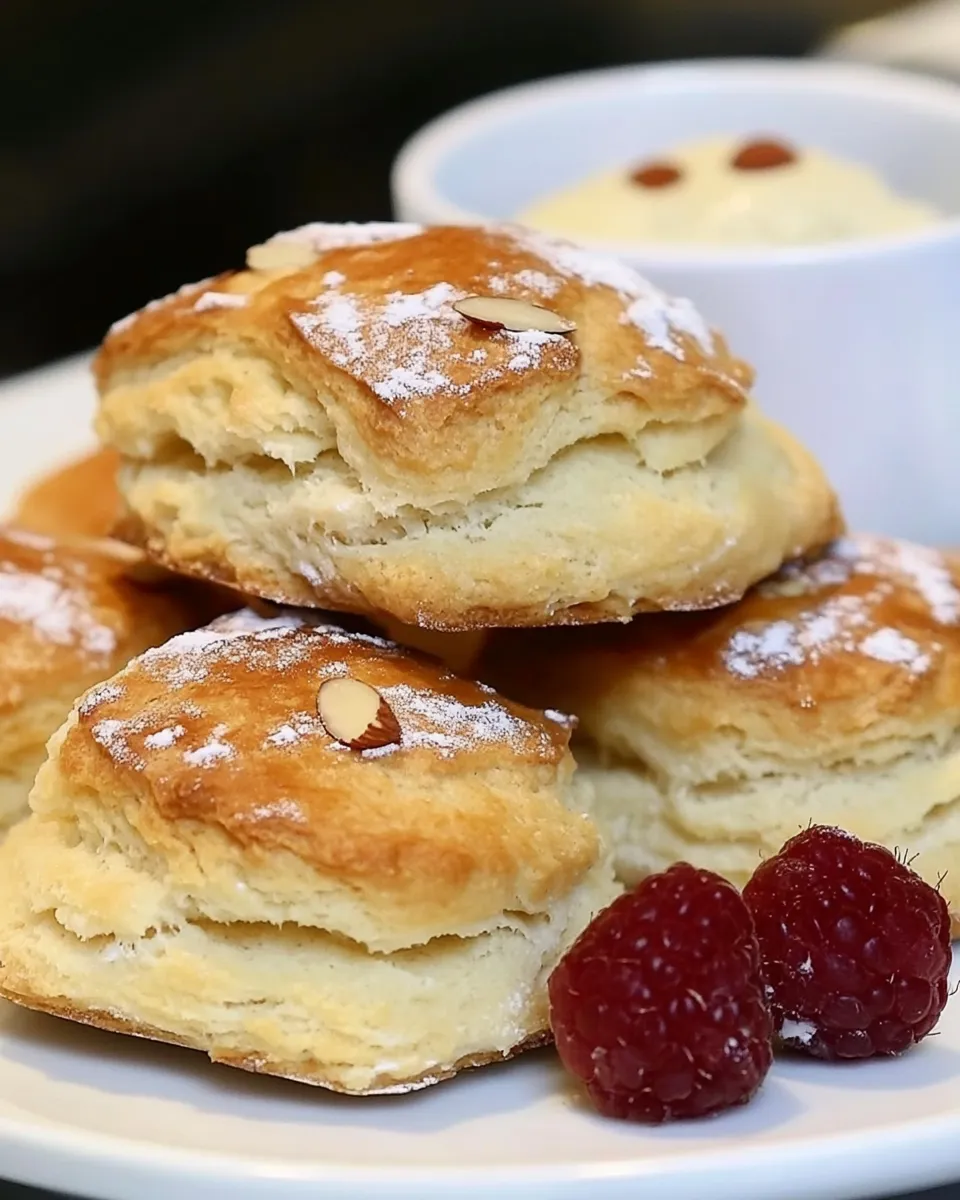
These scones are my weekday-friendly treat: simple, forgiving, and impossibly quick to pull together. They have a tender crumb from yogurt, a buttery bite from cold butter, and a little crunch on top from flaked almonds. I reach for them when I want something homemade without a lengthy bake day.
The recipe is straightforward and honest. A short list of pantry staples, a cold butter technique, and a light brush of honey before they go into the oven are all you need. They come together in under 30 minutes and taste like you fussed longer than you actually did.
I like to serve them warm with plain yogurt or jam, but they stand up to a smear of lemon curd just as well. If you bake a batch and keep a few in the freezer, you’ve got a quick breakfast or coffee companion ready any morning.
Ingredients
- 300gflour — the structure of the scone; plain or all-purpose works fine.
- 60gbutter — cold and cubed; creates the flaky, tender layers when rubbed into the flour.
- 150-200mlyogurt — the moistening agent and flavor; start with less and add as needed so the dough isn’t sticky.
- 1pinchsalt — balances flavor and enhances the butter and almond notes.
- 5gbaking powder — the lift; make sure it’s fresh for the best rise.
- honey — used to brush the tops; adds shine and a touch of sweetness that helps the almonds stick.
- flaked almonds — for texture and a toasty finish; press them lightly into the honey so they don’t fall off while baking.
Shopping List
Before you start, gather everything. This keeps the process tidy and fast: the scone dough comes together quickly and benefits from uninterrupted handling. Use the exact items listed in the ingredient section to keep the balance of texture and flavor true to the recipe.
- 300gflour
- 60gbutter
- 150-200mlyogurt
- 1pinchsalt
- 5gbaking powder
- honey
- flaked almonds
Yogurt and Almond Scones: Step-by-Step Guide
- Preheat the oven to 220°C and line a large baking tray with baking paper.
- Sift 300 g flour together with 5 g baking powder and 1 pinch salt into a bowl.
- Cut 60 g cold butter into small pieces, add to the dry ingredients, and rub the butter into the flour with your fingertips until the mixture resembles coarse crumbs.
- Make a well in the centre of the crumb mixture and add 100 ml yogurt. Gently fold the yogurt in with a spatula or your hands until the dough begins to come together.
- Gradually add more yogurt from the remaining amount (use in total 150–200 ml yogurt) a little at a time, mixing only until the dough is soft but not sticky. Stop as soon as the dough holds together; do not overmix or knead.
- Lightly flour a work surface and turn the dough out onto it. Handle the dough gently.
- Pat or roll the dough to an even 2–3 cm thickness. If the dough sticks, dust the surface lightly with flour.
- Cut circles with a 4–5 cm round cutter, pressing straight down without twisting. Place the rounds on the prepared baking tray, leaving a little space between them. Re-roll scraps once and cut more scones if needed.
- Brush the tops lightly with runny honey and sprinkle with flaked almonds.
- Bake in the preheated oven for 10–15 minutes, until the scones are lightly browned on top.
- Remove from the oven, transfer to a cooling rack, cool slightly, and serve.
Why This Recipe Belongs in Your Rotation

This scone is a practical weekday favorite. It uses yogurt instead of cream or milk, which keeps the dough tender while adding a subtle tang that complements the almonds. The method is forgiving: you don’t need perfect measurements beyond what the recipe gives, and the dough is forgiving if you stop mixing at the right moment.
They bake quickly, so you can have warm scones without planning a whole morning. The recipe scales well — halve it for two people or double it for a small gathering — and freezing works well, so you can stock up and thaw when needed. Texture, flavor, and speed make these a reliable baking choice.
Quick Replacement Ideas

- Yogurt — if you must substitute, Greek yogurt will produce a denser crumb and may need the full 200 ml; thin it slightly with a splash of milk if it’s very thick.
- Flaked almonds — swap for chopped walnuts or sliced pistachios for a different texture and flavor.
- Honey — use maple syrup or agave for brushing if you prefer a different kind of sweetness.
- Flour — plain/all-purpose is intended; if you experiment with part wholewheat, reduce amount slightly or expect a firmer scone.
Cook’s Kit
Keep these tools close at hand for the smoothest experience. Most are standard in a modestly equipped kitchen.
- Mixing bowl — for dry ingredients and for combining the dough.
- Sieve or fine mesh — to sift flour and baking powder for a lighter texture.
- Baking tray lined with baking paper — for even browning and easy cleanup.
- Round cutter (4–5 cm) — a biscuit cutter or a sturdy glass works; pressing straight down matters more than the exact size.
- Spatula and bench scraper — to fold dough gently and transfer rounds to the tray.
- Cooling rack — to avoid soggy bottoms and cool scones evenly.
Avoid These Traps
There are a few small mistakes that change the result. Watch for them and you’ll bake reliably good scones.
- Overmixing — kneading or vigorous mixing develops gluten and makes scones tough. Stop as soon as the dough holds together.
- Warm butter — use cold butter cut into small pieces and rub quickly until coarse crumbs form. If the butter gets soft, chill the bowl for a few minutes.
- Twisting the cutter — when cutting rounds, press straight down. Twisting seals the edges and prevents rise.
- Too much yogurt — add the yogurt gradually. The dough should be soft but not sticky; if sticky, dust lightly with flour.
- Overcrowding the tray — leave space so the bottoms brown and the dough cooks through evenly.
Seasonal Flavor Boosts
Small seasonal tweaks keep this scone feeling fresh through the year.
- Spring — finely grated lemon zest in the dough (a half lemon) brightens the yogurt and pairs beautifully with almonds.
- Summer — fold in a few chopped, dried apricots or use a berry jam when serving for a bright contrast.
- Autumn — add a pinch of cinnamon or a little grated apple mixed into the dough for a cozy twist.
- Winter — swap flaked almonds for chopped toasted hazelnuts and brush with a little warmed honey for a deeper nuttiness.
Cook’s Commentary
I keep coming back to this method because it’s resilient. The crumb is tender without being crumbly, and the top gets a very light gloss from honey that helps the almonds toast nicely. When I’m short on time, I make the dough, flatten it quickly, and cut rounds while the kettle boils — they practically bake themselves while I make coffee.
One small habit that helps: chill the baking tray for a few minutes if your kitchen is very warm. Cold dough on a colder surface holds its shape better and produces a slightly flakier scone. Also, if you want extra height, don’t flatten the rounds too thin; 2–3 cm is the target and gives a pleasing interior.
Freezer-Friendly Notes
These scones freeze well at two stages: before baking (cut rounds) or after baking once cooled. For best results with each method:
- Freeze unbaked — place cut rounds on a tray in the freezer until firm, then transfer to a sealed bag. Bake from frozen, adding a couple of minutes to the baking time, brushing with honey halfway through if desired.
- Freeze baked — cool completely, wrap individually or in a single layer with parchment, then seal in a freezer bag. Reheat in a 160°C oven for about 8–10 minutes or until warmed through.
- Thawing — for baked scones, thaw at room temperature for 20–30 minutes before reheating if you want a softer finish.
Your Top Questions
Q: The recipe lists 150–200 ml yogurt. How do I know how much to add?
A: Start with 100 ml as directed, then add slowly from the remaining amount until the dough just comes together and is soft but not sticky. Environmental factors like flour brand and humidity affect the exact amount.
Q: Can I use flavored yogurt?
A: You can, but be mindful of added sugars or strong flavors. Plain yogurt preserves the classic balance; a mildly flavored yogurt can be interesting but may change browning and sweetness.
Q: My scones spread too much. Why?
A: Usually because the dough was too wet, or butter was too warm. Chill the dough briefly and use less yogurt next time. Also, avoid twisting the cutter when cutting rounds.
Q: The tops don’t brown evenly.
A: Your oven hotspots or overcrowding could be the culprit. Rotate the tray halfway through baking and leave space between scones for even air circulation.
Before You Go
These Yogurt and Almond Scones are a dependable, fast-bake treat that performs well for breakfast, brunch, or a last-minute guest. Keep the ingredients simple, handle the dough gently, and don’t overmix. A light brush of honey and a sprinkle of almonds give a beautiful finish that looks and tastes like effort — even when it took only a short while.
Try a batch this weekend. Bake a few now and freeze the rest for quick mornings. If you experiment with a seasonal twist, I’d love to hear which variation became your new favorite.

Yogurt and Almond Scones
Ingredients
Ingredients
- 300 gflour
- 60 gbutter
- 150-200 mlyogurt
- 1 pinchsalt
- 5 gbaking powder
- honey
- flaked almonds
Instructions
Instructions
- Preheat the oven to 220°C and line a large baking tray with baking paper.
- Sift 300 g flour together with 5 g baking powder and 1 pinch salt into a bowl.
- Cut 60 g cold butter into small pieces, add to the dry ingredients, and rub the butter into the flour with your fingertips until the mixture resembles coarse crumbs.
- Make a well in the centre of the crumb mixture and add 100 ml yogurt. Gently fold the yogurt in with a spatula or your hands until the dough begins to come together.
- Gradually add more yogurt from the remaining amount (use in total 150–200 ml yogurt) a little at a time, mixing only until the dough is soft but not sticky. Stop as soon as the dough holds together; do not overmix or knead.
- Lightly flour a work surface and turn the dough out onto it. Handle the dough gently.
- Pat or roll the dough to an even 2–3 cm thickness. If the dough sticks, dust the surface lightly with flour.
- Cut circles with a 4–5 cm round cutter, pressing straight down without twisting. Place the rounds on the prepared baking tray, leaving a little space between them. Re-roll scraps once and cut more scones if needed.
- Brush the tops lightly with runny honey and sprinkle with flaked almonds.
- Bake in the preheated oven for 10–15 minutes, until the scones are lightly browned on top.
- Remove from the oven, transfer to a cooling rack, cool slightly, and serve.
Equipment
- Mixing Bowl
- sieve
- Spatula
- Baking tray
- baking paper
- round cutter (4–5 cm)
- Cooling rack


